How to Prevent Wood Rot

How to Prevent Wood Rot

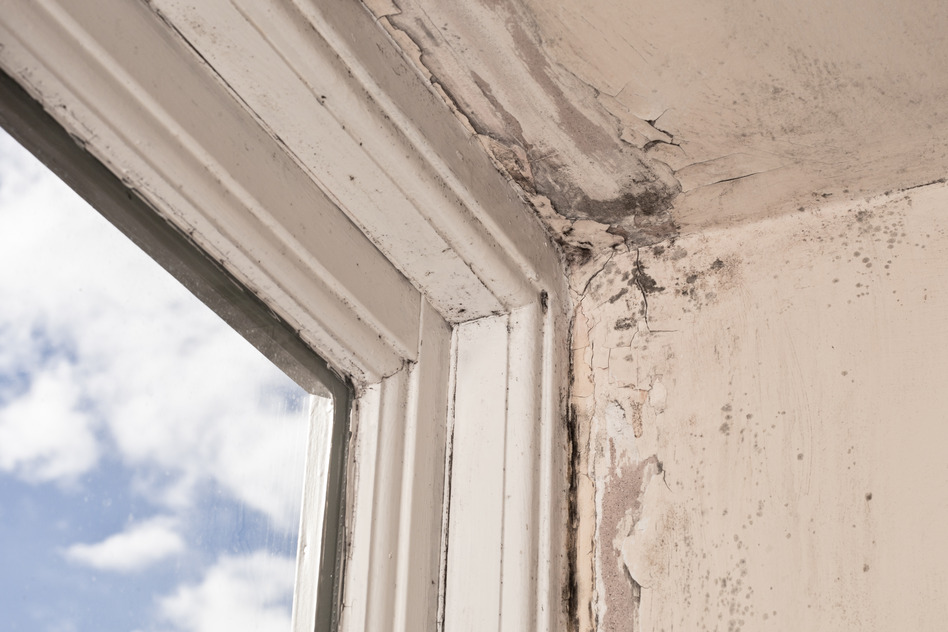
If water gets into cracks and under painted surfaces and doesn’t dry out, it can cause wood rot. Once wood rot takes hold, your only options are big-buck repairs and replacement of the rotted parts.

Left untreated, wood rot may spread, infecting other wood parts and possibly leading to structural damage.

That’s not all: The dampness that causes wood rot invites voracious termites. Bottom line: Because your house is made with a lot of wood — framing members, plywood sheathing, trim — there’s a lot to protect.

Look for Trouble Spots

The best defense against rot? Your eyes — once each year, make a tour of your house to inspect for:

  • Cracks and holes in the caulking around windows, doors, dryer vents, etc.

Remedy: Re-caulk any openings using a high-quality acrylic latex exterior caulk.

  • Stains under eaves, around fireplaces, and on interior ceilings. 

Remedy: You may have a roof leak. Inspect for damage yourself or hire a specialized roofing inspector ($175) through the National Roof Certification and Inspection Association. Roof repairs may cost as little as $10 to patch a minor leak, or $1,000 to fix a leaky roof valley.

  • Sagging and leaking gutters and downspouts.

Remedy: Most gutter repairs and replacements are easy DIY jobs. That said, you’ll want to be cautious about working near the top of a multi-story house. Pro gutter repairs are $100 to $900, depending on the extent of the damage.

  • Shrubbery and tree branches closer than 2 feet from siding and roofing.

Remedy: Trim back shrubbery; it should be 3 feet away from siding. Tree branches can rub against roofs during windy days, damaging the roofing. Trim tree branches at least 3 feet away from roofing.

  • Peeling and cracked painted surfaces.

Remedy: Scrape and sand peeling paint. Apply primer to ensure good adhesion. Paint the damaged area with color-matched exterior paint.

  • Crawl space vents blocked with leaves and other debris.

Remedy: Remove blockage; use a shop vac to thoroughly clean vent screens.

  • Dirt, leaves, and twigs between decking boards.

Remedy: Use a screwdriver or awl to pry out gunk that may trap moisture and lead to rot. Flush out any remaining debris using a garden hose.

Probe for Rot

As you inspect your house, you should actively look for wood rot. It’s not always obvious; wood rot may occur below the outer surface of wood and underneath intact layers of paint.

If you suspect rot, use your fingers to press on wood surfaces and see if they feel soft or crumble easily. Use an awl to probe wood framing members. Typical trouble spots include:

  • Where two pieces of trim meet.
  • Siding butt joints, and where siding meets trim.
  • Horizontal surfaces, such as window sills, door thresholds, and railings.
  • Deck support posts.
  • Exterior stair stringers that support steps.
  • Fascia behind leaking gutters.

Tips for Preventing Wood Rot

  • Always use decay-resistant or pressure-treated lumber for decks. Wood that touches the ground should be pressure-treated lumber that’s rated for ground contact.
  • When building an exterior project with wood, stain or paint all sides of each lumber piece before assembly.
  • Don’t lean anything against your siding, such as old plywood, tools, and ladders.
  • Clean your gutters regularly to prevent clogs that could cause water to back up and spill onto fascia and siding.

Other Ways to Protect Your House

Home inspections are a good defense against a multitude of problems. Here are other essential inspections you can easily do yourself:

  • Checking Your Plumbing Pipes
  • How to Inspect Your HVAC
  • How to Make Sure Your Fireplace is Safe

By: John Riha:© Copyright 2015 NATIONAL ASSOCIATION OF REALTORS®

How to Win the Energy-Savings Argument in 3 Easy Steps

How to Win the Energy-Savings Argument in 3 Easy Steps

Published: August 21, 2013

Trying to convince someone to save energy requires a bit of due diligence — we’ll show you how to win that argument every time.

If you’re trying to convince your partner to save energy, you may be facing an uphill battle.

That’s because debating it is about as much fun as watching your electric meter spin. In addition, your other half probably thinks adding energy-saving features costs too much and isn’t worth the effort.

So how do you make a dent in that ironclad reluctance?

Step #1: Do Your Homework

“The best way to minimize disagreements is with research and proof,” says Sandy Arons. She should know. As a financial counselor, it’s her job to assess the nuances of everyday costs, including home maintenance and repair.

Knowing her spouse wasn’t keen on spending for energy upgrades on their relatively new 17-year-old house, Arons gathered data to prove they could save money.

Energy audit infographic

The heart and soul of her data crunch was an energy audit provided free by her local utility company. An audit shows:

  • Where you’re wasting energy
  • How you can remedy problems
  • Your probable cost savings if you upgrade

Many utility companies offer a free home energy profile as an online service at their website or via an in-person visit from an energy expert.

You can also use calculators at government-supported websites, such as Home Energy Saver and Energy Star.

Better yet, hire an independent pro to do an energy evaluation for about $150. Just don’t forget to factor that money into the costs of your energy upgrades.

Related:

  • Professional Energy Audits: Costs and Benefits
  • DIY Home Energy Audit in 6 Easy Steps

Step #2: Gathering Cost Info

Gather estimated costs for the upgrades suggested by your audit. You can get estimates at an online home improvement cost site, such as CostHelper and DIYorNot, or contact local contractors to get bids for the work.

Step #3: Figuring Payback

Compare those proposed annual energy savings against the cost of the upgrades. Your goal is to figure out payback — how long it’ll take for the energy savings to pay off the cost of the improvements.

For the Arons house, an energy audit recommended increasing the depth of attic insulation, insulating attic knee walls, and adding roof vents to get rid of hot, trapped air.

Those improvements totaled about $1,000. With her audit showing a potential annual energy saving of $300, Arons figured a payback of about three years.

She put everything in a spreadsheet and showed her husband.

“Once I did that, it was easy for my husband to agree to the upgrades,” says Arons. “And once we’re through the payback period, all the savings are gravy.”

Related: Best ways to take back your energy bills

Want an Even Stronger Argument?

Don’t forget to research federal, state, local, and utility rebates for energy upgrades and apply those to your cost savings.

For example, if you upgrade your insulation in 2013, you may be eligible for a federal tax credit of up to $500.

With a Little Help from Some Friends

“When you’re trying to convince people to try something new to save money, it’s important to go straight to the numbers,” says Andrew Schrage, co-owner of Money Crashers Personal Finance.

When Schrage tried to get his neighbors to join the energy-savings movement, he called upon a friend who had recently gotten an energy audit and installed a programmable thermostat. The friend had tracked his utility bills for several months and discovered he was getting about a 25% savings.

Armed with his friend’s paperwork and a copy of the energy audit, Schrage was able to convince his neighbors to get their own audits and see what savings they could muster.

“They didn’t even know an energy audit was available,” notes Schrage. Now, he says, those neighbors are enjoying annual energy savings of 20%.


By: John Riha:© Copyright 2015 NATIONAL ASSOCIATION OF REALTORS®


What Is Saint Patrick’s Day?

What Is Saint Patrick’s Day?

What is Saint Patrick’s Day?

Saint Patrick’s Day has come to be associated with everything Irish: anything green and gold, shamrocks and luck. Most importantly, to those who celebrate its intended meaning, St. Patrick’s Day is a traditional day for spiritual renewal and offering prayers for missionaries worldwide.

Why is it celebrated on March 17th? One theory is that that is the day that St. Patrick died. Since the holiday began in Ireland, it is believed that as the Irish spread out around the world, they took with them their history and celebrations. The biggest observance of all is, of course, in Ireland. With the exception of restaurants and pubs, almost all businesses close on March 17th. Being a religious holiday as well, many Irish attend mass, where March 17th is the traditional day for offering prayers for missionaries worldwide before the serious celebrating begins.

In American cities with a large Irish population, St. Patrick’s Day is a very big deal. Big cities and small towns alike celebrate with parades, “wearing of the green,” music and songs, Irish food and drink, and activities for kids such as crafts, coloring and games. Some communities even go so far as to dye rivers or streams green!


Saint Patrick, the Apostle of Ireland

Saint Patrick is the patron saint and national apostle of Ireland. St Patrick is credited with bringing christianity to Ireland. Most of what is known about him comes from his two works; the Confessio, a spiritual autobiography, and his Epistola, a denunciation of British mistreatment of Irish christians.

According to different versions of his life story it is said that he was born in Britain, around 385AD. His parents Calpurnius and Conchessa were Roman citizens living in either Scotland or Wales. As a boy of 14 he was captured and taken to Ireland where he spent six years in slavery herding sheep. He returned to Ireland in his 30s as a missionary among the Celtic pagans.

Saint Patrick described himself as a “most humble-minded man, pouring forth a continuous paean of thanks to his Maker for having chosen him as the instrument whereby multitudes who had worshipped idols and unclean things had become the people of God.”

Many folk ask the question ‘Why is the Shamrock the National Flower of Ireland ?’ The reason is that St. Patrick used it to explain the Holy Trinity to the pagans. Saint Patrick is believed to have been born in the late fourth century, and is often confused with Palladius, a bishop who was sent by Pope Celestine in 431 to be the first bishop to the Irish believers in Christ.

In the custom known as “drowning the shamrock”, the shamrock that has been worn on a lapel or hat is put in the last drink of the evening.

Saint Patrick is most known for driving the snakes from Ireland. It is true there are no snakes in Ireland, but there probably never have been – the island was separated from the rest of the continent at the end of the Ice Age. As in many old pagan religions, serpent symbols were common and often worshipped. Driving the snakes from Ireland was probably symbolic of putting an end to that pagan practice. While not the first to bring christianity to Ireland, it is Patrick who is said to have encountered the Druids at Tara and abolished their pagan rites. The story holds that he converted the warrior chiefs and princes, baptizing them and thousands of their subjects in the “Holy Wells” that still bear this name.

There are several accounts of Saint Patrick’s death. One says that Patrick died at Saul, Downpatrick, Ireland, on March 17, 460 A.D. His jawbone was preserved in a silver shrine and was often requested in times of childbirth, epileptic fits, and as a preservative against the “evil eye.” Another account says that St. Patrick ended his days at Glastonbury, England and was buried there. The Chapel of St. Patrick still exists as part of Glastonbury Abbey. Today, many Catholic places of worship all around the world are named after St. Patrick, including cathedrals in New York and Dublin city.


By: Saint-Patrick’s-Day.com

Should You Refinish Hardwood Floors Yourself?

Should You Refinish Hardwood Floors Yourself?

You’ll save money by refinishing your own hardwood floors, but the risk to your floors may not be worth it.

Hardwood floors have two big advantages over other types of flooring:

1. They’re a timeless mix of beauty and durability that pair with any design.

2. If your hardwood floors get worn and scuffed, chances are good you won’t have to replace them; you can simply refinish them.

We say “simply” with a word of caution, though. For a pro, the process is straightforward, although there are a lot of steps that must be completed carefully.

DIYers, however, should think twice. Experience definitely counts when it comes to a good floor refinishing job. Mistakes show up big time on wood flooring, and you may end up devaluing your home’s appearance rather than improving it.

Related: Frugal Fixes for Frightful Floors

What Will a Pro Do?

A professional wood floor refinisher takes 2 to 5 days to complete a simple job, and up to two weeks for a complex job calling for custom stains and finishes. Sometimes humid weather interferes with drying times and causes delays.

A floor refinisher will do one of two things:

1. Rebuff your finish. Wood floors are covered with a clear protective coating. Over time, that topcoat can get scratched and scuffed, but the wood floor underneath may be undamaged.

If that’s the case, your floor refinisher will use a floor buffing tool and a succession of grits to restore the luster to your floor’s topcoat. The process is called screening. A new coat of clear finish completes the job. The job runs $1-$2 per sq. ft.

Screening gets a bit more complicated if you’ve waxed or used an oil soap product to clean your floors. If so, your contractor has to remove any residue before buffing to make sure the new topcoat dries correctly.

2. Sand and finish your flooring. The contractor will sand your floors down to bare wood, then apply a stain and two to three coats of finish. The cost is $1.50 to $4 per sq. ft., depending on the repairs necessary and if staining is required.

Steps in the Pro Sanding and Finishing Process Include:

Inspection. An estimator inspects your floors and takes measurements. He’ll check the thickness of your flooring to make sure there’s enough solid wood for a complete sanding job. A solid hardwood floor can take up to a dozen complete sanding and refinishing jobs during its 100-year lifespan. Laminated plank floors can be refinished at least once if the hardwood veneer is at least 1/8-inch thick.

Sanding the floors down to bare wood. This messy job uses progressively finer-grit sandpaper to produce a smooth surface. Look for companies that offer dustless sanding, meaning they hook up their sanding machines to vacuums that remove most — but not all — of the dust. You’ll still need to seal off doorways to keep dust out of the rest of your house.

Applying filler to cracks and holes.

Staining the floor. You can leave your floor natural, but if you want a certain color or tone, you’ll have to stain the floor. Staining usually requires several applications, plus sanding between coats.

Finishing coating the floor. Two or three separate coats are applied, with thorough drying time between coats. You’ll have a choice of:

  • Water-based finishes are eco-friendly and have low odors and VOCs. They generally aren’t as tough as other finishes.
  • Polyurethane finishes are the industry standard. They’re recommended for high-traffic floors and for kitchens.
  • An acid-cured finish is a two-part process that leaves an exceptionally tough coating. It has fast drying times, which may make it possible to apply two coats in a single day. However, some brands produce volatile odors that require you to turn off pilot lights, avoid using light switches, and leave your house until the finish is completely dry.

DIY Floor Refinishing

Floor refinishing is labor-intensive, messy, and loud. Be sure to have top-quality dust masks or a respirator, eye protection, and ear protection. Use plastic sheeting to seal doorways and keep dust out of the rest of your house.

Buffing the Floor — DIY

For buffing a worn topcoat, you’ll need to rent a buffer and buy a gallon of polyurethane floor finish ($55-$65/gallon). It’ll cost you $75 to $125 to buff out and recoat a 15-by-15-ft. room.

Note: You can’t buff out a floor that’s been waxed or cleaned with an oil soap — a favorite product used on wood flooring. You’ll have to strip off any residue before buffing; otherwise, the new finish won’t adhere.

Test the floor in an inconspicuous area, such as a closet. Buff out the old finish and apply a new coat. If the new coat dries and sticks, you’re in business. If not, you’ll have to thoroughly clean the entire hardwood floor with ammonia and water or a commercial floor cleaning product.

Sanding and Refinishing — DIY

To sand and completely refinish a 15-by-15-ft. floor, you’ll spend $125 to $250 for the drum sander, sandpaper, wood filler, and polyurethane floor finish.

A drum sander is a heavy piece of equipment that you walk behind and guide like a lawn mower. You’ll use a series of progressively smaller grits to remove the old finish and sand the bare wood smooth.

A drum sander takes a deft touch; let it linger too long in one spot, and you’ll gouge the flooring.

An orbital sander is a smaller tool you’ll use to remove the finish and sand the wood next to walls and in corners where the drum sander can’t reach.

Dealing with Super-Hard Finishes

Some varieties of prefinished hardwood flooring are coated with super-hard finishes made with aluminum oxide compounds. These tough finishes extend the life of the flooring (and a manufacturer’s guarantee) but are difficult to remove.

Although conventional wisdom says to start with heavy sandpaper grits (40-grit) and work to progressively smaller grits, in this case you’ll want to reverse the process.

Start with a medium grit (80- or 100-grit) to begin breaking down the outer layer of the finish. Once that’s accomplished, you can move to the heavier grit to remove the remainder of the finish and flatten the floor.


By: John Riha:© Copyright 2015 NATIONAL ASSOCIATION OF REALTORS®


Can Your Facebook Friends Really Influence Your Credit Score?

Can Your Facebook Friends Really Influence Your Credit Score?

Published: October 24, 2013

Recent news reports suggesting your Facebook and other social media friendships could someday influence your credit score left out a few details — like why that’s not going to happen in the U.S.

After reading news headlines from CNN to Mint.com suggesting that it’s just a matter of time before credit reporting bureaus begin using my social media footprint and friendships to rate my credit, I felt sad that I was going to have to drop all the old friends I reconnected with on Facebook after my high school’s 30th reunion.

After all, I did meet them in my school’s smoking lounge in the late 1970s. Who knows what kind of credit they have now. What if they grew up to become financial lollygaggers?

I put in a call to Experian Director of Public Education Rod Griffin to find out the best way to figure out my friends’ credit scores so I’d know who to unfriend, lest they tarnish my stellar score and prevent me from getting a mortgage

Griffin told me to take my finger off the unfriend button. Turns out, those companies trying to use social media to determine creditworthiness are in other countries.

Here in the U.S., social media isn’t used for consumer credit scoring. Why not? Because there are some pesky consumer laws in this country that require credit reporting companies to use data that actually predicts whether you’re likely to pay a debt. The data has to be about your behavior, not your friends’ behavior, and it has to be related to repayment, not what you think of Obamacare.

Even if someone could show that posts about hating pink houses corresponded to hating to pay your bills on time, Experian wouldn’t use your hatred of pink houses to calculate your credit score because it’s not related to actual bill-paying behavior.

The data most relevant to credit scoring isn’t who you’re interacting with on social media, it’s your financial track record. A late payment on a car loan is a strong indicator that you’re not going to pay another debt, like your mortgage.

We Americans have other consumer rights that would make using social media in credit reporting tough — like the right to fix mistakes in our credit reports.

If social media information was used in credit scoring, can you imagine the letter you’d have to write to get errors fixed? And how would the credit bureau try to correct errors? Maybe we would write a letter like this:

Dear Social Media Credit Reporting Firm:

I don’t know where you got the idea I’m good friends with Joe Johnson. I’m not. He contacted me after my 30th reunion and I didn’t want to hurt his feelings by refusing his friend request. Please make the correction in your files as required by the Fair Credit Reporting Act.

It Doesn’t Work for Loans, Either

A second federal law would make it really tricky to use your social media postings to decide whether to give you a loan. The Equal Credit Opportunity Act says you can’t discriminate against me because of my gender, ethnicity, marital status, or age.

All of those characteristics appear on the average mom’s Facebook feed. If you stripped out pictures of me (I’m pretty obviously white), my husband (yes, I’m married), and my girls’ nights out with friends (I’m pretty obviously female), there’d be nothing left but pictures of my daughter playing field hockey. And a headshot of me that’s so digitally altered you might not realize you should be discriminating due to my age.

So for now, I’ll remain friends with my fellow Wilde Lake High School Wildecats because finding out what happened to old classmates is what social media was meant to do. But credit scoring? Not so much.

Related:

6 Ways to Improve Your Credit Score

Stats on Credit Report Disputes


By: Dona DeZube:© Copyright 2015 NATIONAL ASSOCIATION OF REALTORS®

The owner of this website has made a commitment to accessibility and inclusion, please report any problems that you encounter using the contact form on this website. This site uses the WP ADA Compliance Check plugin to enhance accessibility.