Are You Prepared to Evacuate in an Emergency?

Are You Prepared to Evacuate in an Emergency?

When stuff hits the fan and you need to flee your home, being organized is the best way to protect your home and family.

If there comes a time when you have to abandon your house, an emergency probably won’t give you enough time to gather essentials and take steps to limit property damage. Getting all of your ducks in a row before disaster strikes is the best course of action.

How to Get Ready Now

Evacuations in the U.S. are more common than most people realize, according to FEMA. Natural disasters aside, people are forced to leave their homes hundreds of time a year because of transportation and industrial accidents.
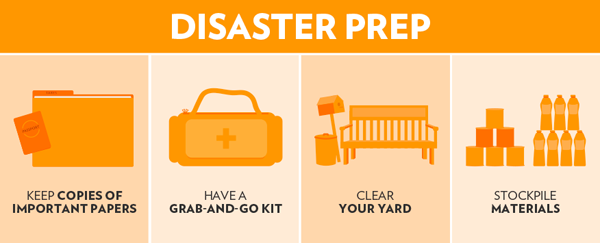
Home evacuation checklist infographic

Here’s a list of things you can prepare now in case your home is ever in harm’s way:

  • Have a grab-and-go kit. Include essential supplies, such as water, food, and first-aid supplies.

    Related: What to Put In Your Emergency Preparedness Kit

  • Have copies of important papers. Keep these in a plastic, waterproof case. FYI, this stuff is priceless, because you may need to prove who you are and that you own your house. Include:
    • Your driver’s license.
    • The deed to your house.
    • Proof of insurance.
    • Medical records.
    • Passports.
    • Social security cards.
    • A list of personal contacts.
  • Safeguard pets. Make sure they’re micro-chipped and have I.D. collars. Create pet grab-and-go kits that include leashes, medications, meal bowls, and three days worth of food and water.
  • Prep your yard. Maintain your trees and shrubs so diseased or weakened branches won’t fall down and damage your property.
  • Know your utility shutoffs. Learn now how to safely shut off all utility services in your home. FEMA has tips for shutting off electricity, water, and gas. Note: To turn off gas you may need a special wrench.
  • Stockpile sandbag materials. If you live in a flood prone area, keep sandbags on hand or the materials to make them. It takes 100 sandbags to create a 1-foot-tall wall that’s 20 feet long. If you’re filling bags on the fly, two adults can create the wall in about an hour.
  • Protect windows. If you live in an area susceptible to hurricanes, install shutters that are rated to provide protection from windblown debris.

When It’s Time to Evacuate

Before you pick up and go (and if you have enough time) follow these steps — they’re designed to protect your pets and help prevent property damage:

  • Clear your yard. Remove any objects hanging on trees or your home’s exterior, such as birdhouses and wind chimes — they can break off in high winds and cause serious damage. Bring inside anything that’s not nailed down including lawn furniture, trashcans, toys, and garden equipment.
  • Shut off utilities. Turn off electricity, water, and gas. Doing so will help prevent additional dangers including flooding, fire, and explosions. Keep in mind, you’re going to need the utility company to turn your gas back on when you return home.
  • Windproof windows and doors. If you don’t have storm-proof shutters, fit plywood coverings over all windows. (FYI, using just tape on windows is not recommended because it will not stop windows from breaking, just shattering.)
  • Protect indoor stuff. Move valuables to higher levels in your home to prevent water damage. As an extra measure, wrap electronics and furniture in sheets, blankets, or plastic drop cloths.
  • Gather up pets. If it’s not safe for you to stay, it’s not safe for Fido. Make plans to stay with friends or at a pet-friendly hotel — most emergency shelters will only accept service animals that assist people with disabilities.
  • Lock your house. Because crooks and looters take advantage of evacuations, lock all doors and windows and don’t leave house keys in an obvious place, such as a mailbox.

Important Stuff to Remember

Whether the order is voluntary or mandatory, if officials in your area tell you to evacuate, you should do so before things get worse. Although laws vary from area to area, you may receive a hefty fine or face a jail sentence if you don’t follow a mandatory evacuation order.

Failure to follow an evacuation order can place your life in danger by leaving you stranded in an area with no basic services or food and water.

When you return home after an emergency, don’t use matches, lighters, or any sources of flame or spark until you’re 100% certain that you don’t have a natural gas leak inside your home — you’ll need a gas company service technician to confirm that it’s safe.

Stay Informed with Emergency Alerts

Smartphone technology has made it easier to receive disaster alerts free of charge. You’ll automatically receive alerts if you have a phone capable of receiving Wireless Emergency Alerts (WEA) and your wireless carrier participates in the program. To find out if your mobile device is capable of receiving WEA alerts, contact your mobile device carrier or visit CTIA – The Wireless Association.

Related: Preparing Your Home for a Natural Disaster


By: Deirdre Sullivan:© Copyright 2015 NATIONAL ASSOCIATION OF REALTORS®

What’s the No. 1 Thing People Want in Their Bathroom?

What’s the No. 1 Thing People Want in Their Bathroom?

Bathroom exhaust fans make air smell (much!) sweeter, paint last longer, and mold grow slower — or not at all. Learn how to do a bathroom exhaust fan installation.

Return to the Best Bath Ideas for Love & Money

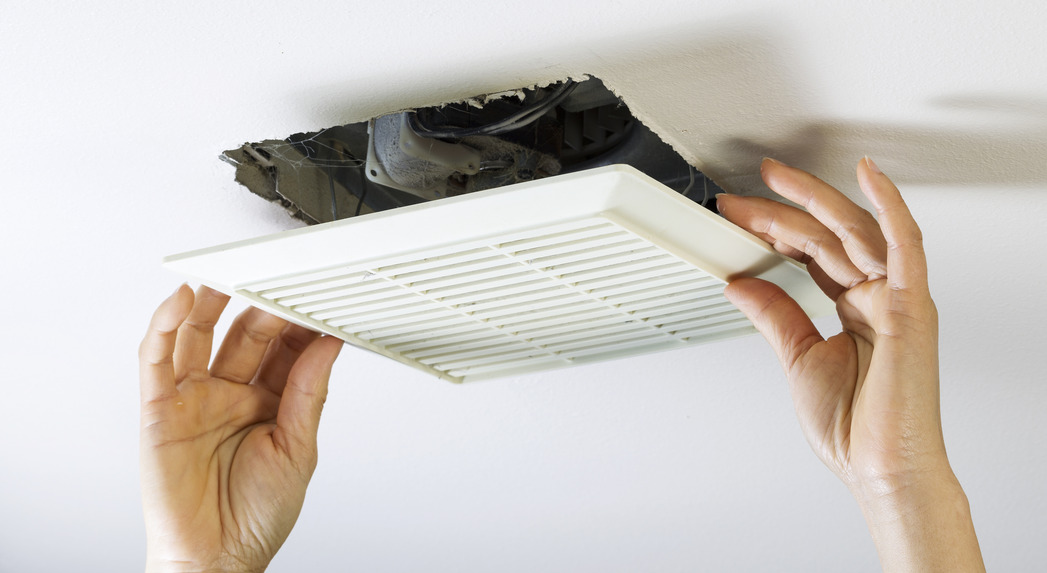
A bathroom exhaust fan is an inexpensive upgrade that packs a value punch. The shoe-box-size fan clears obnoxious bathroom odors (priceless!) and removes moisture, which protects your home and health, and reduces maintenance costs.

And, it turns out, everyone wants one. Exhaust fans are the No. 1 feature homebuyers want in a bathroom, says a National Association of Home Builders report. Ninety percent ranked exhaust fan as No. 1, with linen closet second, and a separate tub and shower as third. Who knew?

Still, many homes don’t have a bathroom fan. Although the fans are required by building code in many places, older homes — pre-1960s — didn’t routinely install them. And homeowners today may be reluctant to retrofit bathrooms with an appliance that requires venting to snake through attics, joists, soffits, and ultimately punctures an exterior wall or roof.

We feel your fear, and we’re here to help. Below, we break down everything you need to know about selecting and installing a bathroom exhaust fan.

What Does a Bathroom Exhaust Fan Do?

A bathroom exhaust fan is a small, ceiling- or wall-mounted fan that pulls air from the bathroom, sends it through venting (4-inch is preferable), and deposits it outside.

This helps you and your home by:

  • Improving indoor air quality, especially by removing bathroom smells.
  • Removing shower and bath humidity.
  • De-fogging mirrors.
  • Thwarting mold growth.
  • Preventing door and window warp.
  • Slowing fixture rust.
  • Retarding paint blister and wallpaper peel.

Related: How To Kill and Prevent Household Mold

How Are Fans Rated?

Exhaust fans are measured by two factors found on the fan’s box:

  • CFM (cubic feet per minute): Indicates the strength of the fan’s draw. CFM’s can range from 50 to 1,000-plus, although most bathrooms typically require fans with less than 200 CFM.
  • Sone: Measures of the sound the fan makes, typically from 0.5 (almost silent) to 4.0 (sounds like a normal television) — loud for a fan, but it does provide privacy against toilet sounds, especially nice for powder rooms often located near public areas of your home.

Most people choose a 1- or 2-sone fan — quiet enough keep your teeth from rattling, but not so quiet that you’ll forget it’s on.

CFM and sone are related, because stronger fans — with higher CFMs — usually create more noise; quieter fans — lower sone — often can’t adequately clear air from bigger areas.

The important thing is to pick a fan that’s right for your space, ears, and budget.

Sizing Your Fan

The Home Ventilating Institute, which tests and certifies manufacture claims, suggests that homeowners follow these formulas when sizing a fan:

For bathrooms less than 100 sq. ft.
: Calculate your bathroom’s square footage (length x width), and pick a fan with at least that number of CFMs. For example: If your bathroom is 6 feet by 8 feet, you should buy a fan that’s at least 48 CFM. A 50-CFM model comes closest and is the minimum size suggested for small bathrooms.

Size a fan for a ginormous bathroom: If your bathroom is bigger than 100 sq. ft., forget about the square footage figure; instead assign a CFM capacity for each fixture:

  • 50 CFM — toilet.
  • 50 CFM —  bathtub.
  • 100 CFM — jetted whirlpool tub.
  • 50 CFM — shower.

If you have a completely tricked-out bathroom, you may need at least 200 CFM of draw, which you can accomplish with several 50-CFM fans (one fan should be in separate toilet enclosure), or one big, 200-CFM fan.

How To Install Your Fan

Bathroom fan installation isn’t brain surgery — collect air here; exhaust air out there. But it’s not for beginners either, because the project includes removing drywall, perhaps drilling through joists, certainly busting through an exterior wall or roof.

We suggest hiring an HVAC pro, who will charge $150-$700.

If you decide to install a fan yourself, here are some decisions you’ll have to make:

Location: If you have a separate WC, put a small fan there. If your toilet is part of the bathroom, locate the fan between the toilet and tub/shower.

Venting: Exhaust flows through venting attached to the fan and out an exterior wall or roof. Never vent smelly, damp air into an attic or crawl space, which will warp rafters and promote mold growth.

The idea is to run venting the shortest, straightest path from the bathroom to outside. Every extra foot and bend the venting makes increases friction and decreases air draw and fan efficiency.

Appropriate venting runs up into your attic, then along or through floor joists until it reaches the eaves. From there, it can be exhausted out a soffit.

In some instances it may be more practical (and less expensive) to run the vent directly out a wall, or through a vent stack in your roof.

Door clearance: During installation, make sure your bathroom door has at least ¾-inch clearance from the floor, so “makeup air” can easily replace the sucked-out air, putting less stress on the fan.

Related: A Replacement Fan That’s Easy to Install

Fan Options

Bathroom exhaust fans come in custom styles and colors, but most of us would rather spend our decor budget elsewhere and will choose an off-the-rack fan with one or more of the following options:

Fan only: If you’re retrofitting a small bathroom that already has a ceiling fixture, select a basic fan, 50-70 CFM. Cost: $15-$50.

Fan-and-light combo: Good for small bathrooms or WCs. Choose a combo with enough wattage to sufficiently light the area, typically upwards of 60 watts. Cost: $30-$150.

Deluxe combo: All the bells and whistles — fan, light, heater, nightlight, timer (necessary for super-quiet fans you won’t remember are on), humidistat (automatically turns on fan when air moisture rises). Cost: $150-$600.

Return to the Best Bath Ideas for Love & Money


By: Lisa Kaplan Gordon:© Copyright 2015 NATIONAL ASSOCIATION OF REALTORS®

How to Clean and Care for Your Home’s Siding

How to Clean and Care for Your Home’s Siding

Cleaning your home’s siding every year and keeping it in good repair extends the life of any siding and heads off replacement costs.

With a bit of preventative maintenance, your home’s siding could be trouble-free for 50 years or more. And that means you won’t have to replace siding as often.

Cleaning siding removes the dirt and mildew that shortens the life of siding. A clean house protects your investment, too. Some real estate appraisers say good curb appeal can add 5%-10% to the value of your house.

Related: How Maintenance Also Adds to Your Home’s Value

Cleaning All Types of Siding

All types of siding benefit from an annual cleaning to remove grit, grime, and mildew. Cleaning an average-sized house may take you and a friend every bit of a weekend. Here’s how to do it:

1.  Start with a bucket of warm, soapy water. Mix 1/2 cup trisodium phosphate (TSP, available at grocery stores, hardware stores, and home improvement centers) with 1 gallon of water.

2.  Divide your siding into 10-foot sections. Scrub each section using a soft-bristled brush attached to a long handle. Work from bottom to top to avoid streaking, and rinse often. (For two-story homes, you’ll be using a ladder, so keep safety foremost.)

Related: Care and Maintenance of Your Deck

What’s a Professional Cleaning Cost?

If you don’t have the time — or the inclination — you can have your house professionally cleaned for $300-$500. A professional team will use a power washer and take less than a day.

You can rent a power washer to do the job yourself for about $75/day, but beware if you don’t have experience with the tool. Power washers can strip paint, gouge softwoods, loosen caulk, and eat through mortar. Also, the tool can force water under horizontal lap joints, resulting in moisture accumulating behind the siding.

A siding professional has the expertise to prevent water penetration at joints, seams around windows and doors, and electrical fixtures.

Inspecting Siding for Damage

All siding: Siding is vulnerable to water infiltration where it butts against windows, doors, and corner moldings. Look for caulk that has cracked due to age or has pulled away from adjacent surfaces, leaving gaps. Reapply a color-matched exterior caulk during dry days with temperatures in excess of 65 degrees for maximum adhesion.

Wood siding:
Check for chipped or peeling paint, and cracked boards and trim.

Stucco: Be on the lookout for cracks and chips.

Brick: Look for crumbling mortar joints.

You’ll want to repair any defects before cleaning. The sooner you make repairs, the better you protect your house from moisture infiltration that can lead to dry rot and mold forming inside your walls.

Related: 10 Steps to the Perfect Exterior Paint Job

Repairing Wood, Vinyl, and Fiber-Cement Siding

Repairs to wood, vinyl, and fiber-cement siding require the expertise to remove the damaged siding while leaving surrounding siding intact. Unless you have the skills, hire a professional carpenter or siding contractor. Expect to pay $200-$300 to replace one or two damaged siding panels or pieces of wood clapboard.

Repairing Brick and Mortar

Crumbling and loose mortar should be removed with a cold chisel and repaired with fresh mortar — a process called repointing. An experienced do-it-yourselfer can repoint mortar joints between bricks, but the process is time-consuming. Depending on the size of the mortar joints (thinner joints are more difficult), a masonry professional will repoint brick siding for $5-$20/sq. ft.

Efflorescence — the powdery white residue that sometimes appears on brick and stone surfaces — is the result of soluble salts in the masonry or grout being leached out by moisture, probably indicating the masonry and grout was never sealed correctly.

Remove efflorescence by scrubbing it with water and white vinegar mixed in a 50/50 solution and a stiff bristle brush. As soon as the surface is clear and dry, seal it with a quality masonry sealer to prevent further leaching.

Persistent efflorescence may indicate a moisture problem behind the masonry. Consult a professional building or masonry contractor.

Repairing Stucco

Seal cracks and small holes with color-matched exterior acrylic caulk. Try pressing sand into the surface of wet caulk to match the texture of the surrounding stucco. Paint the repair to match.

To repair larger holes and cracks, you may want to call in a pro who’s familiar with stucco work. A professional charges $200-$1,000 for a repair job, depending on the size of the damage. Repainting the patch to match your siding will be up to you.

Removing Mildew

Stubborn, black spotty stains are probably mildew. Dab the area with a little diluted bleach — if the black disappears, it’s mildew. Clean the area with a solution of one part bleach to four parts water. Wear eye protection and protect plants from splashes. Rinse thoroughly with clean water.


By: John Riha:© Copyright 2015 NATIONAL ASSOCIATION OF REALTORS®


Can One Home Insurance Claim Bump Up Your Annual Premium?

Can One Home Insurance Claim Bump Up Your Annual Premium?

Published: November 7, 2013

Depending on where you live, filing even one claim can push your annual insurance premium up 20%.

When a tree fell on my house during a derecho wind storm last summer, it poked a half-dozen holes about the size of a car steering wheel in the roof. But my husband, Al, and I weren’t in a hurry to call our insurance company.

Call us paranoid, but until we knew how much it was going to cost to repair the roof, we didn’t want to risk letting our insurer know we were even thinking about filing a claim.

Al manages our family’s rental properties and has filed a fair share of insurance claims — from siding damage after someone drove into a house we own in York, Pa., to having our own hardwood floors ruined when the neighbor’s water heater failed, flooding next to our shared townhouse wall.

Our theory is that every time you file a claim, the insurance company punishes you by raising your premium at the very next renewal. File too many claims and they’ll put you in a special, super-expensive rate class.

Related: What Does Homeowners Insurance Cover?

So I wasn’t totally surprised when InsuranceQuotes.com recently came out with a study saying that in some states, filing just one claim with your homeowners insurer can cause your rates to rise as much as 20%.

Some states where you’ll see double-digit premium increases after filing only one claim, according to the study:

Minnesota 21%
Connecticut 21%
Maryland 19%
California 18%
Oregon 17%
Arizona 17%
Alaska 17%

But if you live in other states, your premiums will barely budge after you file a claim:

Texas 0%*
New York 1%
Florida 2%
Vermont 2%
Massachusetts 2%

*In Texas, insurers aren’t allowed to boost premiums after your first claim.

What Gives? Why So Different from State to State?

The differences come down to the rules states set for insurance companies and the difference in weather from state to state, says InsuranceQuotes.com Senior Analyst Laura Adams.

And what sounds bad — being in a state where rates get bumped up pretty heavily after the first claim — can actually be a good thing.

“In some states where we’re seeing big rate increases, consumers are getting low rates to begin with,” she explains. If you live in one of those states and never file a claim, you continue to get the advantage of the low initial rate. If you file a claim, however, you pay a heck of a lot more after that claim.

And what sounds good — being in a state where your insurer either doesn’t bump your premium for filing a claim or bumps it only a bit — can be bad because you may be paying a pretty high premium to begin with, especially if you’re in a state prone to weather-related insurance claims like hurricane-prone Florida.

Careful What You Say When You Call Your Insurer

Imagine how mad you’d be if your premium went up because you called to talk about a claim you were thinking about filing but didn’t file. Suppose, for example, I called my insurance company to talk about that tree limb that fell on my house and said I might be filing a claim, but only if the damage is more than my deductible.

If the insurance company’s customer service representative hears me use the word “claim,” she might open a claim and put that tree damage information in my permanent insurance track record. That could happen even if I opted not to file the claim. Then, I wouldn’t get the claim payment and I might still have my premium rise the next year.

But wait, it gets worse. Claims filed by the people who lived in your house before you did can also cause your premiums to rise. That’s because your CLUE report includes claims filed by anyone who lived at your address for the past five to seven years. So maybe you only filed one claim, but if the prior owner filed two homeowners insurance claims, your insurance premium is underwritten as though you filed all three claims.

You know what else can make your homeowners insurance premiums rise? Having neighbors who file claims. Insurance companies create rates by ZIP code, points out Amy Bach, executive director of United Policyholders, a consumer advocacy group.

“It’s not just the claims you file, it’s the claims your neighbors file, and sometimes it’s just the insurance company just plain trying to make more profit,” she says.

What’s a Homeowner to Do?

1. Don’t play your insurance claim card unless you have a catastrophic loss.

2. Don’t file a claim for less than your deductible. If it’s a close call, say a $750 claim on a policy that has a $500 deductible, think before you file. Is the $250 you’d get ($750 claim less $500 deductible) worth the chance that your premium will rise?

3. Check your permanent insurance record, called a CLUE report. It’s a list of every claim you’ve filed in every property you’ve insured and all the claims filed for your property in the past five to seven years.

4. Ask that mistakes in your CLUE insurance report be fixed. If you called to ask a question and it got recorded as a claim, for instance, get that corrected.

5. Think really hard before you file a second, or worse, a third claim. If you’ve had past claims or prior owners filed claims, every claim could be the one that’s one claim too many and causes the company to tell you they’re not renewing your policy or raising your rates substantially.

Related: How to Correct Mistakes on Your CLUE Insurance Report

I would tell you exactly how many claims is too many, but there’s no universal, industry-wide official number of claims that is too many, according to Michael Barry, vice president of media relations for the Insurance Information Institute.

He points out that insurers have to take natural disasters and other community-wide events into account. For example, there are likely homeowners in the Northeast who’ve filed three claims because they were hit by Hurricane Irene, the derecho that dropped the tree on my house, and Superstorm Sandy.

Personally, I suspect the magic number is three. Bach — despite 29 years of advocating for consumers and analyzing insurance issues – has never been able to uncover the magic number either. “It feels like three claims in five years will get you canceled,” she agreed. “But I don’t know what it is.” United Policyholders dug into the issue when it attempted to restrict insurance companies in California from levying rate increases following minor claims, but the rules remained a mystery to the consumer advocacy group.

You could ask your agent or call your insurance company, but it’s hard to find someone who knows and will tell you what the company’s rules are when you file a claim, Bach says. And by the way, she adds, your company may pay your agent an annual incentive based on how many claims his customers file — so the fewer claims you file, the more money he makes.

The bottom-line: Every time you file a claim, it’s a financial crapshoot. So don’t file unless there’s major money at stake. And if you decide to call your insurance company to discuss the issue, you literally need to repeatedly say that you’re not, not, not filing a claim.


By: Dona DeZube:© Copyright 2015 NATIONAL ASSOCIATION OF REALTORS®


Gorgeous Ideas to Make Home Maintenance Less of a Pain

Gorgeous Ideas to Make Home Maintenance Less of a Pain

Tired of home maintenance chores? So are we. That’s why we love these easy-care features that free up your free time — and do it beautifully.
1.  Front Yard Patio

Patio in the front yard of a houseImage: Westover Landscape Design, Inc.Lawns are classic suburbia; they’re also classic maintenance time-sucks. Good-looking patios, on the other hand, don’t need mowing, watering, or fertilizing. Ever. Be a trend-setter and put one in your front yard for you to enjoy and your neighbors to envy. A professionally installed brick or flagstone patio runs $15 to $18 per square foot.
2.  Vinyl Shake Siding

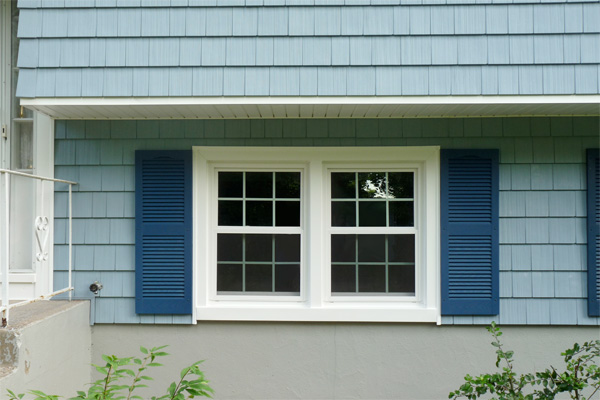
Vinyl shake siding on the exterior of a houseImage: Essex Home Improvements, Inc.Vinyl shakes look as beautiful as real wood but they won’t crack, rot, fade, or need periodic staining and sealing. Even better: At $2 to $7 per square foot, installed, they’re about half the price of real wood shakes. Lots of colors available. Did we say that bugs don’t like them, either? Well, they don’t!

3.  Quartz Countertop

Low-maintenance quartz countertop in a kitchenImage: Bellingham from Cambria’s Waterstone Collection
Everyone seems to love granite — until it’s time to reseal it. You can get a look that’s just as gorgeous with engineered quartz countertops. Made with 95% quartz (one of the hardest known materials), a quartz countertop shrugs off stains, scratches, and germs (it’s antimicrobial). Cost is $40 to $100 per square foot, installed, about the same as granite. But — unlike granite — a quartz countertop is non-porous and never needs to be resealed. For that reason, quartz countertops are starting to rival granite as the preferred choice.

4.  Fiberglass Entry Door

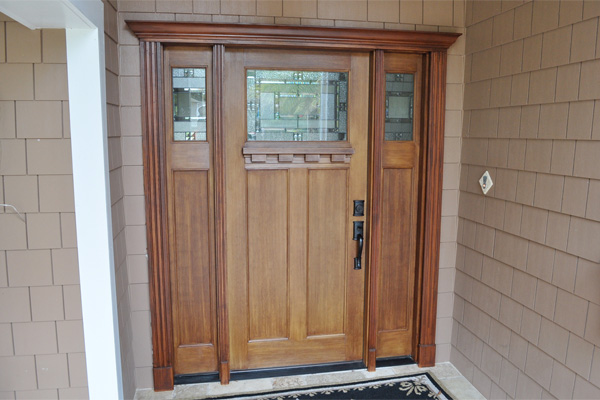
Fiberglass entry door on a homeImage: Heckard’s DoorWhat looks like and feels as beautiful as wood, stains like wood, but never chips, warps, or cracks? Answer: fiberglass. All of which makes fiberglass an ideal material for high-style, low-fuss entry doors that mimic oak, mahogany, walnut, fir, and other woods. Average installed cost for this cool curb appeal upgrade: about $3,000.

5.  Shaker-Style Cabinets

Shaker-style white kitchen cabinets in homeImage: Dwelling Studio / All Around Joe Construction

Can style be low-maintenance and gorgeous, too? Of course! These Shaker-style kitchen cabinets, with their simple lines and absence of frills and trills, make cleanup a snap. They also fit with most any design, from traditional to modern. Order them with a tough factory finish that resists stains.

6.  Turf Grasses

Buffalo grass front lawnImage: Takao NurseryIf you love a lawn but hate the upkeep, go alternative. Lush, green turf grasses are beautiful and specially formulated so they’ll grow well in various climates. Once established, turf grasses, like the buffalo grass shown here, require very little watering or mowing, and virtually no fertilizers or pesticides.
7.  Direct-Vent Gas Fireplace

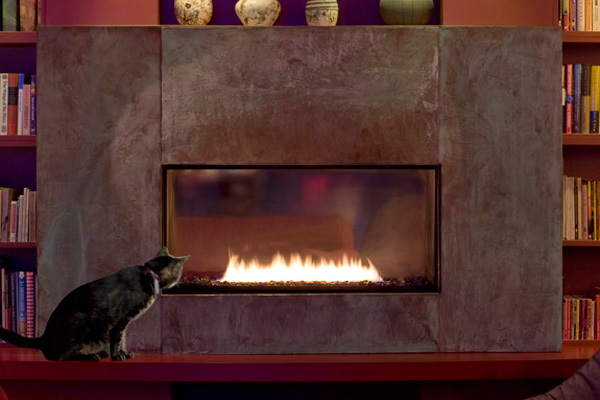
Cat next to direct vent fireplace in living room
Image: Spark Modern Fires

OK, you’re not Grizzly Adams. You don’t care for chopping firewood, cleaning a sooty hearth, or paying somebody to sweep the chimney every year. But you still like to curl up in front of a blazing fire. Solution: A gorgeous direct-vent gas fireplace ($2,000 to $5,000) burns clean, is energy-efficient, and throws off tons of ambiance.

8.  Manufactured Stone Veneer

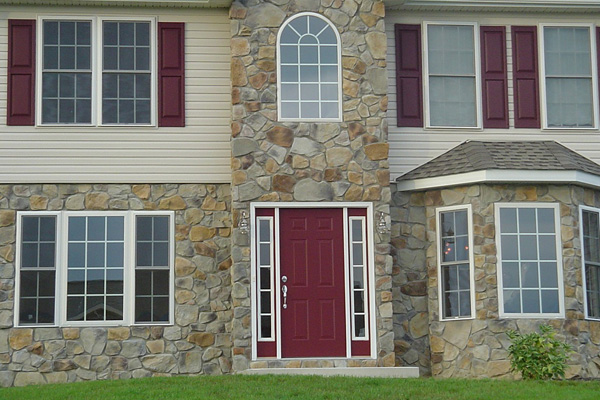
Stone veneer on the exterior of a homeImage: Eldorado Stone

One of our favorite faux finishes, gorgeous manufactured stone veneer won’t split, crack, or fade. At about $18 per square foot installed, it isn’t cheap, but “Remodeling” magazine’s “Cost vs. Value Report” says you’ll recoup about 92% of your investment at resale — one of the highest returns in the report.

9.  Drought-Resistant Landscape Plants

Flowering azaleas in a home's yard
Image: Abby Farson Pratt

Azaleas like these are in the genus Rhododendron, a group of woody shrubs that grow in many different climates and have showy spring blossoms. Beautiful azaleas are tough and hardy once rooted into well-drained soil, making upkeep easy and reducing the need for water.

Related: 8 Remodeling Choices That Keep the Home Maintenance Monkey Off Your

By: John Riha:HouseLogic© Copyright 2015 NATIONAL ASSOCIATION OF REALTORS®
The owner of this website has made a commitment to accessibility and inclusion, please report any problems that you encounter using the contact form on this website. This site uses the WP ADA Compliance Check plugin to enhance accessibility.