Top 10 Common Repair Costs

Top 10 Common Repair Costs

The good news is that most repairs are simple, inexpensive, and DIY-friendly. If you can fix stuff yourself, you’ll only pay for the cost of materials and save a bundle on these common repairs and replacements.
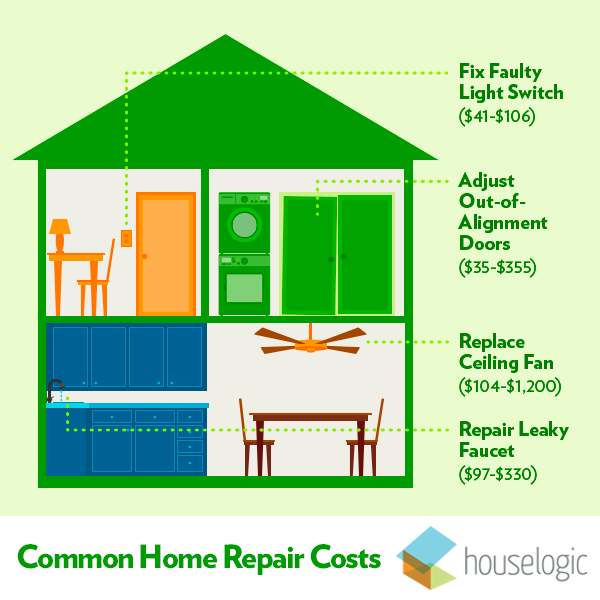
Common home repair costs infographic

1.  Replace Toilet Fill Valves

That annoying sound of water continually filling and draining from your toilet tank is often caused by leaky fill valve, which a plumber can replace, stopping water waste and restoring quiet. Plumber rates vary widely around the country, from $45 to $150 per hour, and the job will take about two hours — the minimum some plumbers require just to take the job.

Labor: $50 to $200

Materials: $11 to $23

Total: $61 to $223

Related: Home Maintenance 101: 7 Things Every Homeowner Should Know

2.  Repair a Leaky Faucet

The water torture drip-drip-drip from a leaky faucet won’t just drive you insane, it can drive up water bills, too. Depending on the type of faucet you have, fixes typically involve replacing damaged rubber washers (10 for $2), O-rings (10 for $2), or a faucet cartridge ($8 to $30).

Labor: $95 to $300

Materials: $2 to $30

Total: $97 to $330

Related: The WaterSense Label: What to Look For

3.  Replace Ceiling Fan

If you’ve got a ceiling fan, sooner or later the motor will burn out, the blades will warp, and fashions will change, so you’ll need to replace it. Replacing isn’t a big deal, because upgraded wiring, a reinforced ceiling box, and a light switch with ceiling fan controls are already in place. What you’re paying for is an electrician’s time — one or two hours — and a new fixture.

Labor: $50 to $200

Materials: $54 to $1,000 and up

Total: $104 to $1,200

Related: Ceiling Fans: Know the Spin Before You Install

4.  Repair Drywall

Nicks, gashes, and smashes inevitably mar your beautiful walls. You’ll have to patch and paint to make them look as good as new. A painter can do both jobs and will probably give you a flat rate that will include patching or filling blemishes, then sanding, priming, and painting.

Painters charge $25 to $62 per hour for labor or $2.68 to $4.60 per square foot including materials. Figure it will take about three hours to repair a wall, including drying time for the patching compound and paint. It’s a good idea to save up painting chores so you have enough to keep a painter busy while repairs cure.

Materials include paint at $12 to $50 or more a gallon, which should cover about 350 square feet; plus another $10 to $50 for brushes, rollers, drop clothes, and drywall patching compound.

Labor: $75 to $186

Materials: $22 to $100

Total: $97 to $286

Related: Patch a Drywall Hole

5.  Repair Cracked Tile

Tile is hard and durable, but drop something heavy on it and it’s likely to crack — a reason to always order more tile than you need so you’ll always have spares. To replace cracked tiles, a handyman must pry out the damaged tiles, scrape away old fixative, re-glue new tiles, and spread new grout. Replacing a 2-foot-by-2-foot section of tile should take one to two hours, not including the drying time required for the adhesive to set.

Labor: $30 to $125 per hour; with possible $150 to $350 minimum charge for a handyman

Materials: $1 to $20 per square foot

Total: $34 to $430

Related: Smart Tips for Choosing Bathroom Flooring

6.  Replace Caulk Around Tubs, Sinks, and Showers

Caulk is the waterproof seal around sinks, tubs, and showers that prevents moisture from seeping through gaps and onto drywall and flooring. When caulk cracks or peels, it should be replaced immediately to prevent mold and rot.

A handyman can dig out old caulk around a tub and reseal with new in about an hour.

Labor: $30 to $125 per hour; with possible $150 to $350 minimum charge for a handyman

Materials:  $1 to $4 for a tube of bathroom caulk

Total: $31 to $354

Related: How to Remove Caulk

7.  Fix Gutters

Gutters and downspouts carry water from rain and snow away from your house and onto the ground. Sometimes the weight of wet snow and soggy leaves puts too much pressure on gutters, causing them to pull away from the house or pitch at inefficient angles.

A gutter contractor will clean gutters, and replace or reinstall supportive hardware and hangers. To restore the correct pitch, the contractor must detach and reattach each gutter section.

Labor: $127 to $282 (depending on length of gutter)

Materials: $10 for five hangers; $6 to $9 for gutter sealant

Total: $143 to $301

Related: How to Unclog a Gutter

8.  Fix Out-of-Alignment Doors

Over time, your house moves as its foundation settles and building materials expand and contract with changes in humidity. The movement often is noticed when doorframes shift slightly, causing hinges to creak and doors to not shut properly.

Adding wooden shims to frames and hinges can bring doors back into alignment and let them easily open and close once again. Replacing worn-out screws with longer screws helps secure hinges tightly.

A handyman can fix a door in about an hour. Materials will include shims and screws.

Labor: $30 to $125 per hour; with possible $150 to $350 minimum charge for a handyman

Materials: $5

Total: $35 to $355

Related: Cool Improvements: Replacing Your Interior Doors

9.  Repair Ice Damming

If your house isn’t insulated correctly or your roof isn’t designed correctly, melting roof snow can run off and freeze around roof edges. Eventually, this can form an ice dam that creeps up your roof, damaging shingles and forcing melting water into your home.

One popular solution to ice damming is to install a heating cable along the roof’s edge, which warms the area and prevents freezing. It’s not a DIY job. Roofing contractors will install the cable, and an electrician will install outlets that will juice up the cable. If you want a thermostat to turn the cable on and off automatically, that’ll be extra, too.

Labor and materials: $30 to $60 per linear foot

Total: $371 to $1,319 (average job cost)

Related: How to Prevent Ice Dams

10.  Fix a Faulty Light Switch

Sometimes you turn on the light but nothing happens; or sparks crackle, and the light turns on. It’s disconcerting, but most likely it’s an easy fix. An electrician will turn off the power, take off the faceplate, check and perhaps tighten wires; or replace the switch. All told, it will take less than an hour.

Labor: $50 to $100 per hour

Materials: $1 to $6 for a single pole light switch

Total: $41 to $106

Related: How to Repair a Light Switch

By: Lisa Kaplan Gordon:© Copyright 2015 NATIONAL ASSOCIATION OF REALTORS®

Your Guide to Choosing Patio Stones

Your Guide to Choosing Patio Stones

Published: April 9, 2013

Brick

Brick pavers are classic. They’ve got lots of character, and you can explore your creative chops by setting them in intricate patterns. Thinner than typical “builder bricks” used on home siding, they’re made to hold up under heavy foot traffic.

Brick pavers come in a variety of shapes, sizes, colors, and finishes, and can look old or new. Because they’re smaller than other pavers, they take a while to put in place, and installation costs can be higher.

You can do the job yourself for $3 to $5 per square foot. You’ll need to rent a brick saw — a heavy table-mounted saw that makes cutting masonry a snap. Cost: $60 to $95 per day. Don’t forget: You’ll need to figure out a way to get the brick saw to your house.

For a pro-installed brick patio, you’ll pay $12 to $18 per square foot, professionally installed.

Concrete
Concrete Pavers
Rubber Tiles
Flagstone, Slate, and Marble
Decomposed Granite and Pebble Surfaces
Finding Your Own Recycled Materials
Mixing Materials
Getting on Base

Concrete

Concrete can be finished off in lots of imaginative ways — brushed, acid washed, scored, and stamped — and lots of colors. Its long lifespan and relatively inexpensive installation make it a popular choice.

“For colder climates, consider adding $1 to $2 per square foot for a specialized base preparation and concrete additive,” says Chris Fenmore, principal with Garden Studio Landscape Design.

Stamped concrete can simulate flagstone, brick, cobbles, and other decorative patterns, but adds about $3 per square foot to installation costs.

Figure $6 to 12 per square foot, depending on finish and color.

Brick
Concrete Pavers
Rubber Tiles
Flagstone, Slate, and Marble
Decomposed Granite and Pebble Surfaces
Finding Your Own Recycled Materials
Mixing Materials
Getting on Base

Concrete Pavers

Concrete pavers offer an embarrassment of riches — there are shapes, sizes, textures, and colors galore. Some are plain; some look like real stone; others have intricate patterns embossed on their surfaces. They’re readily available at home improvement centers and are well-suited to DIY patio projects.

Interlocking concrete pavers have tabs and slots so they fit together like pieces of a very simple puzzle. They’re fairly inexpensive, have minimal maintenance, and install quickly.

Concrete pavers are $2 to $8 per square foot. If you’d rather have a pro do it, you’ll pay $7 to $15 per square foot, including materials.

Brick
Concrete
Rubber Tiles
Flagstone, Slate, and Marble
Decomposed Granite and Pebble Surfaces
Finding Your Own Recycled Materials
Mixing Materials
Getting on Base

Rubber Tiles

Rubber tiles are made from recycled tires. They’re designed to go over any surface, and their light weight means you can use them on decks. They look like concrete tiles, with finishes that resemble brick and terra cotta. They’re fairly new on the market, so the jury is still out on how they perform over time.

Rubber tiles are strictly a DIY material, and they snap together with connector clips. They’re good for quickly covering up old, cracked, worn patio surfaces. You’ll pay $3 to $5 per square foot.

Brick
Concrete
Concrete Pavers
Flagstone, Slate, and Marble
Decomposed Granite and Pebble Surfaces
Finding Your Own Recycled Materials
Mixing Materials
Getting on Base

Flagstone, Slate, and Marble

Almost any stone can work as a paver, but most are either sandstone, limestone, slate, or granite. The materials you select will be especially cost-efficient if they come from locally operated quarries; check your local stone supplier before looking at national home improvement chains.

Stone pavers are cut into modular shapes; 6-by-12, 12-by-12, and 18-by-18-inch sizes are standard. Uncut pavers have rough, irregular edges and come in various sizes.

When it comes to installing uncut stone, an experienced pro works quickly and is your best bet for a good-looking patio with even spaces between stones.

Pro installation is $12 to $28 per square foot, depending on the stone you choose.

Want to see some stone patios that really rock?

Brick
Concrete
Concrete Pavers
Rubber Tiles
Decomposed Granite and Pebble Surfaces
Finding Your Own Recycled Materials
Mixing Materials
Getting on Base

Decomposed Granite and Pebble Surfaces

Decomposed granite is made up of very small pieces of granite, ranging in size from 1/4-inch to the size of sand. It’s an affordable way to go, and some folks really love the slightly crunchy texture underfoot, and the way rain disappears — no puddles!

You’ll probably have to refresh and replenish the granite now and then, as the surface can erode with time, so there’s some preventative maintenance involved. Figure about $1 per square foot every three years for upkeep.

Also, decomposed granite isn’t solid and furniture legs tend to sink into the stones. Adding stabilizers that help bind particles together can strengthen the surface.

Cost: $1.50 per square foot without stabilizers, $2 with stabilizers.

Brick
Concrete
Concrete Pavers
Rubber Tiles
Flagstone, Slate, and Marble
Finding Your Own Recycled Materials
Mixing Materials
Getting on Base

Finding Your Own Recycled Materials

Like the idea of upcycling? A patio is a good way to reuse old building materials, and it’s a cost-effective and eco-friendly alternative to new materials. Plus, you’ll be building a one-of-a-kind creation. Tip: Look for materials that provide uniform thickness.

  • Cast-off concrete sections from a neighbor’s old driveway or sidewalk.
  • Check nearby construction sites for old materials — be sure to ask permission before hauling anything away.
  • Know of a building scheduled for demolition? See if there’s any old brick or stone is going to be discarded.

Although the materials are usually free, it’s a good idea to enlist some strong-backed helpers and the use of a pick-up truck. For a typical 12-by-12-foot patio, you’ll save $500 to $800 versus new pavers. Spend some of that on a patio party for your helpers.

(If you’re a salvaged materials aficionado, check out our slideshow on clever ways to use salvage in your home.)

Brick
Concrete
Concrete Pavers
Rubber Tiles
Flagstone, Slate, and Marble
Decomposed Granite and Pebble Surfaces
Mixing Materials
Getting on Base

Mixing Materials

Remember, you’re not stuck with one type of patio paver. Combining different materials — such as brick together with concrete, or stone with rock trim, can create a cool, customized look.

Southern California designer Chris Fenmore notes, “Too much hardscape can be tedious. I often like to use four-inch troughs separating masonry from concrete that can be filled with gravel, beach rocks, or ground cover. They provide a bit of relief from the hardscape and nice detail, adding to the custom look of the yard.”

Brick
Concrete
Concrete Pavers
Rubber Tiles
Flagstone, Slate, and Marble
Decomposed Granite and Pebble Surfaces
Finding Your Own Recycled Materials
Getting on Base

Getting on Base

Choosing paving materials begins with a basic: the base or foundation. The base supports your pavers, and it’s got to be firm, strong, and designed to stand up to years of wear and weather. A poorly installed base leads to shifting and settling that’ll crack concrete and make your patio pavers look like choppy seas.

A sand-and-gravel base is a good DIY project; leave a concrete slab base to the pros.

A gravel and sand base is a simple foundation that lets you “dry set” pavers — you put the pavers on top of the base, then sweep fine sand into the joints to hold them there. Building a gravel-and-sand base is an easy (but time-consuming) DIY project. You’ll pay $2 to $3 per square foot for a DIY job. If you’d rather have a pro do the work, figure $3 to $5 per square foot.

With a sand or gravel base, chances are there’ll be some settling over time. Every couple of years, plan on resetting individual pavers that have gotten out of whack because of settling.

A concrete base offers greater longevity and stability, with less potential for settling. On a concrete slab base, the paving materials are set permanently with mortar, and ongoing maintenance is minimal.

Working with concrete is a challenge for weekend warriors, so skip experimentation (mistakes in concrete are permanent) and go with a pro. You’ll pay $5 to $8 per square foot for a professionally installed concrete base.

If you’re a fan of concrete, check out these imaginative ways to use concrete inside your house.

Brick
Concrete
Concrete Pavers
Rubber Tiles
Flagstone, Slate, and Marble
Decomposed Granite and Pebble Surfaces
Finding Your Own Recycled Materials
Mixing Materials


By: Andrea Nordstrom Caughey:© Copyright 2015 NATIONAL ASSOCIATION O FREALTORS®

When is Foreclosure Removed from Your Credit Report?

When is Foreclosure Removed from Your Credit Report?

Use this handy guide to figure out how quickly you can buy a home after a major financial setback when applying for a loan through FHA, Fannie Mae, or Freddie Mac.

Foreclosures, deeds in lieu, short sales, bankruptcies — they can damage your credit for a long time. But by following guidelines from the FHA, Fannie Mae, or Freddie Mac, you can become a home owner again if you work to rebuild your credit and have a little patience.

Government entities set guidelines for credit events

The chart below outlines the criteria that government entities FHA, Fannie Mae, and Freddie Mac follow for major credit-busting events, including foreclosure. Although FHA, Fannie Mae, and Freddie Mac aren’t direct lenders, they wield a lot of behind-the-scenes influence by working with banks to guarantee loans and help lenders free up capital to provide more mortgages.

One of these entities may have made your loan possible without you even knowing it. Although for the most part banks make loans to whomever they want, they’ll likely find themselves following FHA, Fannie Mae, or Freddie Mac guidelines at a minimum in order to keep working with these useful partners.

Some lenders may have more stringent policies and others, willing to take greater risks, may work outside these entities and offer more liberal lending policies.

How to read the chart

This chart offers summaries of what can be complex rules and regulations. So:

1. Look to professionals, such as a bankruptcy lawyer and a CPA specializing in bankruptcy provisions, before making major financial decisions.

2. For HUD-approved counselors, go to http://www.hud.gov/offices/hsg/sfh/hcc/fc/index.cfm. You can also call 1-888-995-HOPE for help from the Homeownership Preservation Foundation.

3. Understand what “extenuating circumstances” means in each case:

FHA: An event that was out of the borrower’s control that made a significant impact on the borrower’s finances and led to bankruptcy or foreclosure.

Fannie Mae: A nonrecurring event that’s beyond the borrower’s control that results in a sudden, significant, and prolonged reduction in income or a catastrophic increase in financial obligations.

Freddie Mac: A nonrecurring or isolated circumstance, or set of circumstances, that was beyond the borrower’s control and that significantly reduced income and/or increased expenses and rendered the borrower unable to repay obligations as agreed, resulting in significant adverse or derogatory credit information.

FHA Fannie Mae Freddie Mac
Foreclosure •3-year wait. •7-year wait from the completed foreclosure sale date.
•3-year wait if borrower can show extenuating circumstances (additional underwriting requirements apply for 4 years after 3-year waiting period).
•7-year wait for a second home, investment opportunity, or cash-out refinancing.
•5-year wait from the completed foreclosure sale date.
•3-year wait if borrower can show extenuating circumstances.
Short Sale •No wait if not in default.
•3-year wait if in default at closing of short sale.
•2-year wait if the borrower puts 20% or more down.
•4-year wait if the borrower puts 10-20% down.
•7-year wait if the borrower puts less than 10% down.
•2-year wait time if borrower can show extenuating circumstances and puts 10% or more down.
•4-year wait.
•2-year wait if borrower can show extenuating circumstances.
Deed in lieu of foreclosure •Same as FHA’s foreclosure policy. •Same as Fannie’s short sale policy. •Same as Freddie’s short sale policy.
Bankruptcy Chapter 7 (liquidation):
•2-year wait from the discharge date of the bankruptcy.
•1-2 year wait if borrower can show extenuating circumstances.

Chapter 13 (repayment plan):
•1-year wait from the discharge date of the bankruptcy.

Chapter 7 or Chapter 11 (reorganization, usually involving corporations or partnerships):
•4-year wait from the discharge or dismissal date of the bankruptcy.
•2-year wait from the discharge or dismissal date may be accepted if borrower can show extenuating circumstances.

Chapter 13:
•2-year wait from the discharge date or 4-year wait  from the dismissal date.
•2-year wait for a dismissal if borrower can show extenuating circumstances.

Multiple bankruptcies:
•5-year wait if the borrower has filed more than one bankruptcy petition in the past 7 years.
•3-year wait if borrower can show extenuating circumstances.

Chapter 7 or Chapter 11:
•Same as Fannie’s bankruptcy policy.

Chapter 13:
•2-year wait from the discharge date of the bankruptcy.
•2-year wait from the discharge or dismissal date of the bankruptcy if borrower can show extenuating circumstances.

Multiple bankruptcies:
•Same as Fannie Mae’s policy for multiple bankruptcies.

Source: FHA Handbook, Fannie Mae Selling Guide, Freddie Mac Selling Guide


Published: April 8, 2013 By: © Copyright 2015 NATIONAL ASSOCIATION OF REALTORS®

How to Replace a Light Switch

How to Replace a Light Switch

You flip a light switch and nothing happens. What gives?

If it’s not a burned-out light bulb, chances are the switch itself is faulty. The easiest and least expensive solution is to replace the switch altogether. You won’t need a $90-per-hour electrician — it’s an easy DIY job.

What Kind of Switch Do I Need?

The most common type of light switch is single-pole, which controls power to a light source simply by flipping it to the on or off position. It has two terminals: One for the incoming hot wire, the other for the outgoing. It also may have a ground wire.

  • A single-pole light switch costs less than $5 to replace. Go for a rocker switch that’s easy to use and adds sensible universal design to your home.
  • Three-way switches let you control the same light from two different locations. When you flip one switch to the on position, the other switch is simultaneously moved to the on position. A three-way switch will cost less than $5.
  • Likewise, four-way switches let you control the same light from three or more locations. Each four-way switch costs in the $10-$15 range.
  • Double-pole switches have four terminals instead of two, so they’re used for outlets and appliances that require 240-volt circuits. They also come in rockers. Each double-pole switch will cost $7-$15.

What if I Want a Dimmer?

Dimmer switches not only add instant mood lighting to a room, they save energy, too — for every 10% you lower a light bulb’s brightness, you’ll double the bulb’s life.

The only hitch: CFLs often don’t work with dimmers, so you’ll have to use LEDs or halogen incandescents in your fixtures. Dimmers come in rotary, slide, touch-activated, or digital varieties; the cheapest is rotary and will cost less than $10.

So How Do I Replace My Light Switch?

It’s easy. All you’ll need are:

  • Phillips-head screwdriver
  • Flathead screwdriver
  • Voltage tester
  • Needle-nosed pliers

Important: Before you attempt any repairs, cut power to the light switch by switching off the circuit breaker at your electrical service box.

Learn More About Lighting

  • Do You Know Which Light Bulb to Buy?
  • LEDs Aren’t Cheap: Here’s How to Get the Most for Your Money
  • It’s Not True! Incandescent Light Bulbs Aren’t Banned


By: Courtney Craig: © Copyright 2015 NATIONAL ASSOCIATION OF REALTORS®


13 Lucky Superstitions for Your Home

13 Lucky Superstitions for Your Home

Published: January 8, 2013

Is 13 an unlucky number? We don’t think so. But just to be safe, we found 13 superstitions that just might bring your home a little luck this year.

1. Never walk under a ladder. This is believed to be the devil’s territory. If there’s no way around it, protect yourself by crossing your fingers or making the fig sign with your hand — closed fist, with the thumb between your index and middle fingers.

2. When you move out of a house, leave the broom behind. Along with the dust and dirt of your old home, old brooms also carry the negative aspects of your life. A new broom signifies a fresh start in your new home.

3. Carry bread and salt with you when you first enter a new home (along with your new broom). After crossing the threshold, sprinkle salt in front of the door to keep evil spirits away.

4. It’s bad luck to carry a hoe into the house. If you do it by mistake, carry it out by walking backwards through the same door — it’ll reverse the bad luck.

5. Stuff fennel, an herb with yellow flowers and feathery leaves, into your keyhole or hang it over the door to protect your home from witches.

6. Paint your front porch blue to ward off ghosts. This superstition, which originated in Southern plantation homes, tells us that “haints,” or ghosts, can’t cross water. Painting the porch “haint blue” would confuse ghosts into thinking the porch was made of water, so they wouldn’t enter the home.

7. Never put shoes on a dresser or table. Bad luck will ensue, according to a Jewish superstition.

8. In fung shui architecture, there should be windows on a house’s east side to face the sunrise. A 27-story home in Mumbai, valued at $1 billion, currently sits empty because its owner believes the lack of windows on the east side will bring him bad luck.

9. On Chinese New Year, which will be celebrated on Feb. 10 this year, you should clean your home thoroughly to get rid of bad luck and accept new luck into your home. Also decorate your doors and windows with posters featuring the word “fu,” which means good luck and happiness.

10. According to a Norse superstition, placing an acorn on a windowsill will protect a house from being struck by lightning. Window blind pulls decorated like acorns are still popular.

11. Never open an umbrella inside. Doing so would be an insult to the sun god, as umbrellas are commonly used for protection against the sun.

12. Don’t move into a new place on a Friday, Saturday, or rainy day. These days are unlucky and may prevent you from ever truly settling into your new home. According to Indian superstition, Thursday is the luckiest day to move in.

13. Never pound a nail after sunset, or you’ll wake the tree gods. Wouldn’t want to do that.

Have any superstitions to add to the list?


By: Courtney Craig:© Copyright 2015 NATIONAL ASSOCIATION OF REALTORS®

The owner of this website has made a commitment to accessibility and inclusion, please report any problems that you encounter using the contact form on this website. This site uses the WP ADA Compliance Check plugin to enhance accessibility.