8 Cleaning Tips and Tricks to Keep Things Cleaner Longer

8 Cleaning Tips and Tricks to Keep Things Cleaner Longer

Giving your home that fresh feeling takes some elbow grease, but these ideas make it easier to fight those dirty jobs faster and keep it cleaner longer.

1.  Defy Dust

Trick: You can combat dust by adjusting your home’s humidity level.

The facts: Low humidity levels cause static electricity. Not only does static attract dust, it makes it stick, so it’s difficult to remove. High humidity causes problems, too — it’s an ideal environment for dust mites. These microscopic critters are a double threat: They’re a common allergen, and they contribute to dust production. There are as many as 19,000 dust mites in half a teaspoon of house dust, according to the American College of Allergy, Asthma, and Immunology. Yuck!

Next steps: Keep your home’s humidity level between 40% to 50%. That’ll eliminate static while decreasing dust mite growth.

Related: Measure Your Home Humidity Level

Tip:
Make it easy to keep your household vents dust free. Remove and wash them once a year with mild soap and water. After they’re clean and completely dry, apply a liberal coat of car wax; then buff.

2.  Keep Glass Shower Doors Crystal Clear

Trick: You can eliminate soap scum build-up by coating your glass shower doors with a rain-repellant product made for car windshields.

The facts: When applied to glass, products like these create an invisible barrier that causes water, oils, and debris (like soap suds) to bead and roll off.

Next steps:
Find this product anywhere that sells basic auto supplies. You’ll know it’s time to reapply when water stops beading on shower doors. Keep in mind, windshield rain repellants were made to treat glass, not plastic.

Tip:
Automatic shower cleaners claim to let you clean your shower and tub less frequently — like every 30 days. After you finish bathing, the gadget will douse your shower and tub with a cleanser that prevents soap scum build-up while combating mold and mildew. You can buy automatic shower cleaners at most big-brand retailers, like Target and Walmart.

Related:

  • Green Clean Your Bathroom for Pennies
  • 5 Things You Forgot to Clean in Your Bathroom

3.  Seal Your Stone Countertops

Why:
Natural stone countertops, including granite and marble, are porous, so if they’re not sealed, liquids like red wine, juice, or soy sauce can stain them.

The facts: A countertop sealer repels stains by causing spills to bead instead of getting absorbed. Likely, your contractor sealed your countertop when it was installed.

Next steps: To keep your countertops in tip-top shape, re-apply sealer twice a year. To see if you need a fresh coat, pour a tiny bit of water on your natural stone countertop. If the water doesn’t bead or doesn’t stay beaded for two to three minutes, it’s time to reseal.

Tip:
Shopping for stone countertops? Slabs with lots of swirls or veins tend to be more porous.

4.  Protect Your Furniture and Carpets

Why: Protective furniture sprays and carpet sealants guard against inevitable spills. Some of these products also protect fabrics from fading and resist mold, mildew, and bacteria.

The facts: Protective sprays and sealants, like Scotchgard and Ultra-Guard, cause liquids to bead on the surface instead of being absorbed.

Next steps: Apply the appropriate sealer once a year after a deep upholstery and carpet cleaning.

Tip: In the future, you may not need to buy a protective furniture spray or carpet sealer thanks to a new fabric coating that repels dirt and water. It’s made by Liquipel, the company that created a water-shield substance to protect cell phones, MP3 players, and other electronic devices. The company plans to release a water-repellent clothing line next year. We bet household fabrics and materials will be next.

Rust-Oleum introduced a similar product, NeverWet, last year. But the company doesn’t recommend it for furniture, because the product “will repel liquids when applied to fabric, but will change the appearance.“

5.  Give Oven-Cleaning Products the Boot

Why: Most cleaners give off noxious fumes and make a horrible mess.

The facts: The basic ingredient in many oven cleaners is lye, which can burn your eyes and your skin; it’s usually fatal if swallowed.

Next steps: Use a wet pumice stone to scrape off dirt and grease. It’s faster than oven cleaner and toxin-free.

Tip: Need to wipe your range or anything else down? You can bust filth faster by heating up a clean, damp sponge or cloth in a microwave for 30 seconds before wiping with or without a cleaning product. Put on rubber gloves before you pick up that hot sponge.

Related: Green Clean Your Kitchen to Avoid Chemicals

6.  Keep Things Tidy with Quick Touch-Ups

Why: Small cleaning projects prevent filth from building up.

The facts: When you spot clean daily, you can prevent smudges from staining, banish dust bunnies, and even combat allergens.

Next steps: Create a spot-cleaning kit so you can address small, dirty situations in minutes.

  • Cleaning pads are great for eradicating dirty fingerprints on walls and light switches.
  • Damp micro-cloths can reduce airborne dander when used daily to wipe down pets.
  • Dry sweeper cloths can quickly pick up dust and dry dirt off floors, shelves, and electronics.

Tip: Keep stored items cleaner longer by shutting closets, cabinets, and drawers, so circulating dust and dirt can’t get in.

7.  Ditch Your Outdated Low-Wattage Bulbs

Why: Good lighting can make you and your home look and feel great.

The facts: A room lit with low-wattage incandescent bulbs and compact fluorescents can look dark and dingy. “Daylight” bulbs brighten things up. These full-spectrum light bulbs mimic natural light, so they give better visual accuracy. Bonus: Like sunlight, these bulbs can boost your mood.

Next steps: When shopping for bulbs, look for those marked “daylight” that have a range between 5,000 to 6,500 kelvins.

Tip: Don’t understand the difference between warm white bulbs and daylight bulbs? Check out the video for a side-by-side comparison.

Related:

  • Save Energy and Feel Better with Daylighting
  • Did You Know that Dirty Light Bulbs Waste Energy?

8.  Use a Cleaner Sweeper

Why: Brooms hold on to dirt.

The facts:
You don’t want to just push dirt around when you sweep. You can use spray dusters (like the ones used on computer keyboards) to blow dust bunnies off brooms, and soapy water to get rid of the grime. But how about combing dirt off broom bristles while you’re sweeping?

Next steps: Check out the Broom Groomer. It was invented by a guy who cut his hand on broken glass when it got stuck on the bristles of his broom. Watch the video to see how it works.

Tip: About 80% of dirt in homes walks in from the outside. Stop dirt with a bristly doormat before it’s tracked inside



By: Deirdre Sullivan© Copyright 2015 NATIONAL ASSOCIATION OF REALTORS®


9 Easy Mistakes Homeowners Make on Their Taxes

9 Easy Mistakes Homeowners Make on Their Taxes

Published: January 5, 2015

Don’t rouse the IRS or pay more taxes than necessary — know the score on each home tax deduction and credit.

As you calculate your tax returns, be careful not to commit any of these nine home-related tax mistakes, which tax pros say are especially common and can cost you money or draw the IRS to your doorstep.

Sin #1: Deducting the wrong year for property taxes

You take a tax deduction for property taxes in the year you (or the holder of your escrow account) actually paid them. Some taxing authorities work a year behind — that is, you’re not billed for 2013 property taxes until 2014. But that’s irrelevant to the feds.

Enter on your federal forms whatever amount you actually paid in that tax year, no matter what the date is on your tax bill. Dave Hampton, CPA, a tax department manager at the Cincinnati accounting firm of Burke & Schindler, has seen homeowners confuse payments for different years and claim the incorrect amount.

Sin #2: Confusing escrow amount for actual taxes paid

If your lender escrows funds to pay your property taxes, don’t just deduct the amount escrowed. The regular amount you pay into your escrow account each month to cover property taxes is probably a little more or a little less than your property tax bill. Your lender will adjust the amount every year or so to realign the two.

For example, your tax bill might be $1,200, but your lender may have collected $1,100 or $1,300 in escrow over the year. Deduct only $1,200 or the amount of property taxes noted on the Form 1098 that your lender sends. If you don’t receive Form 1098, contact the agency that collects property tax to find out how much you paid.

Sin #3: Deducting points paid to refinance

Deduct points you paid your lender to secure your mortgage in full for the year you bought your home. However, when you refinance, you must deduct points over the life of your new loan.

For example, if you paid $2,000 in points to refinance into a 15-year mortgage, your tax deduction is $2,000 divided by 15 years, or $133 per year.

Related: How to Deduct Mortgage Points When You Buy a Home

Sin #4: Misjudging the home office tax deduction

The deduction is complicated, often doesn’t amount to much of a deduction, has to be recaptured if you turn a profit when you sell your home, and can pique the IRS’s interest in your return.

But there’s good news. There’s a new simplified home office deduction option if you don’t want to claim actual costs. If you’re eligible, you can deduct $5 per square foot up to 300 feet of office space, or up to $1,500 per year.

Sin #5: Failing to repay the first-time homebuyer tax credit

If you used the original homebuyer tax credit in 2008, you must repay 1/15th of the credit over 15 years.

If you used the tax credit in 2009 or 2010 and then within 36 months you sold your house or stopped using it as your primary residence, you also have to pay back the credit.

The IRS has a tool you can use to help figure out what you owe.

Sin #6: Failing to track home-related expenses

If the IRS comes a-knockin’, don’t be scrambling to compile your records. File or scan and store home office and home improvement expense receipts and other home-related documents as you go.

Sin #7: Forgetting to keep track of capital gains

If you sold your main home last year, don’t forget to pay capital gains taxes on any profit. You can typically exclude $250,000 of any profits from taxes (or $500,000 if you’re married filing jointly).

So if your cost basis for your home is $100,000 (what you paid for it plus any improvements) and you sold it for $400,000, your capital gains are $300,000. If you’re single, you owe taxes on $50,000 of gains.

However, there are minimum time limits for holding property to take advantage of the exclusions, and other details. Consult IRS Publication 523. And high-income earners could get hit with an additional tax.

Sin #8: Filing incorrectly for energy tax credits

If you made any eligible improvements in 2014, such as installing energy-efficient windows and doors, you may be able to take a 10% tax credit (up to $500; with some systems your cap is even lower than $500). But keep in mind, it’s a lifetime credit. If you claimed the credit in any recent years, you’re done.

Installing a solar electric, solar water heater, geothermal, or small wind energy system can also make you eligible to take the Residential Energy Efficient Property Credit.

To claim the deduction, you have to use the complicated Form 5695, which can mean cross-checking with half a dozen other IRS forms. Read the instructions carefully.

Sin #9: Claiming too much for the mortgage interest tax deduction

Taxpayers are allowed to deduct mortgage interest on home acquisition debt up to $1 million, plus they can also deduct up to $100,000 in home equity debt.

This article provides general information about tax laws and consequences, but shouldn’t be relied upon as tax or legal advice applicable to particular transactions or circumstances. Consult a tax professional for such advice.


By: G. M. Filisko© Copyright 2015 NATIONAL ASSOCIATION OF REALTORS®


10 Tips for Saving Energy in the Laundry Room

10 Tips for Saving Energy in the Laundry Room

Knowing how to save energy while doing laundry is a good start to helping you trim energy costs in your home.

Here’s a fun laundry room fact: The average American family washes 300 loads of laundry a year, spending about 68 cents per load, for a yearly total of $204.

Most laundry room expenses come from heating water for washing and heating air for drying. But these costs aren’t set in stone, and you can save money by following these energy-reducing tips.

Get the Most From Your Washer

Ninety-percent of the cost of running a washer goes to heating water. Only 10% goes to electricity needed to run the motor. Here’s how to save money while getting your clothes clean.

1. Use cold water. You can save a bundle by washing your clothes in cold water, which is a perfectly efficient way to clean most clothes. Washing a load in cold water costs only about 4 cents, compared to washing in hot/warm water for 68 cents. Annually, you’ll save $40 with an electric water heater and $30 with a gas water heater.

2. Run full loads. It takes as much electricity to wash a small load as it does a full one, so you’ll save money by only washing full loads.

3. Update your machine. If you don’t already have an Energy Star-certified washer, it’s time to get one. These energy-efficient machines use 15 gallons of water per load, compared to 23 gallons for a standard machine. If a gallon of water costs you a penny (the U.S. average), you’ll save $24 a year.

4. Buy a front-loading machine. They use two-thirds less water than top-loaders, reducing water and heating costs.

Related: How to Buy a Washer

Get the Most From Your Dryer

5. Spin faster. The faster you spin clothes in the washer, the less time they’ll need in the dryer. If you have the option, chose a faster spin cycle.

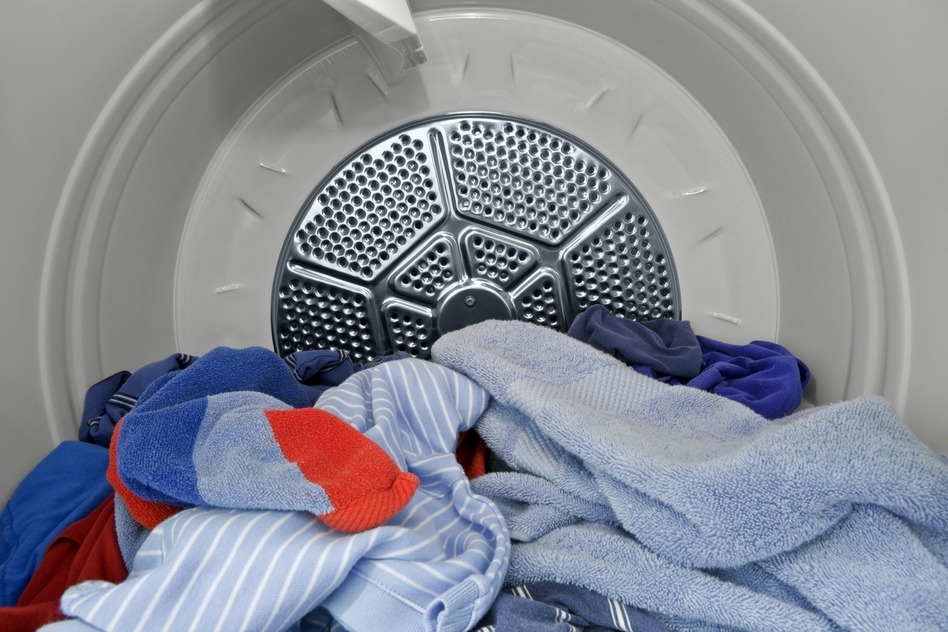
6. Clean lint filters. Remove lint after every load, and clean ducts annually. Your clothes will dry faster, using less energy.

7. Warm it up. If possible, locate your dryer in a warm laundry room rather than in a cold basement. The warmer the air coming into the dryer, the less energy your machine will use to heat it up.

8. Go gas. Drying a load of laundry in a gas dryer generally costs 15 to 33 cents less per load than an electric dryer (32 to 41 cents).

9. Keep it full. Dry only full loads, and try not to mix fast and slow-drying clothes — a practice that wastes energy by continuing to dry clothes that are no longer wet.

10. Let nature help out. When the weather is warm, cut your energy costs by drying clothes outside on a clothesline. If HOA regulations don’t allow you to set up a clothesline outside, then use a stand-alone drying rack inside.


By: Douglas Trattner© Copyright 2015 NATIONAL ASSOCIATION OF REALTORS®


How to Help Your Appliances Last Longer

How to Help Your Appliances Last Longer


Is it just me or does it seem that appliances don’t last as long as they’re supposed to?
Our dryer died after 11 years (two years before a typical dryer’s lifespan is up), and we repaired our refrigerator three times before it reached its 12th birthday (it’s supposed to live for 13 years).

Full disclosure: I wouldn’t give myself an A in appliance care. But in the future, I vow to keep up on regular maintenance that’ll keep my new dryer running longer than my last one.

Rob Carpenter, owner of a Mr. Handyman franchise in Maryland, shares some insider tips about how to extend the life of home appliances.

Refrigerators That Last

Refrigerators break down when doors don’t close tightly, forcing motors to work overtime to keep food cold. To test your door seal, close the door on a dollar bill: If the bill slips, you’ve got a problem that requires refrigerator maintenance.

Magnetic strips embedded in gaskets around refrigerator doors make doors close snugly, but they routinely wear out and should be replaced or re-magnetized every couple of years. If you’re handy, re-magnetizing is a DIY job — just run a powerful magnet along each side of the gasket, in the same direction, about 50 times.

If messing around with the refrigerator door is beyond your pay grade, call a professional. Pros typically charge around $242 to repair door problems.

Related: How to Buy a Refrigerator

Washing Machine Endurance

Loose change banging around your washer drum can cause dents, chipped paint, and rust, so make sure to empty pockets before washing clothes.

Also, maintain your washing machine by regularly cleaning or replacing filters that trap water sediment before it enters your machine. Filters, which look like thimbles, are located in the back where supply hoses attach to the machine. Remove hoses and either poke out debris with a tip of a flathead screwdriver, then remove and wash the filter, or replace it.

Dryers That Keep on Drying

In addition to regularly cleaning out your dryer’s lint trap and exhaust hose, inspect the exterior vent — hot air must escape your house unimpeded.

Make sure the hinged exterior vent pops open when the dryer runs. If it doesn’t, open the cover and scrape out lint with the end of a hanger or dryer vent brush ($13). If your vent is louvered, clean slats with an old toothbrush.

When my dryer recently lost its heat, we called a repair guy who discovered a family of sparrows living in the vent. He sucked the birds out (poor birdies), and then we covered the vent opening with a wire mesh.

Related: The World’s First Solar-Powered Laundry Dryer
Dishwasher Extenders

Here are ways to keep your dishwasher stress-free and long-lasting:

  • Prime your dishwasher by running the hot water in your sink before you begin the cycle. This will clean your dishes with hot water from the very start of the cycle.
  • Once a week, run your dishwasher empty except for a cup of vinegar, which will keep it shining and smelling fresh.
  • Clean out food traps regularly.
  • Wipe clean the seals around dishwasher doors.

Related: Which Homemade Dishwasher Soap Recipe is Best?
Toaster Thoughts

Darkly toasted bread will burn out your toaster two years earlier than lightly toasted bread. So if you can live with lightly crisp rather than almost burnt, you’ll get a few more years out of your toaster. Just saying.

What’s your oldest appliance? What did you do to keep it humming?


By: Lisa Kaplan Gordon© Copyright 2015 NATIONAL ASSOCIATION OF REALTORS®


4 Money-Saving Ways to Add Style and Function to Your Yard

4 Money-Saving Ways to Add Style and Function to Your Yard

Homeowners wow with clever DIY outdoor projects on a budget.

No doubt, exterior upgrades like adding a wood deck or installing new garage door offer great return on investment that’s worth the cash outlay. But these four blogger projects will ratchet up your curb appeal for a lot less money. And your friends will think you hired a pro.

A Champagne Fence on a Beer Budget

DIY wood fence in a yard
Image: The Unique Nest

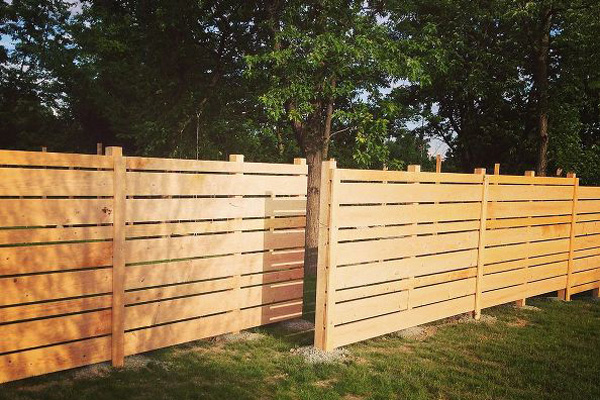
Laura, the blogger behind The Unique Nest, wouldn’t let her limited funds put a damper on her curb appeal vision. Her DIY fence enclosed a 1/4-acre side yard for only $1,000.

Not only is it beautiful, it’s functional: It keeps her kids and dog safely in the yard and adds privacy and value.

She and her hubby:

  • Sketched out their design to calculate how much lumber they needed. The project required around 250 pieces of rough-cut Hemlock wood.
  • Contacted Dig New York, a nonprofit that marked underground utility cables and pipes on the property, so they could dig safely.
  • Rented an auger — essentially a giant drill — to dig holes. Their project required 29 fence posts. The rental made the four-day building process a lot easier.

Get all the project details.

Tip: If you have a wood fence, apply stain or wood preservative every three to five years to protect it from bugs, rot, and sun damage.

Related: A Guide to Fencing Options

The Landscaping Power of a Little Concrete Edging

Man smoothing concrete edge in a garden
Image: Home is Where They Love You

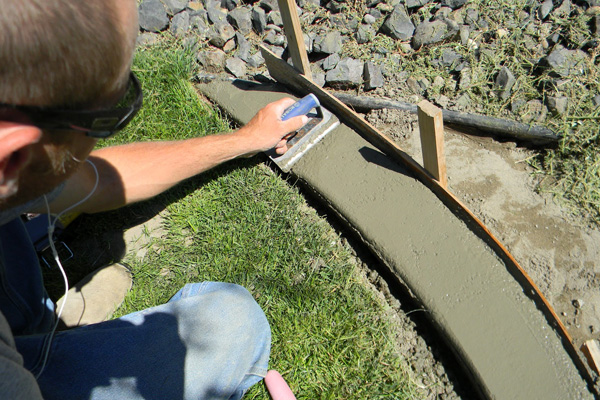
Besides adding spit and polish to your landscape, edging can help keep weeds and grass from overrunning your garden.

Camie, from the blog Home is Where They Love You, thinks her decorative and functional concrete curb looks like a pro job, and we agree. Even better, she created it for less than $20.

In a nutshell, she and her husband:

  • Crisply defined the garden’s border while also creating the curb’s form using bender board and wood stakes.
  • Poured the concrete into the form.
  • Used an edging trowel to smooth out the curb’s shape.

Get all the project details.

Related: Use a Garden Hose to Design Your Edging
A Driveway That Just Looks Expensive

DIY stamped concrete drivewayImage: DIY Fun Ideas

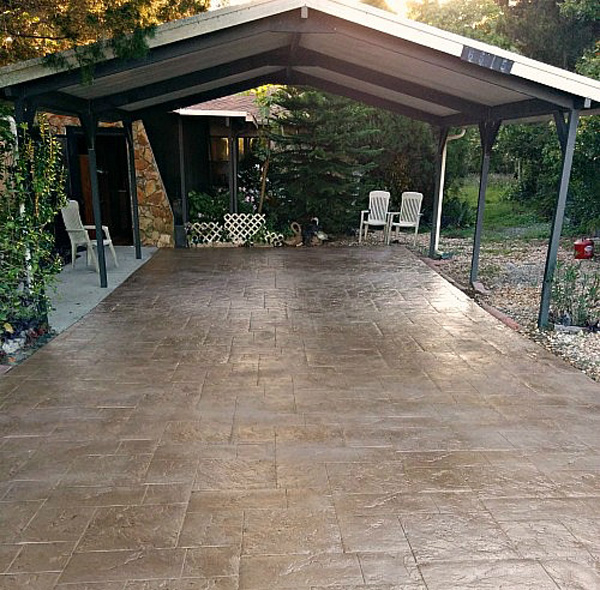
When Jenise from DIY Fun Ideas created this tile driveway at her mom and pop’s place, she became a serious contender for world’s best daughter.

But, here’s a secret: She says this concrete project is so easy that even a DIY novice can build it.

Here’s quick breakdown of the project’s three basic steps.

1.  Mix mortar in a bucket.
2.  Spread the mortar into a tile mold.
3.  Place the freshly minted tile into place on the driveway.

And get this: A pro might charge $10 per square foot to build a driveway like this one; Jenise’s project cost about $3 per square foot.

Get all the project details.

Related: Why You Should — and Shouldn’t — Go with Stamped Concrete
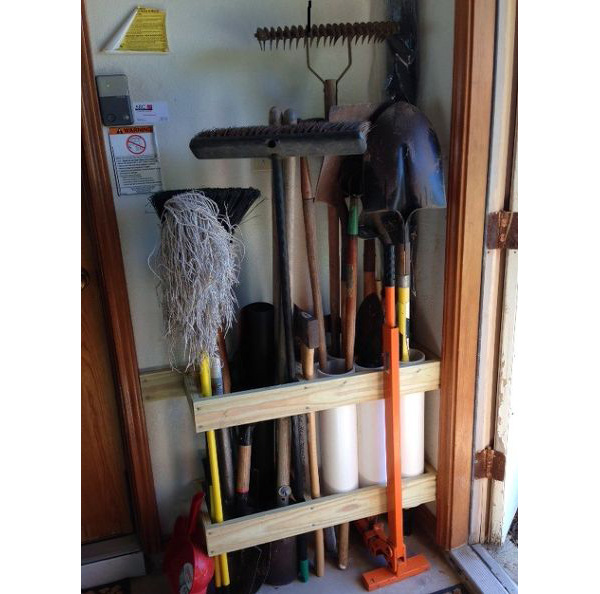
A Garden Tool Organizer to Love

DIY garden tool rack made with PVC pipe and woodImage: Ouina, HomeTalk.com contributor, Edinburg, Texas

Love to putter around in your garden, but hate trying to retrieve yard tools from a disorganized jumble in your garage?

Ouina, an avid tipster to the HomeTalk.com online community, concocted a clever built-in that keeps rakes, spades, trowels, and pruners neatly grouped in a garage or shed corner.

She:

  • Created the built-in using precut lumber and PVC pipe.
  • Attached the lumber used to create the wood frame to the wall studs.
  • Mounted PVC pipe onto the wood frame to keep it off the floor. This makes cleaning up around the built-in easier.

Get all the project details.


By: Deirdre Sullivan© Copyright 2015 NATIONAL ASSOCIATION OF REALTORS®

The owner of this website has made a commitment to accessibility and inclusion, please report any problems that you encounter using the contact form on this website. This site uses the WP ADA Compliance Check plugin to enhance accessibility.