Why Seller’s Remorse is Totally Common

Why Seller’s Remorse is Totally Common

Thinking of selling your home and worried you’ll regret it? Here’s how to cope.

Selling your house can be scary: It’s been your home, where you’ve lived and made memories. Chances are good it’s your most important asset and your biggest investment so far. Wrestling with the emotional heft of putting your home on the market is a difficult byproduct of real estate — but once a closing date has been set, the hard work is done. Right?

Actually, it’s not uncommon for sellers to feel pangs of regret when a buyer gets serious. If you’re feeling remorse for your soon-to-be-former home, don’t panic: You’re far from alone.

“When you’re selling a house, you’re not selling an object,” says Bill Primavera, a REALTOR® in Westchester County, N.Y., and “The Home Guru” blogger. “A house provides shelter and is probably the biggest thing we ever acquire, so it has a bigger impact on our life.”

The Origins of Seller’s Remorse

Moving is one of life’s biggest stressors. According to Daryl Cioffi, a Rhode Island counselor and co-owner of Polaris Counseling & Consulting, it’s one of the biggest instigators for depression.

“There’s a lot of latent stuff that happens when change occurs,” Cioffi says. Are you feeling insecure? Are you wondering if you made the right decision? Those feelings are normal reactions to change — but when they get tangled up with the sale of your biggest investment, they can be downright terrifying.

Here are some things you can do to help you manage the emotional roller coaster that comes with selling your home:

Do the Emotional Work Beforehand

Doing the emotional work before it’s time to sell is the best way to avoid regret.

“Look at the flaws of what makes it not the perfect home for you,” Cioffi says. Is it just too small for your family? Does your Great Dane need a bigger backyard? Ask yourself, “How can I close this chapter?”

That doesn’t mean you have to develop negative feelings toward your current home. You’re just trying to remind yourself of why you decided to move on.

“Begin the detachment process by saying: ‘This works for me now, but it won’t work for me forever,'” Cioffi says.

Once you’ve processed your reasons for selling the home, give yourself space to grieve the house you’ve loved and the memories you’ve made inside its walls. It’s okay to be sad you’ll never step inside your child’s first bedroom again; conversely, that’s not a reason to stay in a home forever. You can even have fun with your grief. Why not acknowledge your feelings by throwing a goodbye party for your house?

Focus On the Future

Working through your feelings early will make the selling process smoother, but even if you spent time grieving before putting your home on the market, it’s still normal to feel some pangs of sadness during closing. While it’s easy to tell yourself you’re overreacting, getting past remorse isn’t a simple process.

How can you do it? Say goodbye to your old home and prepare yourself for what’s next. If you’re still feeling remorse after the sale has gone through, don’t overthink it: Even if you did make the wrong decision — and chances are good you didn’t — it doesn’t matter. The deed is, quite literally, done.

The next step is distraction. If you’ve already moved into your new home, throw yourself into fixing it up. Redo the shelving in the kitchen. Start a garden. Primavera recommends taking your mind off of homes completely by picking up a new hobby or exploring your new neighborhood to find fun activities, like yoga or pottery classes.

“Keep your mind focused on what’s ahead,” says Cioffi. “The fact is, it’s done. Now what? Look forward and focus on how you can make this new place something to be excited about.”

If you’re still having problems adjusting to your new life, your old home might just be a stand-in for bigger problems: Perhaps a depression worsened by moving, or it has triggered anxiety about your life in general. A long-term struggle to resolve your grief indicates you should speak with a professional counselor about your situation.

Cioffi says a good therapist will help you answer the questions, “What’s going on that you can’t let go?” and “What’s keeping you from moving forward?”

No matter how deep your seller’s remorse may be, uncovering the reasons behind it and focusing on the future are the best ways to let go of the stress of leaving a former home behind. Give yourself time to get used to the change and focus on creating new memories. After all, the happy life you had in the home you sold was the reason you loved it so much. Someday, with a new set of memories made, you’ll love your new home just as deeply.

Related:

  • Selling Your House Next Spring? 5 Fall Projects to Do Now
  • How Much Do You Love Your Home?


By: Jamie Wiebe: © Copyright 2015 NATIONAL ASSOCIATION OF REALTORS®


What Was I Thinking? The Worst DIY Decisions

What Was I Thinking? The Worst DIY Decisions

Sometimes what seems like a good idea at the time just isn’t. Get tips from these DIY projects that didn’t go so well.

Finishing a DIY project feels amazing: Not only can you impress your friends, but you can spend every day walking by your masterpiece, gleaming with pride.

Unless DIY becomes DI-why?, that is. Even the most practiced do-it-yourselfers sometimes find themselves in the middle of projects that aren’t going according to plan. Don’t feel badly about the organizational system that fell over in your garage or the crooked tiling in the basement. It happens to everyone. Here’s proof.

Misunderstanding the Project Scope

Washington, D.C., homeowner Dave Coulon took on the task of making his own kitchen cabinets against the advice of his contractor friend, who told Coulon, “I’ll see you in two years.”

Coulon’s no DIY novice — he’s a shop teacher and has worked on his home’s dishwashers and toilets. Still, his friend’s words proved prophetic. The project was more than Coulon bargained for in more ways than one: Not only did it require a technical know-how beyond his ability, it required more physical space than was available in his home.

So while he was aiming to create a kitchen full of fancy, self-closing cabinets, he ended up with a crowded maze of poorly engineered, half-completed ones in his basement.

“I did the cabinets because I wanted to do it, but I would definitely not bother to make them again,” he says.

Related: How Hard is It to Install IKEA Cabinets?

Allowing a Renovation to Snowball

When a small project grows bigger and bolder, it can be painful to your budget and your schedule. Blogger Tanya of “Dans le Lakehouse” says most often, when her projects go awry, it’s due to snowballing beyond her original plans.

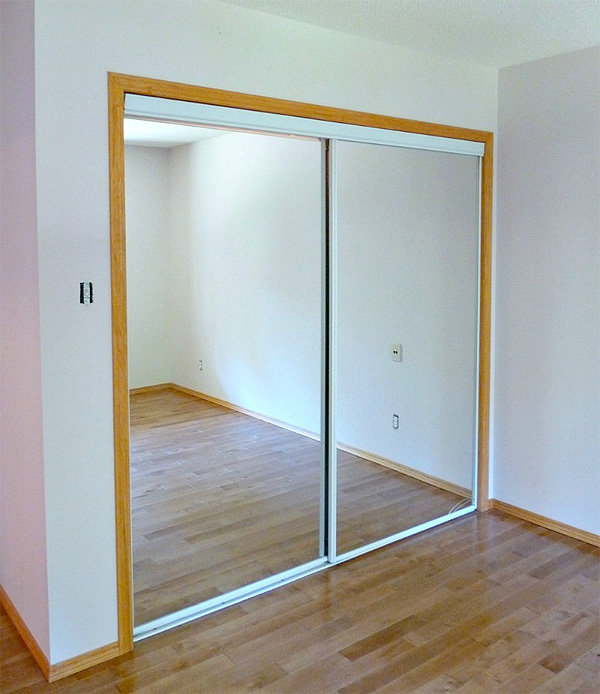
That’s what happened when she was changing the closet doors in her bedroom.

Old closet doors in a bedroomImage: “Dans le Lakehouse”

It was a presumably simple project that led to removing a closet organizer, then replacing newly discovered damaged flooring, then painting the entire closet bright orange — and ended with Tanya dropping $800 on new doors.

“We did run out of funds, energy, and time, so we patiently waited a year to save up for new closet doors,” she says. Eventually, they splurged on pretty white glass sliding doors, “so I can’t complain.”

How can you avoid a DIY project that soaks up more time, energy, and resources than intended? “Start with a lot of work reflection,” Tanya says.

Though the closet project was more than she bargained for, it was important to take the time to do it right once the additional issues were discovered.

“It’s best not to run away from the problem,” she says.

Skipping the Research

See a project on Pinterest or a blog that looks tempting? Don’t dive right in without researching the materials and how-to. Kerry Bindernagel, one half of the husband-and-wife DIY duo behind “Burritos and Bubbly,” learned this lesson the hard way.

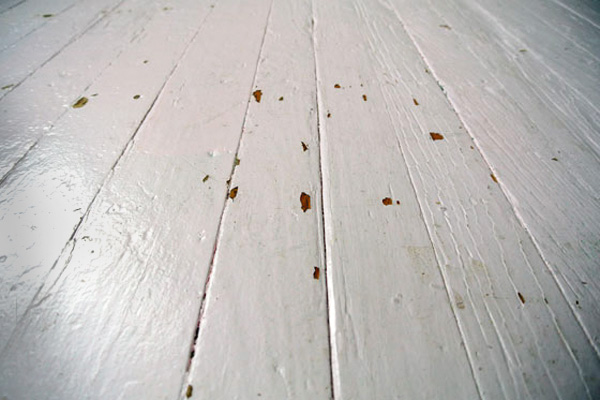
Like many homes built in 1890, the Bindernagel home featured painted wooden floors. Unhappy with the color — not to mention the chipped paint — they decided to go bold and paint their hardwood office floors pink. But they skipped a key step: They didn’t research anything about how to paint wood floors.

“And we did a horrible job,” Bindernagel says.

Assuming painting a floor was just like painting a wall, they purchased a cheap can of white floor paint and mixed it — by hand — with pink. After a quick sweep of the broom and swipe of the paint roller, they were done.

Until it chipped.

Before the painted floor was repaintedImage: “Burritos and Bubbly”

“Every time we’d move a piece of furniture or even push a chair back from the desk, the paint would stick to the furniture and peel,” Bindernagel says. “It turns out painting a wood floor isn’t the same as painting a wall.”

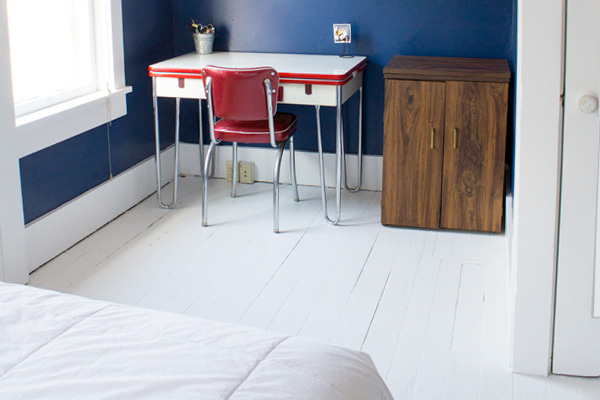
Their second try — four years later — was more successful.

“We read every single thing we could find about how to paint wood floors,” she says. “We sanded and vacuumed and washed and primed and painted by hand.” The paint was more expensive; they used three coats both of primer and color, waiting 24 hours for it to dry between each.

Results of properly painting a floorImage: “Burritos and Bubbly”

“It was annoying and difficult and a giant pain, but we learned that investing more time and effort and research made all the difference,” Bindernagel says.

Related: 5 Affordable DIY Flooring Ideas

Discovering the Devil in the Details

DIY is hard work. While some people have endless patience for tedious projects, sometimes it’s best to recognize when the drudgery isn’t for you.

Chelsea Mohrman of “Farm Fresh Therapy” recalls such an ambitious project: hand-stamping — with a potato.

“It was a very easy, yet tedious project,” Mohrman says. It becomes boring fast, and every repetitive motion you make is an opportunity to screw up. The project required cutting a slippery potato into small triangles, dipping them in paint, and carefully stamping them onto a shower curtain — again and again and again.

The end result might be stunning, but Mohrman isn’t sure it was worth all the work. Luckily, her project was just a shower curtain, but the hard-learned lesson can translate to bigger projects. If you’re considering hand-stamping a wall — or even taking on another project that requires repetitive steps, like tiling a floor or refinishing a kitchen full of cabinet doors — be prepared to be meticulous and dogged, and consider if such a detailed DIY is worth the mind-numbing effort.

“I dropped my potato more times than I can count and failed to keep my cat out of the studio,” Mohrman says. “Never again!”


By: Jamie Wiebe:© Copyright 2015 NATIONAL ASSOCIATION OF REALTORS®


Find the Best Agent to Sell Your House

Find the Best Agent to Sell Your House

Ask detailed questions about their experience and skills to help you find the right agent for your home sale.

Working with the right real estate agent can mean the difference between getting prompt, expert representation and feeling like you’re going it alone when selling your home. Here are 10 questions to ask when you’re interviewing agents.

1. How long have you been selling homes?

Mastering real estate requires on-the-job experience. The more experience agents have, the more likely they’ll be able to handle any curveballs thrown during your home sale.

2. What designations do you hold?

Designations like GRI (Graduate REALTOR® Institute) and CRS® (Certified Residential Specialist), which require that agents complete additional real estate training, show they’re constantly learning. Ask if agents have designations and, if not, why not?

3. How many homes did you sell last year?

Agents may tout their company’s success. An equally important question is how many homes they’ve personally sold in the past year; it’s an indicator of how active and aggressive they are.

4. How many days on average did it take you to sell homes?

Ask agents to show you this data along with stats from their local Multiple Listing Service (MLS) so you can see how many days, on average, their listings were on the market compared to the average for all properties in the MLS.

5. How close were the asking and sales prices of the homes you sold?

Sometimes sellers choose their agent because the agent’s suggested listing price is higher than those suggested by other agents. A better factor is the difference between listing prices and the amount homes actually sold for. That can help you judge agents’ skill at accurately pricing homes and marketing to the right buyers. It can also help you weed out agents trying to dazzle you with a lofty sales price just to get your listing.

6. How will you market my home?

The days of agents putting a For Sale sign in the yard and hoping for the best are long gone. Look for an agent who does aggressive and innovative marketing, especially on the Internet.

7. Will you represent me exclusively?

In most states, agents can represent the seller, the buyer, or both in a home sale. If your agent will also represent buyers, understand and consent to that dual representation.

8. How will you keep me informed?

If you want weekly updates by email, don’t choose an agent who plans to contact you only if there’s an offer.

9. Can you provide references?

Ask to talk to the last three customers the agent assisted. Call and ask if they’d work with the agent again and if the agent did anything that didn’t sit well with them.

10. Are you a REALTOR®?

Ask whether agents are REALTORS®, which means they’re members of the NATIONAL ASSOCIATION OF REALTORS® (NAR). NAR has been an advocate of agent professionalism and a champion of homeownership rights for more than a century.

G.M. Filisko is an attorney and award-winning writer who’s worked with many real estate agents in the past 20 years. A frequent contributor to many national publications including Bankrate.com, REALTOR® Magazine, and the American Bar Association Journal, she specializes in real estate, business, personal finance, and legal topics.


By: G. M. Filisko:© Copyright 2015 NATIONAL ASSOCIATION OF REALTORS®


Does Landscaping Give a Good Return on Investment?

Does Landscaping Give a Good Return on Investment?

Published: November 8, 2012

Boost Your Roost contest points up what an appraisal is and isn’t and the fact that home value is more than financial.

At the end of episode 5 of our Boost Your Roost series, we’ll reveal the post-landscaping appraisal and value add for the contest winners’ backyard makeover, which included installing a door, pouring a concrete patio, and adding plants.

If you landscape your yard, will you get the same ROI as the Smiths did?

Nope. You might appraise higher. Or lower. Appraisals are hyper-local: An appraisal in Santa Maria, Calif., where the Smiths live, has nothing to do with the outcome of an appraisal in MacLean, Va., or even nearby San Luis Obispo, Calif.

Appraisers give their best opinion of value based on how a home’s features stack up against those of similar homes recently sold nearby. In addition, appraisal values shift with market changes. A home appraised at $150,000 today might appraise higher or lower two months from now.

So is a landscape makeover worthwhile? You bet!

Like any home improvement, it enhances qualify of life. “Having a usable yard is huge” especially for Aaron, who uses a wheelchair, says Sandy MacCuish, who appraised the Smiths’ home before and after the makeover. “The Smiths can now use the entire backyard, and it’s accessible from the dining room. The traffic flow is good, and the door brings in more light than the window did.”

And when it comes time to sell, landscaping is the first thing people will notice. In fact, many people make up their minds about a property within the first few seconds.

But don’t do a landscaping project just to flip a house. You won’t get your money back, MacCuish notes. In that case, you’re better off redoing a dated kitchen or bath, he says.

Other exterior projects — yea curb appeal! — that typically offer a good ROI, according to “Remodeling” magazine’s annual “Cost vs. Value Report,” are:

  • Exterior door replacements. On average nationally, a steel entry door replacement recouped 101.8% of its cost in the 2015 survey.
  • Midrange garage door replacements recoup 88.4% of the cost.
  • Wood deck additions recoup more than 80%.


By: Christina Hoffmann © Copyright 2015 NATIONAL ASSOCIATION OF REALTORS®


8 Tips to Make Your Remodeling Process More Energy Efficient and Your Home Healthier

8 Tips to Make Your Remodeling Process More Energy Efficient and Your Home Healthier

By: Dona DeZube

Published: October 18, 2012

As long as you’re remodeling, why not cut your utility bill and make your home a bit healthier?

Saving energy wasn’t on the list of reasons we’re finally ripping out the kitchen in our mid-century home (green-veined, imitation marble laminate countertops figured much more prominently). But, a session at the recent 2012 Remodeling Show in Baltimore clued me in as to why adding a few simple tasks to our remodeling plan could lower our home’s energy bill, get rid of some of the annoying hot and cold spots in our house, and make our home less hospitable to mold and other allergens.

Carl Seville, author of Green Building: Principles and Practices in Residential Construction, shared some simple, inexpensive ways to make remodels and additions more energy efficient from the standpoint of energy usage and conservation of resources.

Try these eight tips from Seville:

1. Check for water intrusion, condensation, and excess moisture before you begin the project. Fixing those issues during remodeling can improve your home’s indoor air quality (excess moisture encourages mold).

2. Use the least amount of framing allowed by your building code when adding walls. Not only will you have to pay for less lumber and fewer nails, the contractor will have more room to put insulation in your walls, making your home more energy efficient.

3. Resist the urge to splurge on multiple shower heads. Opt for a single low-flow shower head rather than installing a car wash-style plethora of shower heads.

4. If possible, add new HVAC ducts to parts of your home that are heated and cooled, rather than placing them in a space with unconditioned air (like the attic). If that’s not possible, insulate the ducts. Have an HVAC diagnostician analyze your system to make sure it’s sized correctly and balanced to properly exchange old and new air.

5. Be sure to insulate around recessed lights that protrude into un-insulated attic spaces — these are major sources of air leaks.

6. If you’re wasting water, you’re wasting energy. Look at high-efficiency or solar water heaters, and insulate your water pipes. If you want hot water faster, move the water heater closer to the faucet or install demand pumps to drive hot water to the fixture.

7. Install wall-mounted efficiency toggle switch plates for the outlets where you plug in your televisions and computers to make it easy to cut off the power to electronics you’re not using.

8. A humidistat that automatically turns on the bathroom fan when moisture rises beats depending on teenagers or tenants remembering to use the fan. Reducing bathroom moisture reduces the chances you’ll have mold.

When I pull the kitchen cabinets off the wall, I’m going to use caulk to seal between the wallboards and the floorboards before I put down new flooring and install the new cabinets. And since I’ll have the caulk out, I’m going to seal the top of window trim, something my home’s builder didn’t do.

Read more: http://members.houselogic.com/articles/how-to-make-your-remodel-more-energy-efficient/preview/#ixzz3kUz87biz
Follow us: @HouseLogic on Twitter | HouseLogic on Facebook

The owner of this website has made a commitment to accessibility and inclusion, please report any problems that you encounter using the contact form on this website. This site uses the WP ADA Compliance Check plugin to enhance accessibility.