5 Smart Home Products

5 Smart Home Products

Published: January 28, 2013

Would you buy any of the wow products HouseLogic’s intrepid reporter spotted at the home builder show?

After hiking miles of aisles past thousands of products (you’re welcome!) displayed at the 2013 International Builders Show in Las Vegas, I found a few designed to make your life easier, cooler, more efficient, and more fun. (Of course, many come with a steep price.) Come on, wouldn’t you want these?

Music in Your Showerhead
Showerhead

Credit: Kohler

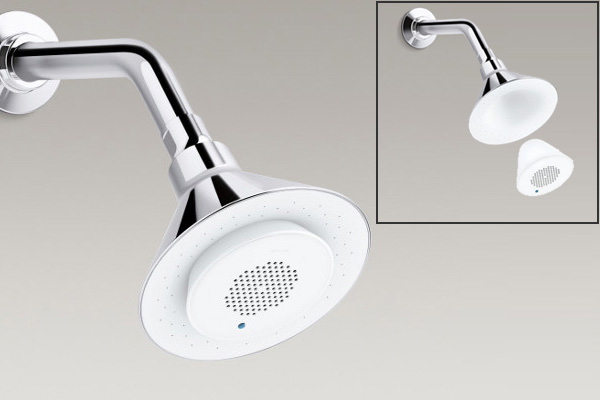
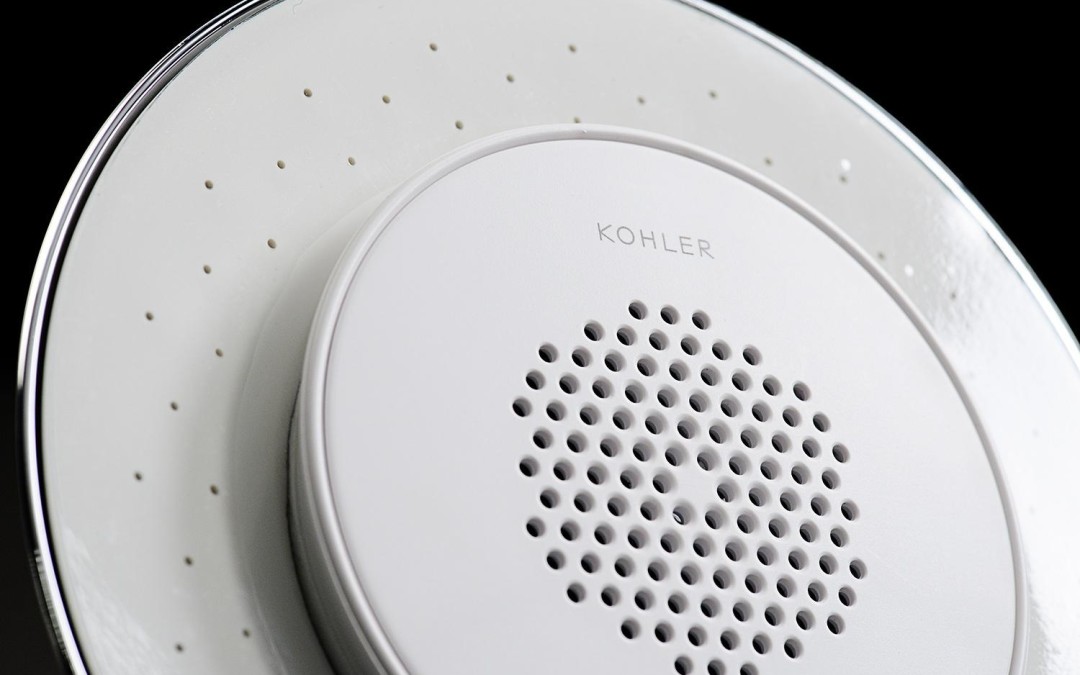
Closet crooners, rejoice! Kohler’s Moxie shower head features a Bluetooth-enabled speaker so you can pipe your favorite playlist directly into your morning shower. The waterproof (obviously) wireless speaker attaches with a magnet to the shower head so that — even if you can’t carry a tune — you can detach it post-shower and carry the little speaker with you while you decide which socks to wear. The lithium-ion battery gives 7 hours of play and is rechargeable via USB. List price is $199.

Music Inside Your Bathtub

Can’t help but give innovative Kohler another shout-out for its VibrAcoustic hydrotherapy technology that lets you transfer your music directly into your tub via an MP3 device. Plug in your iPod, pick some mood music, and VibrAcoustic makes the walls of your tub — and the surrounding water — gently vibrate to the rhythms of your tunes. Talk about an immersive musical experience!

VibrAcoustic technology adds $2,400 to the price of your tub. Need even more fun? Include chromatherapy (colored lights) for another $600.

Solar-Ready-or-Not HVAC

Solar HVAC

Credit: John Riha for HouseLogic

Sure, you’d like to go solar, but maybe you’re not sure how to go about it. No worries — Lennox SunSource solar-ready air conditioners and heat pumps are ready when you are. When you decide to go solar and save on your utility bills, an HVAC pro simply plugs compatible solar panels into the unit — there’s no need to fool around with your breaker box or add a power converter.

If you’re not using your HVAC, the unit simply routes the juice from your solar panels into your home to power your appliances, lights, and other electrical goodies.

A high-efficiency unit runs $2,500 to $3,500 installed, depending on its capacity. Solar panels available through Lennox are $1,200-$1,500 per; a typical house uses at least eight.

You may be eligible for a federal tax credit of up to 9% of the cost of “solar-ready equipment.” If you also invest in solar panels, then you may be able to claim a federal tax credit of up to 30% for the whole kit and kaboodle. Check with your tax pro.

Don’t forget: Many states offer additional credits and rebates for solar installations.

Is Your Refrigerator in Hot Water?

Hot water refrigerator

Credit: John Riha for HouseLogic

Your refrigerator wants to be so much more to you than cold. The GE Café series has a touch-control, on-demand hot water dispenser that serves up H2O at four pre-set heat settings. You can get warm water for baking or piping hot water for instant oatmeal. Yup, you can get chilled water and ice cubes from the door-mounted dispenser, too. The sleek fridge retails for $3,299.

Even More Keyless
Fob lock

Credit: John Riha for HouseLogic

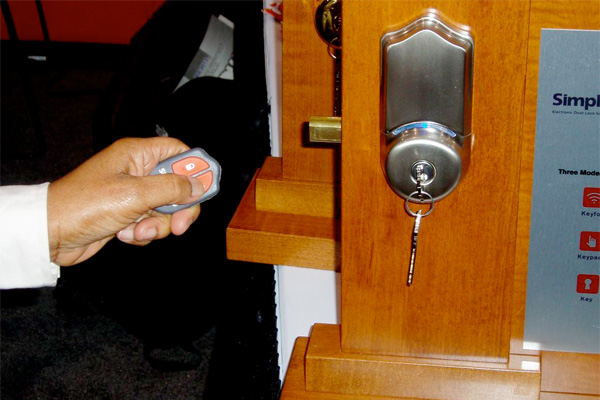
Biometric locks have been on the market for a while now, but Simplicikey takes high-tech security one step further: a handheld key fob locks and unlocks your door from up to 50 feet away.

Add the new Keycloud technology and you’ll be able to lock your door using your smartphone, tablet, and laptop. Use the Keycloud app to check the status of any of your exterior doors, even at a second house or rental property. Cost: $199-$279 (the app is free).

Private Screening
Bamboo curtain

Credit: John Riha for HouseLogic

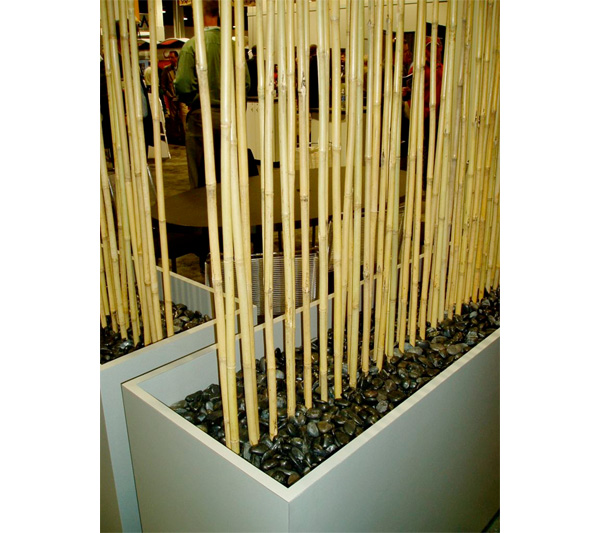
On the low-tech end of things, I saw this at a booth and thought it was pretty clever. No, it’s not an actual product, but part of a booth design. Take a large planter, fill it with polished rocks, and stick some bamboo stalks in it to create a tres modern fence. Use it as an indoor partition or outdoor privacy screen.



B: John Rihay © Copyright 2015 NATIONAL ASSOCIATION OF REALTORS®

15-Minute Home Makeovers

15-Minute Home Makeovers

Here are 7 house pick-me-ups that take about as much time as brewing a pot of coffee and fit your schedule whenever you have a few extra minutes.

Caught between your lack of time and the urge to give your home some spit and polish? Never fear. These ideas will add panache in no time at all.

Easy quick house makeovers infographic

1.  Switch the plates. Upgrade your drab, plastic switch plates with snazzy covers that match or accent your décor. Even the most expensive brass switch plates cost less than $20 each. Or, spend a buck for a plastic plate and decorate it yourself. Use craft paint, or cover the plate with decorative paper. You also can switch outlet covers, but don’t get too fancy. Outlet covers should blend with the wall.

2.  Touch-up boo-boos. A bit of new paint gives any room a fresh face, which is why you should keep extra color-matched paint after you remodel. Touch up banged-up baseboards, door and window trim, and wall marks that won’t wash away. Even spot painting requires care; use a drop cloth to protect other surfaces.

3.  Change out drawer and door hardware. Upgrade your kitchen or bathroom by installing new pulls and knobs. Be sure to measure drawer pulls so you won’t have to drill new holes. Check out these cute and economical ($4.95 for 8) zoo dresser drawer knobs on Esty. Home improvement centers have a large selection of inexpensive pulls and knobs.

4.  Update your mailbox. Bump up curb appeal by spray-painting your old mailbox. You can freshen the same color, or go wild with bright hues. Don’t forget to scrub off dirt and rust before painting with rust-proof paint ($6 to $12 for a 10-ounce can; lots of decorative textures and colors).

5.  Play the numbers game. Decorative house numbers and plates give your home a custom and classy look. Some numbers are quick peel-and-stick affairs; others you’ll have to screw in. They’re made of wood, plastic, brass, stainless steel, and other materials; $6 to $30 each.

6.  Embellish your throne. A new toilet seat gives you a regal bearing. Plastic and enameled seats ($12 to $25) in a rainbow of colors add a dash of panache; a solid wood mahogany or walnut seat ($45-$60) makes an executive statement; cushioned seats ($15 to $20) won’t make a lasting impression — and that’s a good thing.

7. Declutter. You’ll be amazed how a 15-minute daily declutter can make a room look like new. First, get rid of stuff from your fridge door: that large, blank canvas will immediately brighten your kitchen. Corral mail and papers in decorative boxes with tops that can close and hide the mess. Organize school supplies in caddies. Every day, tame a new spot.


By: Lisa Kaplan Gordon © Copyright 2015 NATIONAL ASSOCIATION OF REALTORS®

Make Your Own Inexpensive Garden Fertilizer

Make Your Own Inexpensive Garden Fertilizer

Make your own low-cost fertilizer from items in your house and, in one case, from your body.

Your plants need food — nitrogen, phosphorous, potassium — to grow healthy and strong. But they don’t know the difference between store-bought fertilizers and the tonics you mix up yourself.

So save some money (up to $12 for 32 oz. of organic plant food) and use these low- or no-cost ingredients to make your own slow-release fertilizer. Your plants and pocketbook will thank you.

(For more ways to save money in your garden, check out this article on how to salvage free seeds from your kitchen.)

Nutrients Plants Need

Plants needs a well-balanced diet of:

  • Nitrogen: Promotes leaf growth.
  • Phosphorous: Stimulates root growth.
  • Potassium: Aids flower and fruit development.

Plants also need “micro-nutrients” in small amounts, including calcium, sulfur, magnesium, zinc, and iron.

First, Test Your Soil

Test your soil to determine which nutrients it lacks. You don’t want to add, say, a nitrogen-rich fertilizer if nitrogen already is abundant.

A professional soil test costs less than $20 and will tell you everything you need to know about what’s in your soil. Contact your local extension agent to find a soil-testing laboratory near you.

Fish-Emulsion Fertilizer

Why: Fish guts, bones, and heads are good sources of nitrogen, potassium, phosphorous, and amino acids.

How: During the year, collect and freeze fish parts, leftover tuna, and sardines so you’ll have enough to make gallons of fish emulsion in spring.

Add 1 part fish to 2 parts water in an airtight container, and place it a sunny spot far from your house (because it’ll stink). Stir every two days as the soup cooks; in about two weeks, apply to your garden soil at 3 gal./100 sq. ft. Leafy greens, beets, Brussel sprouts, and broccoli love it.

Peeing On Your Veggies

Why: Sounds gross, but human urine is rich in nitrogen, potassium, and phosphate, a well-balanced meal for plants. Rose gardeners know their flowers love it. Fresh urine from a healthy person is sterile, so you can feed it to veggies, too.

How: Pee straight from the source is highly concentrated and can burn plants, much the way dog pee turns grass brown. Make sure you dilute it 1 part pee/10 parts water. Then soak plant roots. Good for leafy greens, cabbages, cucumbers, and roses.

Soak Your Plants in Epsom Salts

Why: Epsom salts consist of magnesium — critical for seed germination and chlorophyll production — and sulfur — key for protein production and plant growth. A dose of an Epsom salts solution increases fruit and flower production in roses, tomatoes, potatoes, peppers, and houseplants.

How: Combine 1 tablespoon of Epsom salts to 1 gallon of water. Spray foliage with the solution for best results.

Save Your Wood Ash

Why: Wood ash not only adds calcium (good for root growth) and potassium (promotes seed and fruit formation) to soil, but it also raises the pH of highly acidic soil, making it friendlier to neutral pH-loving plants, such as most vegetables. (Don’t use it in blueberry gardens, which like acidic soil.)

How: Apply wood ash straight from the fireplace to your garden: Dig in 5 lbs./100 sq. ft.

Adding Crumbled Eggshells

Why: Eggshells are rich in calcium. A calcium deficiency in tomatoes will cause blossom rot, that ugly brown patch on the bottom of the fruit.

How: Place crumbled eggshells in the bottom of your planting hole, or dig them into the soil around the base of your tomato plant.

Bonus: If slugs plague your garden, place crumbled eggshells around the bottom of plants. The shards will cut the slimy pests.


By: Lisa Kaplan Gordon © Copyright 2015 NATIONAL ASSOCIATION OF REALTORS®


Garden Watering Systems You Can Make Yourself

Garden Watering Systems You Can Make Yourself

Easy DIY watering systems for gardens are lifesavers when hot weather moves in and thirsty plants moan, “Feed me!” once or twice a day.

Save money when you make these nifty DIY watering systems from materials you probably already have.

  • Drip hoses that save water by delivering moisture directly to roots.
  • Self-watering planter that hydrates plants by wicking moisture from a water well.
  • Ollas, buried clay pots that deliver water to roots on demand.

DIY Drip Hose

A drip hose soaks soil — drop by drop — without wasting water to evaporation or promoting disease by soaking foliate. A 50-ft. drip hose costs $14 at big box stores. Or you can make one yourself from any old hose you might otherwise toss into the trash. Here’s how.

  • Rescue an old hose. Clean it and lay it on a flat surface, such as a wood plank.
  • On one side of the hose, punch tiny holes 1 to 2 inches apart, leaving 6 inches with no holes on both ends of the hose. To make holes, use an upholstery needle or a tiny, 1/64-inch drill bit.
  • Attach a hose cap ($1.80 for ¾-in. brass) to one end of the hose. Attach the other end to another hose that’s long enough to reach from a spigot to your garden.
  • Turn on water so that drops fall from each hole along the hose. You want a drip — not a spray — so lower the pressure if too much water comes out.
  • Wind the hose along the base of plants, then cover with 2 inches of mulch.

Self-Watering Earth Box Planter

An earth box is a self-watering planter that relies on the wicking ability of soil to continuously draw water from a built-in well. You fill the well through a tube — far less often than if you watered by hand.

An earth box can be any size or material, so long as it has a water reservoir and soil. Here’s a good one:

1. Select a Rubbermaid Roughneck Tote (24-by-16-by-12 inches; $6). Using a super-sharp knife, cut out the flat part of the lid, separating it from the lip.

2. Make “weeping cups” by punching 1/2-in. holes in two 16 oz. plastic cups until they look like Swiss cheese.

3. Take a 5-ft. long piece of ½-inch-diameter ABS pipe ($6), mark it off every 2.5 inches, and cut into 16 pieces. Use the remainder (about 20 inches) for your watering tube.

4. In the lid corners, cut out holes to fit two weeping cups and the watering tube.

5. Using a ½-in. drill bit, punch holes in the lid spaced about 1 inch apart (that’s lots of holes!)

6. Arrange the small PVC pieces in the bottom of the bin — they should be on-end and evenly spaced. Place the lid on top of the pieces. Place weeping cups and watering tube into their holes.

7. Pack the weeping cups snugly with potting soil, then fill the box with soil.

8. Drill a ½-in. drainage hole in the side of the box 2 ½ in. from the bottom.

9. Fill the bin with water through the watering tube. When it’s full, water will come out the drainage hole.

10. Plant.

Check out this video, which shows you how to make an earth box from two Rubbermaid tubs.

Make Your Own Ollas

Ollas (OY-yas) are earthen jars with thin necks and wide bellies that you fill with water and bury in your garden. Water seeps through the ollas’ unglazed walls to feed plant roots without wasting any water to evaporation or runoff. Eventually, plant roots grow around the ollas, drawing water when needed, creating a super-efficient self-watering system.

Make yours from extra clay garden pots and silicone caulk.

  • Select two 8- or 10-in. clay pots with smooth rims that closely match each other.
  • Caulk a bottle cap or piece of tile over the bottom hole of one pot to prevent water from pouring out.
  • Cover the rim of one pot with a thick ribbon of silicone caulk. Place the other pot over the caulk and press lightly.
  • Let caulk dry for 24 hours, then fill the pot with water to check for leaks.
  • When you’re satisfied that your olla is leak-proof, bury it in your garden next to plants. Water in an 8-in. diameter; olla spreads 18 inches.
  • Fill olla with water, and cover the hole with a rock or glazed saucer. Check water levels with a stick and refill as necessary.


By: Lisa Kaplan Gordon © Copyright 2015 NATIONAL ASSOCIATION OF REALTORS®


5 Fragrant Plants for Your Home

5 Fragrant Plants for Your Home

Published: January 9, 2013

Here are 5 green and fragrant houseplants that can chase the winter blues away.

If you’re starting to feel stifled by the dark days of winter, snap out of it with a fresh whiff of spring.

January 10th is National Houseplant Day, so we rubbed our green thumbs together and came up with a list of 5 potted beauties that will brighten your mood and freshen your home with pleasing fragrances.

But that’s not all; each species we picked is also visually stunning — from eye-catching leaf textures to beautiful blossoms. All you have to do is choose the nose-pleaser that’s perfect for you.

1. Scented Geraniums — Nose Candy

There are over 200 varieties of this plant, and some have striking leaf shapes and textures that are ruffled and fuzzy, or smooth and lacey.

Nevertheless, what makes scented geraniums really stand out is the range of fragrances different varieties offer. Types include: Peppermint Lace, Chocolate Mint, Lemon Fancy, Prince of Orange, and the intriguing Pink Champagne.

I recently learned that the leaves of this plant are considered an herb. But here’s a twist: They don’t add flavor when used, just an aroma. Check out this video to learn how you can use your sugar dish to add a dash of fragrance to a room when the bowl is opened.

FYI: Most types of geraniums are pretty hardy and do well indoors, but they do need lots of sunlight. During the short days of winter you can give them a few extra hours of light using fluorescents.

2. Jasmine — Great for Chilly Rooms

If you’re not the type who cranks up the heat during the cold winter months, the Jasminum polyanthum is a houseplant that prefers cool indoor temperatures.

Also known as winter jasmine, this easy-to-grow plant is an evergreen vine. It features pink buds that blossom into fragrant white flowers from January to February. Its sweet, perfume-y scent might remind you of a spring floral garden.

In order for this beauty to thrive, it needs 4-6 hours of indirect sunlight a day in a cool place in your home. If a room is too warm, the flowers won’t open — so don’t place next to a heating source.

For additional tips, check out this video that details how to take care of a winter jasmine houseplant.

FYI: We’ve heard winter jasmine can handle temperatures as low as 20 degrees, so this is a plant that can thrive outdoors in most climates. Just make sure you have a healthy plant before transplanting, and don’t make the transition during cold weather.

3. Orchids — Here’s One that Smells Sweet

There’re oodles of beautiful orchids, but Oncidium are among the easiest to grow indoors.

Orchids can flower up to twice a year and they’re available in a wide range of colors and sizes. A favorite during winter is the fragrant Sharry Baby. It features long stems covered in tiny reddish-brown and cream blossoms.

When it comes to Sharry Baby’s fragrance, there are two camps: Some fans believe it smells like vanilla while others detect a chocolate-like fragrance.

As with all orchids, the Sharry Baby won’t bloom without plenty of light, but direct sunlight will cause the flowers to spot. So make sure you keep your plant in a warm part of your home with lots of filtered light. The amount of water this plant needs varies based on its growth; refer to your local nursery for details.

FYI: When your orchid stops flowering, don’t chuck it out — replant it. That way it will have room to grow and can bloom again. For repotting tips, check out this video.

4. Paperwhites — Just Add Water

These tall, white plants can be forced to bloom indoors any time of the year, and are popular holiday gifts.

Paperwhites are a member of the daffodil family. The bulbs can be easily planted in water and in about a month, flowers will begin to appear.

To get started, all you need is a shallow pot and some pebbles. Just make sure you cover the lower half of the bulbs in water; don’t submerge them. If you do, they won’t sprout.

Check out this video by Lowe’s that shows how quick and easy it is to grow these flowers from bulbs.

FYI: Paperwhites have a sweet, musky smell that some people love and others strongly dislike. We suggest catching a whiff first at a local garden center before growing these flowers at home.

5. Gardenia — High-Maintenance Nose-Pleaser

Gardenias are at the top of most fragrant-houseplant lists. Although they do grow beautiful flowers, it’s actually the leaves that are responsible for its pleasant scent.

Gardenias require a lot of pampering in order to thrive. Most gardenias need daytime temperatures that are between 68 and 74 degrees, with a steady 60 degrees at nighttime.

They also require frequent fertilizing, daily misting, and lots of bright sunlight.

For expert tips, refer to your local nursery about specific types of gardenias. Also, check out this video.
Care Tips for Indoor Gardenia Plants — powered by ehow

FYI: While gardenias need lots of misting, they’re very sensitive to overwatering and can develop root rot and other related conditions very quickly.


By: Deirdre Sullivan © Copyright 2015 NATIONAL ASSOCIATION OF REALTORS®


Want to Refinance Your Mortgage But You’re Being Turned Down?

Want to Refinance Your Mortgage But You’re Being Turned Down?

The federal program HARP might be able to help you. Here’s how it works.

Is your mortgage rate above today’s rates?

Is your house worth less than your current mortgage amount?

Are you unable to refinance into a lower-rate mortgage or convert your adjustable-rate mortgage to a fixed-rate mortgage?

Then the federal Home Affordable Refinance Program (HARP) is an option you should explore.

HARP is one of two components of the federal Making Home Affordable Program for struggling homeowners. Its counterpart, the Home Affordable Modification Program (HAMP), offers loan modifications if you’re behind on your payments or need help exiting gracefully if you can no longer afford your home.

HARP, on the other hand, helps you refinance your home with a brand new mortgage.

What Are the Benefits of HARP?

Your savings from refinancing using HARP could be substantial. The White House says the typical homeowner using HARP could reduce their mortgage payments by about $2,500 a year. Like any refinance transaction, HARP loans come with fees, so you’ll have to weigh the costs and benefits for your specific situation.

The good news is that HARP’s fees are less than the fees for typical refinances. For instance, you won’t have to pay for a full appraisal if the lender can get a reliable automated appraisal for your home. And Fannie and Freddie will waive for borrowers some fees they usually charge lenders (which lenders would normally pass on to you).

What Are the Qualifications?

1. Your mortgage must be owned or guaranteed by Freddie Mac or Fannie Mae.

2. Your current lender had to sell your mortgage to Fannie Mae or Freddie Mac before June 1, 2009. Check with your lender to make sure that happened.

3. This must be your first HARP refinance. You only get one Home Affordable refinance, so if you’ve used the program before, you can’t use it again (although there’s a loophole for those with a Fannie Mae loan refinanced between March and May of 2009).

4. You need the right balance between what you owe and your home’s value. The minimum is that you owe 80% of your home’s value (for example, owing $80,000 on your $100,000 home). If you owe less than 80%, you can’t use HARP. If you owe up to 105% (say your home is worth $100,000 and you owe $105,000), you can refinance into an adjustable-rate mortgage. If you owe above 105%, you have to go with a fixed-rate mortgage. There’s no cap on how much you can owe above what your home is worth.

5. If you’ve paid your mortgage late even once during the past six months, you can’t use HARP, but if you had a late payment between 7 and 12 months ago, you’re fine.

If you can meet those criteria, you have until Dec. 31, 2015, to apply for a HARP refinance through either your current lender or a new lender.

Should You Apply?

HARP makes sense if you owe more than your house is worth, which is preventing you from refinancing, according to Bob Walters, chief economist at Quicken Loans. You’ll still pay full-market rates for a HARP refinance, not a discounted rate or payment that you might get with a loan modification.

As a rule of thumb, for fixed-rate mortgages, you’ll want your new rate to be at least a half-point better than your old one.

Lowering your interest can pay off immediately. Let’s say you took out a 30-year, fixed-rate mortgage at 6.5% for $176,800 at a monthly payment of $1,117.50 five years ago.

Today, you’d still owe $168,065. If you refinance that balance into a new 30-year loan at 4.5%, your monthly payment would drop to $851.56, saving you about $266 a month. Or, you could refinance into a 15-year fixed-rate loan, pay about $168 a month more, and pay your loan off about 10 years earlier.

HARP might also make sense if you can convert an adjustable-rate mortgage to a fixed-rate mortgage. Even if an ARM’s monthly payment is low now, it’ll go up if rates rise.

When applying for HARP, you need paperwork just like any other mortgage application:

  • Pay stubs
  • Tax returns
  • Mortgage statements
  • Account balances
  • Debt totals (for credit cards, student loans, car loans, and such)
  • Details about any second mortgages or home equity lines of credit

Pay attention to the fees associated with the refinancing, which the lender must disclose up front, and ask if those costs can be rolled into the new loan if you’re strapped for cash.

Tips to Make the Process Go Smoothly

To keep the process moving, ask your lender for a list of the documents it will need. Give yourself two weeks to collect everything.

If possible, submit the entire packet together via certified mail. Sending in documents piecemeal could result in lost paperwork and your loan application falling to the bottom of the pile, says Nicole Hall, editor of LendingTree.com. Keep detailed records of any phone calls you make, and dates you mail or fax correspondences.

There are companies that will offer to take care of the paperwork for a fee, but you don’t need to pay. You can access free help through a housing counselor approved by the U.S. Department of Housing and Urban Development. Counselors will help you understand the Making Home Affordable program and aid in gathering the documents needed for your loan servicer.

More about qualifying for HARP.

Don’t qualify for HARP? Then maybe its sister program, HAMP, is for you.


By: Donna Fuscaldo © Copyright 2015 NATIONAL ASSOCIATION OF REALTORS®


The owner of this website has made a commitment to accessibility and inclusion, please report any problems that you encounter using the contact form on this website. This site uses the WP ADA Compliance Check plugin to enhance accessibility.