8 Tips to Make Your Remodeling Process More Energy Efficient and Your Home Healthier

8 Tips to Make Your Remodeling Process More Energy Efficient and Your Home Healthier

By: Dona DeZube

Published: October 18, 2012

As long as you’re remodeling, why not cut your utility bill and make your home a bit healthier?

Saving energy wasn’t on the list of reasons we’re finally ripping out the kitchen in our mid-century home (green-veined, imitation marble laminate countertops figured much more prominently). But, a session at the recent 2012 Remodeling Show in Baltimore clued me in as to why adding a few simple tasks to our remodeling plan could lower our home’s energy bill, get rid of some of the annoying hot and cold spots in our house, and make our home less hospitable to mold and other allergens.

Carl Seville, author of Green Building: Principles and Practices in Residential Construction, shared some simple, inexpensive ways to make remodels and additions more energy efficient from the standpoint of energy usage and conservation of resources.

Try these eight tips from Seville:

1. Check for water intrusion, condensation, and excess moisture before you begin the project. Fixing those issues during remodeling can improve your home’s indoor air quality (excess moisture encourages mold).

2. Use the least amount of framing allowed by your building code when adding walls. Not only will you have to pay for less lumber and fewer nails, the contractor will have more room to put insulation in your walls, making your home more energy efficient.

3. Resist the urge to splurge on multiple shower heads. Opt for a single low-flow shower head rather than installing a car wash-style plethora of shower heads.

4. If possible, add new HVAC ducts to parts of your home that are heated and cooled, rather than placing them in a space with unconditioned air (like the attic). If that’s not possible, insulate the ducts. Have an HVAC diagnostician analyze your system to make sure it’s sized correctly and balanced to properly exchange old and new air.

5. Be sure to insulate around recessed lights that protrude into un-insulated attic spaces — these are major sources of air leaks.

6. If you’re wasting water, you’re wasting energy. Look at high-efficiency or solar water heaters, and insulate your water pipes. If you want hot water faster, move the water heater closer to the faucet or install demand pumps to drive hot water to the fixture.

7. Install wall-mounted efficiency toggle switch plates for the outlets where you plug in your televisions and computers to make it easy to cut off the power to electronics you’re not using.

8. A humidistat that automatically turns on the bathroom fan when moisture rises beats depending on teenagers or tenants remembering to use the fan. Reducing bathroom moisture reduces the chances you’ll have mold.

When I pull the kitchen cabinets off the wall, I’m going to use caulk to seal between the wallboards and the floorboards before I put down new flooring and install the new cabinets. And since I’ll have the caulk out, I’m going to seal the top of window trim, something my home’s builder didn’t do.

Read more: http://members.houselogic.com/articles/how-to-make-your-remodel-more-energy-efficient/preview/#ixzz3kUz87biz
Follow us: @HouseLogic on Twitter | HouseLogic on Facebook

An Eco-Friendly Home That Really Gets Around

An Eco-Friendly Home That Really Gets Around

Published: November 13, 2012

We love eco-minded concept houses, like this energy-efficient creation that resembles a giant caterpillar.

This self-supporting abode was dreamt up by Michael Jantzen, an architect known for his imaginative conceptual works, especially when it comes to alternative energy and storage systems.

His Transformation House is a design concept that truly lives up to its name. The structure literally alters its appearance to take advantage of weather conditions.

The cylindrical building’s exterior is divided into five sections that automatically, or manually, move so it can catch energy from the sun to power it, let the wind in to cool it, and collect rainwater for its inhabitants.

That makes it a self-supporting home with one-of-a-kind curb appeal: Every time one of the five sections rotates, it alters the building’s caterpillar-like appearance.

And it’s not just the exterior that moves. Everything inside this home can be shuffled around.

The windows move 360 degrees so you can tweak your views at the push of a button. The interior also cleverly maximizes space by storing four containers, each one being a room, under the glass floors.

That’s especially convenient if you want to hide a messy room — just store it away and call up a clean one.

If you want to see more of Jantzen’s work, you can visit his site.

By: Deirdre Sullivan © Copyright 2015 NATIONAL ASSOCIATION OF REALTORS®


You’r Green, They’re Not. How Will You Stay Friends?

You’r Green, They’re Not. How Will You Stay Friends?

Published: December 6, 2012

A green lifestyle means different things to different people. How do you deal when your friends and family don’t think like you?

When Kermit the Frog sings about how it’s not easy being green, boy, is he right.

The hard part isn’t adopting a green lifestyle — that’s getting easier these days. Non-toxic cleaners are simple to make; recycling centers are everywhere; and there’s no shortage of green living guides online.

But what happens when your lifestyle clashes with someone whose take on green living is different from yours?

A few months ago, I threw a party that happened to coincide with a three-digit heat wave. As I was cleaning up the next day, I found an incriminating piece of evidence that a guest had forgotten: A small personal fan. My friend later confessed that she’d brought the fan because, knowing of my green lifestyle, she assumed I wouldn’t have the air conditioner on.

Ouch! Of course I had the air conditioner on — it was over 100 degrees outside! Did she really think I’d let my guests suffer? I may be an environmentalist, but I’m not a wacko!

Obviously, even though the environmental movement has gone mainstream, you’re still bound to meet people who don’t see eye-to-eye with you. As a heartfelt environmentalist, how do you handle it? When you go to a friend’s home and they don’t recycle, do you say something?

I’ve learned that it’s best to lead by example. When my friend saw that I’d turned on the air conditioner at my party, I hope she learned that my green lifestyle doesn’t mean I live uncomfortably — or force others to do so. (I also hope she noticed the eco-friendly choices I did make, such as serving organic hors d’oeuvres on reusable plates.)

The fact is, eco-friendliness is a spectrum, and no one’s version of green living matches perfectly with anyone else’s version.

Sure, when I go to someone else’s house, I cringe when they hand me a plastic fork and throw their food waste in the trash instead of composting it. But do I lecture them about their lifestyle? No, because no one likes a sanctimonious guest, and as important as environmentalism is to me, I value my friendships more than I value composting.


Make Your Own Inexpensive Garden Fertilizer

Make Your Own Inexpensive Garden Fertilizer

Make your own low-cost fertilizer from items in your house and, in one case, from your body.

Your plants need food — nitrogen, phosphorous, potassium — to grow healthy and strong. But they don’t know the difference between store-bought fertilizers and the tonics you mix up yourself.

So save some money (up to $12 for 32 oz. of organic plant food) and use these low- or no-cost ingredients to make your own slow-release fertilizer. Your plants and pocketbook will thank you.

(For more ways to save money in your garden, check out this article on how to salvage free seeds from your kitchen.)

Nutrients Plants Need

Plants needs a well-balanced diet of:

  • Nitrogen: Promotes leaf growth.
  • Phosphorous: Stimulates root growth.
  • Potassium: Aids flower and fruit development.

Plants also need “micro-nutrients” in small amounts, including calcium, sulfur, magnesium, zinc, and iron.

First, Test Your Soil

Test your soil to determine which nutrients it lacks. You don’t want to add, say, a nitrogen-rich fertilizer if nitrogen already is abundant.

A professional soil test costs less than $20 and will tell you everything you need to know about what’s in your soil. Contact your local extension agent to find a soil-testing laboratory near you.

Fish-Emulsion Fertilizer

Why: Fish guts, bones, and heads are good sources of nitrogen, potassium, phosphorous, and amino acids.

How: During the year, collect and freeze fish parts, leftover tuna, and sardines so you’ll have enough to make gallons of fish emulsion in spring.

Add 1 part fish to 2 parts water in an airtight container, and place it a sunny spot far from your house (because it’ll stink). Stir every two days as the soup cooks; in about two weeks, apply to your garden soil at 3 gal./100 sq. ft. Leafy greens, beets, Brussel sprouts, and broccoli love it.

Peeing On Your Veggies

Why: Sounds gross, but human urine is rich in nitrogen, potassium, and phosphate, a well-balanced meal for plants. Rose gardeners know their flowers love it. Fresh urine from a healthy person is sterile, so you can feed it to veggies, too.

How: Pee straight from the source is highly concentrated and can burn plants, much the way dog pee turns grass brown. Make sure you dilute it 1 part pee/10 parts water. Then soak plant roots. Good for leafy greens, cabbages, cucumbers, and roses.

Soak Your Plants in Epsom Salts

Why: Epsom salts consist of magnesium — critical for seed germination and chlorophyll production — and sulfur — key for protein production and plant growth. A dose of an Epsom salts solution increases fruit and flower production in roses, tomatoes, potatoes, peppers, and houseplants.

How: Combine 1 tablespoon of Epsom salts to 1 gallon of water. Spray foliage with the solution for best results.

Save Your Wood Ash

Why: Wood ash not only adds calcium (good for root growth) and potassium (promotes seed and fruit formation) to soil, but it also raises the pH of highly acidic soil, making it friendlier to neutral pH-loving plants, such as most vegetables. (Don’t use it in blueberry gardens, which like acidic soil.)

How: Apply wood ash straight from the fireplace to your garden: Dig in 5 lbs./100 sq. ft.

Adding Crumbled Eggshells

Why: Eggshells are rich in calcium. A calcium deficiency in tomatoes will cause blossom rot, that ugly brown patch on the bottom of the fruit.

How: Place crumbled eggshells in the bottom of your planting hole, or dig them into the soil around the base of your tomato plant.

Bonus: If slugs plague your garden, place crumbled eggshells around the bottom of plants. The shards will cut the slimy pests.


By: Lisa Kaplan Gordon © Copyright 2015 NATIONAL ASSOCIATION OF REALTORS®


4 Money-Saving Ways to Add Style and Function to Your Yard

4 Money-Saving Ways to Add Style and Function to Your Yard

Homeowners wow with clever DIY outdoor projects on a budget.

No doubt, exterior upgrades like adding a wood deck or installing new garage door offer great return on investment that’s worth the cash outlay. But these four blogger projects will ratchet up your curb appeal for a lot less money. And your friends will think you hired a pro.

A Champagne Fence on a Beer Budget

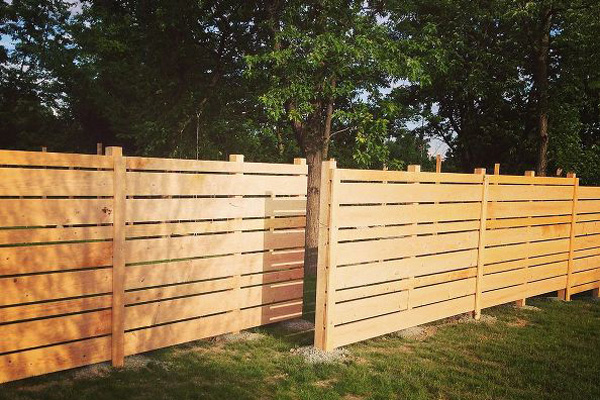
DIY wood fence in a yard
Image: The Unique Nest

Laura, the blogger behind The Unique Nest, wouldn’t let her limited funds put a damper on her curb appeal vision. Her DIY fence enclosed a 1/4-acre side yard for only $1,000.

Not only is it beautiful, it’s functional: It keeps her kids and dog safely in the yard and adds privacy and value.

She and her hubby:

  • Sketched out their design to calculate how much lumber they needed. The project required around 250 pieces of rough-cut Hemlock wood.
  • Contacted Dig New York, a nonprofit that marked underground utility cables and pipes on the property, so they could dig safely.
  • Rented an auger — essentially a giant drill — to dig holes. Their project required 29 fence posts. The rental made the four-day building process a lot easier.

Get all the project details.

Tip: If you have a wood fence, apply stain or wood preservative every three to five years to protect it from bugs, rot, and sun damage.

Related: A Guide to Fencing Options

The Landscaping Power of a Little Concrete Edging

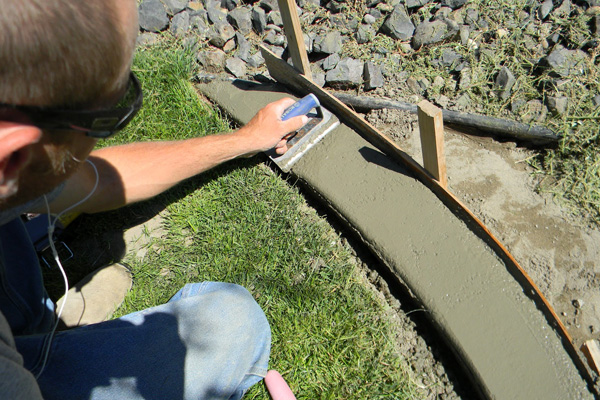
Man smoothing concrete edge in a garden
Image: Home is Where They Love You

Besides adding spit and polish to your landscape, edging can help keep weeds and grass from overrunning your garden.

Camie, from the blog Home is Where They Love You, thinks her decorative and functional concrete curb looks like a pro job, and we agree. Even better, she created it for less than $20.

In a nutshell, she and her husband:

  • Crisply defined the garden’s border while also creating the curb’s form using bender board and wood stakes.
  • Poured the concrete into the form.
  • Used an edging trowel to smooth out the curb’s shape.

Get all the project details.

Related: Use a Garden Hose to Design Your Edging
A Driveway That Just Looks Expensive

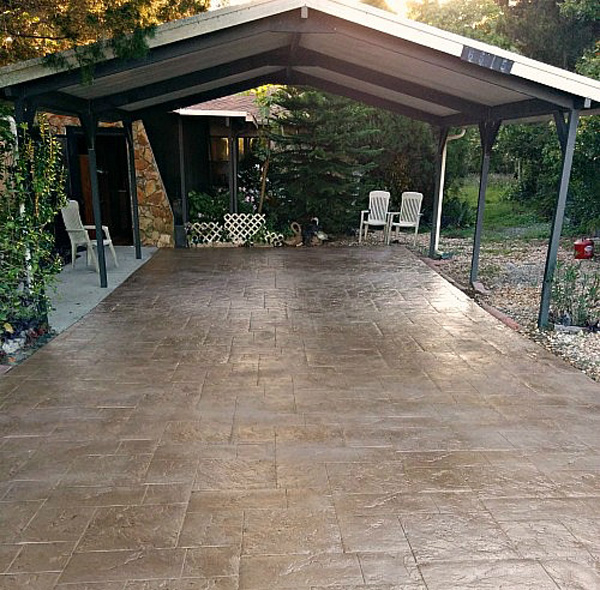
DIY stamped concrete drivewayImage: DIY Fun Ideas

When Jenise from DIY Fun Ideas created this tile driveway at her mom and pop’s place, she became a serious contender for world’s best daughter.

But, here’s a secret: She says this concrete project is so easy that even a DIY novice can build it.

Here’s quick breakdown of the project’s three basic steps.

1.  Mix mortar in a bucket.
2.  Spread the mortar into a tile mold.
3.  Place the freshly minted tile into place on the driveway.

And get this: A pro might charge $10 per square foot to build a driveway like this one; Jenise’s project cost about $3 per square foot.

Get all the project details.

Related: Why You Should — and Shouldn’t — Go with Stamped Concrete
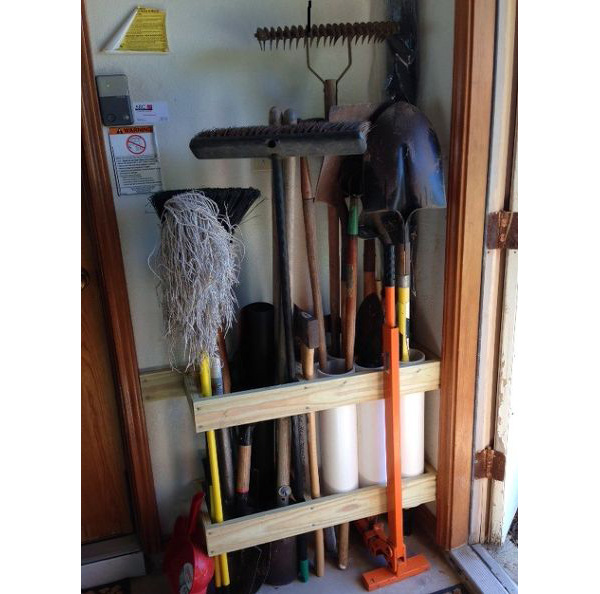
A Garden Tool Organizer to Love

DIY garden tool rack made with PVC pipe and woodImage: Ouina, HomeTalk.com contributor, Edinburg, Texas
Love to putter around in your garden, but hate trying to retrieve yard tools from a disorganized jumble in your garage?

Ouina, an avid tipster to the HomeTalk.com online community, concocted a clever built-in that keeps rakes, spades, trowels, and pruners neatly grouped in a garage or shed corner.

She:

  • Created the built-in using precut lumber and PVC pipe.
  • Attached the lumber used to create the wood frame to the wall studs.
  • Mounted PVC pipe onto the wood frame to keep it off the floor. This makes cleaning up around the built-in easier.

Get all the project details.


By: Deirdre Sullivan© Copyright 2015 NATIONAL ASSOCIATION OF REALTORS®

An Unlikely Place to Find Free Seeds for Your Garden

An Unlikely Place to Find Free Seeds for Your Garden

Want free seeds for your vegetable garden? Look no farther than your kitchen.

Free seeds and starter plants for your vegetable garden happily live in your refrigerator and pantry. Plant a potato and you’ll harvest a bagful; plant a single horseradish root, and you’ll grow a field of the eye-watering spice.

Theoretically, every fruit or vegetable seed in your kitchen can germinate and deliver baby produce. But some store-bought veggies are hybrids and produce offspring that look nothing like their parents. Others are irradiated to prevent insect infestation, or sprayed with anti-sprouting chemicals to prevent spoilage, which wrecks their ability to go forth and multiply.

Your best bet is to shop for produce in an organic market. Seeds (and tuberous roots) from chemical-free produce yield plants that sprout readily and look like their folks.

Here’s a look at some kitchen leftovers you can plant this spring.

Celery: The next time you chop celery, save the crown (the bottom), place it in a shallow bowl of water until the center leaves turn green and sprout, then transplant it into your garden. Or, just plant the crown straight from crisper into garden, keeping the top of the crown at soil level. Not only is celery a yummy vegetable, it attracts beneficial insects that keep unwanted bugs at bay.

Garlic: Separate cloves and plant the largest ones pointy-side up, under about 2 inches of rich, well-drained soil. Plant garlic around roses to reduce black spot and sooty mold.

Poppies: For a brilliant floral display, shake poppy seeds directly from the container onto well-drained soil. Lightly press into the ground and cover with a dusting of soil. Thin seedlings to about 10 inches apart.

Horseradish: In the fall, plant the tuberous horseradish roots horizontally under 2 inches of soil that’s been well-worked with compost. The plant is invasive and spreads quickly, so plant at the end of garden rows or in areas where they have room to wander. Harvest with a pitchfork in late fall.

Ginger: Select a plump ginger rhizome with many small, growing buds. Plant just under rich soil in a spot with filtered sunlight and wind protection. Avoid planting in low-lying areas, or in spots with poor drainage.

Sesame: These seeds grow into flowering plants that are resistant to heat, drought, and pests. Press seeds 1 inch into well-draining soil. Water lightly for 3-5 days after planting, then as needed. Be sure not to overwater, because sesame plants do not like to sit in wet soil. Harvest in about 150 days after seed pods open and seeds are thoroughly dry.

Beans and peas: It’s easy-peasy to plant any dried bean or pea. Just push the seed under 1-2 inches of loose, rich soil in a location that gets at least 6 hours of sun each day. If your soil is hard clay, grow beans and peas in a container.

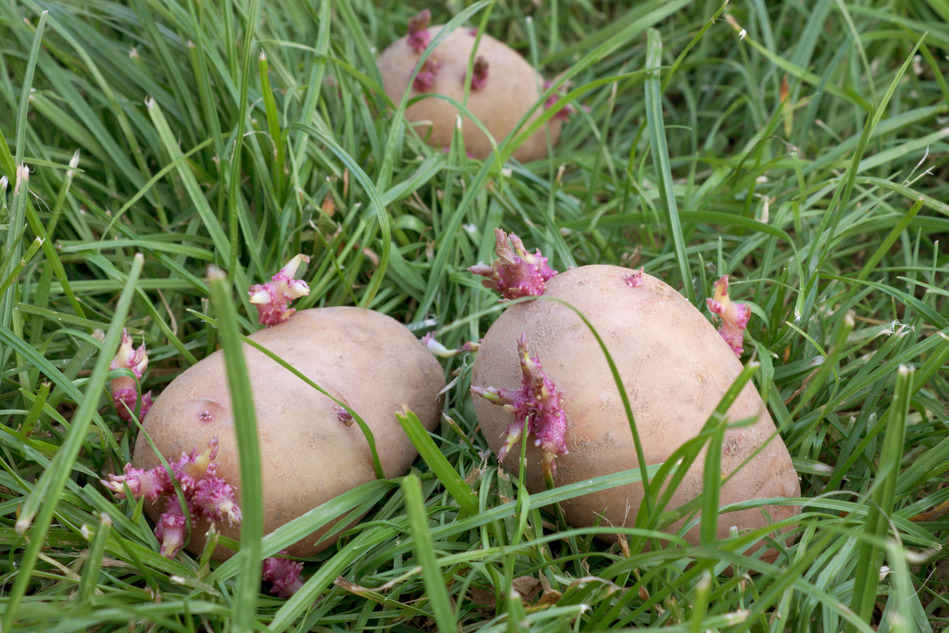
Potatoes: If you’ve ever kept a potato too long in a bowl, you’ve seen the plants begin to sprout. Place the potato in a 10-inch-deep hole, and cover with rich soil. As the plant grows, continue to mound soil around its stem. Harvest potatoes in late fall.

Tomatoes: If you love heirloom tomatoes, cut them in half to scrape out their seeds. “Ferment” seeds in a glass jar with about a cup of water for 2-4 days. When a foamy mold appears, rinse and dry seeds on a paper plate. Start tomato plants indoors in containers, then transplant to a garden spot with full sun.


By: Lisa Kaplan Gordon:© Copyright 2015 NATIONAL ASSOCIATION OF REALTORS®

The owner of this website has made a commitment to accessibility and inclusion, please report any problems that you encounter using the contact form on this website. This site uses the WP ADA Compliance Check plugin to enhance accessibility.