Insulation Types and Tips

Insulation Types and Tips

Here’s our take on your insulation options, with tips on cost effectiveness and whether to DIY or hire a pro.

We know that insulating your home isn’t the sexiest home project. But if you’re planning a remodel that includes opening up walls, ceilings, and floors, it’s a great time to upgrade your insulation to get energy savings of up to $300 per year.

However, it you’re not remodeling, think long and hard about replacing or adding wall insulation. Retrofitting wall insulation has a long payback period that should make you think twice before committing to it.

Related: The 5 Most Effective Things You Can Do to Take Back Your Energy Bills

But adding on? Finishing your basement? Redoing your kitchen? Or your attic insulation needs an upgrade? Read on to learn about the different insulation types, costs, uses, and whether you should DIY it or hire a pro.

Batts and Blankets

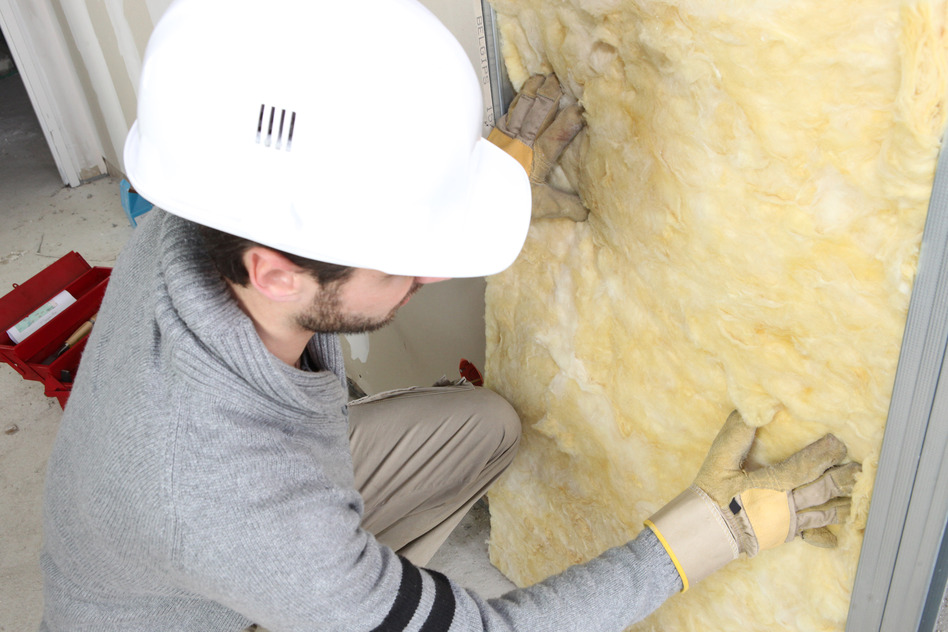
This is the most common type of insulation. It comes in convenient rolls that are easy to transport and carry. It’s especially suitable for do-it-yourself projects, but take care to cut the material to fit around plumbing pipes, wires, and electrical outlets. Clumsily stuffed into awkward spaces, it loses effectiveness — sometimes as much as 50%.

Fiberglass Batts and Blankets

  • R-value: 3.0-4.0 per inch (R-13 for a 2-by-4-framed wall).
  • Advantages: Widely available and familiar, standard widths and thicknesses are designed to fit between studs, joists, and rafters. Paper- and foil-faced versions have stapling flanges that make installation easy.
  • Disadvantages: Can be itchy to install — you’ll need protective clothing. Rolls of fiberglass must be cut by hand to fit spaces. It compresses easily, which causes it to lose insulating properties.
  • Environmental issues: Phenol formaldehyde, linked to cancer, is being phased out as a binder. Labels warning of possible cancer risk from inhaled fibers are being phased out because regulators have concluded the fibers break down quickly in lungs. Recycled content can be up to 60%.
  • Best use: Walls, floors, ceilings.
  • DIY or pro? DIY
  • Cost: 30 cents per sq. ft.

Rockwool Batts and Blankets

  • R-value: 4-5 per inch (R-15 for a 2-by-4-framed wall).
  • Advantages: More fire-resistant than fiberglass. Doesn’t itch. Springs into shape against studs, so installation is staple-free and quick.
  • Disadvantages: Not widely available; retains moisture — if allowed to get damp, it can harbor mold growth.
  • Environmental issues: High recycled content, up to 90% (all pre-consumer). Contains crystalline silica, which if inhaled over a long term could cause lung disease, including cancer.
  • Best use: Walls, floors, ceilings.
  • DIY or pro? DIY
  • Cost: 60 cents per sq. ft.

Cotton Batts (aka “Blue Jeans”)

  • R-value: 3.5-4 per inch (R-13 for a 2-by-4-framed wall).
  • Advantages: Doesn’t itch. Comes in easy-to-handle rolls. Simple to cut for fitting around pipes.
  • Disadvantages: Not widely available and pricier than other batts.
  • Environmental issues: Contains at least 85% recycled fiber and needs little additional energy to make. Contains a borate fire retardant, which also deters some insect pests.
  • Best use: Walls.
  • DIY or Pro: DIY
  • Cost: 90 cents per sq. ft.

Loose-Fill Insulation

This insulation consists of fluffy strands of fiber blown into attics and walls with a special machine. It fills nooks and crannies, eliminating cold spots.

Loose-Fill Fiberglass

  • R-value: 2.2–2.7 per inch.
  • Advantages: Lightweight enough for attic applications over ½-inch drywall ceilings with framing every 24 inches.
  • Disadvantages: The product is so fluffy that loose applications may lose up to half their effectiveness at very cold temperatures unless topped by blanket insulation or higher-density loose fill (see cellulose below).
  • Environmental issues: Same as for fiberglass batts and blankets, except that formaldehyde isn’t an issue. Up to 60% recycled content.
  • Best use: Ceilings.
  • DIY or pro? Insulating an open attic space is relatively easy if you’re a competent DIYer. You’ll save up to 70% over the cost of a pro. Check to see if you can rent an insulation blower from your local home improvement center or tool rental store. But if the job is more complicated than that, definitely hire a professional to make the installation worthwhile in terms of energy savings.
  • Cost: 30 cents per cubic foot.

Loose-Fill Cellulose

  • R-value: 3.2–3.8 per inch.
  • Advantages: Effective at all temperatures, and can even perform better as the air gets colder.
  • Disadvantages: Too heavy for attic installations; ceiling must have at least 5/8-inch drywall or framing every 16 inches. Over time, it can settle almost 20%, reducing its effectiveness.
  • Environmental issues: Fibers are too big to lodge in lungs; dust is only a nuisance issue. The makeup of cellulose insulation typically is around 85% post-consumer recycled paper, plus 15% fire retardant. That’s usually a borate compound, which also helps deter pests.
  • Best use: Ceilings, enclosed existing wall or open new wall cavities, unfinished attic floors, other hard to reach places.
  • Cost: 31 cents per cubic foot.

Structural Insulated Panels

Structural insulated panels (SIPs) have superior energy savings of 12% to 14%, but they’re also pricier. They usually come in 4-by-8-ft. sheets, although some manufacturers make them as large as 8-by-24 feet, used mostly for new construction.

If you’re replacing siding or roofing, or doing an addition, these boards will insulate the entire wall surface, including the framing. Some sheets have tongue-and-groove edges to make tight, energy-efficient seams. 

The insulation also is used for basementand crawl space walls. When facing a living area, building codes usually require the material to be covered with a layer of drywall.

Polystyrene SIPs

This type of SIP comes in two versions: Expanded (EPS) is the least expensive and has the lowest R-value. Extruded (XPS) type is usually blue or pink in color; it’s stronger and blocks moisture better than EPS.

  • R-value: 3.8 (EPS) to 5 (XPS) per inch.
  • Advantages: Lightweight, easy to install.
  • Disadvantages: Must be cut to fit around pipes and other wall penetrations, leaving gaps that should be filled with sealing foam. It’s not structural — you can’t nail anything to it. Insects and pests can tunnel through them. Best to treat the panels with insecticide before using. Also, they’re so air-tight, a well-built SIP structure might need fresh-air ventilation for safety and to meet building codes.
  • Environmental issues: Panels emit toxic smoke when burned. Although scraps and leftovers can be recycled, they rarely are; instead, they can wind up as plastic bead litter in rivers and oceans.
  • Best use: New walls, ceilings, floors, roofs.
  • DIY or pro? You can do it yourself, but since these panels are best for new or full replacement construction, you’ll likely already have a contractor on the job.
  • Cost: EPS: $6 for a 1-inch-thick, 4-by-8-ft. sheet; XPS: $15 for a 1-inch-thick, 4-by-8-ft. sheet.

Polyisocyanurate SIPs

  • R-value: 5.6-7.7 per inch.
  • Advantages: The highest R-value per inch of any insulation with a thickness that ranges from ½ inch to 2 inches. It’s often faced with foil, which acts as a moisture barrier. Easy to install.
  • Disadvantages: Because the foil type is a moisture barrier, it shouldn’t be used where there already is an interior moisture barrier. Expensive.
  • Environmental issues: Panels emit toxic smoke when burned. Although scraps and leftovers can be recycled, they rarely are.
  • Best use: New walls, ceilings, floors, roofs.
  • DIY or pro? Same as the EPS and XPS, you’ll likely be using a contractor.
  • Cost: $22 for a 1-inch-thick, 4-by-8-ft. sheet.

Spray Foam

Spray foam insulation costs more than batt insulation, but it has higher R-vlaues. It also forms an air barrier, which can eliminate some other weatherizing tasks, such as caulking.

This plastic insulation goes on as a liquid and expands to fill the available space, sealing all gaps and cracks and stopping any air leaks. 

Pros spray the foam insulation mixture into framing cavities; once dry, the excess is cut away, leaving a flat, even surface.

Open-Cell Polyurethane Spray Foam

  • R-value: 3.5 to 3.6 per inch.
  • Advantages: Stops movement of air.
  • Disadvantages: Allows water vapor to pass through, so a moisture barrier is still needed in some situations. Requires professional installation.
  • Environmental issues: Often called half-pound foam, this insulation contains a modest amount of petroleum-based or plant-based plastic. Chemicals and VOCs released during application and while curing can cause asthma and other serious health effects, so wait up to three days to re-enter.
  • Best use: Walls, floors, ceilings.
  • DIY or pro? Although DIYers can buy cans for small jobs, such as filling spaces around door framing, you need a pro with special equipment to insulate walls, the roof or attic, and floors, especially if you want to get the highest R-rating possible.
  • Cost: $1 to $1.20 per sq. ft. (R-13 for a 2-by-4-framed wall).

Closed-Cell Polyurethane Spray Foam

  • R-value: 6.0 to 6.5 per inch.
  • Advantages: Stops movement of moisture as well as air.
  • Disadvantages: Relatively expensive. Requires professional installation.
  • Environmental issues: Uses blowing agents that have a high global warming potential. Often called 2-pound foam, it uses significantly more materials than open-cell foam. Exposure issues are similar to open-cell foam.
  • Best use: Walls, floors, ceilings.
  • DIY or pro? Definitely professional.
  • Cost: $1.75 to $3 per sq. ft. (R-13 for a 2-by-4-framed wall).


By: Jeanne Huber:© Copyright 2015 NATIONAL ASSOCIATION OF REALTORS®


How to Keep Your Dog Out of Your Garden

How to Keep Your Dog Out of Your Garden

Is your pooch pawing your petunias? Here’s how to keep your dog out of your garden and away from your precious plants.

We want our dogs to eat well, but we don’t want them snacking on our heirloom vegetables and prized perennials. Nor do we want them digging up the daffodils.

How can you keep dogs from wrecking your garden?

Spray Nasty Odors

Your vegetable garden is a salad bar for your dog. To keep him away, spray plants with pungent white vinegar or apple bitter. Or plant marigolds between vegetable rows, which repel dogs and other backyard pests, such as Mexican bean beetles, aphids, squash bugs, and whiteflies.

However, don’t apply rabbit or deer repellents that contain coyote urine. Dogs love the smell of urine and will either roll in your sprayed plants or leave an odor of their own.

Sprinkle Yucky Tastes

Sprinkle powdered mustard or red pepper flakes around your plants. A few sniffs and licks of these unpleasant tastes will discourage your dog from returning to the area.

Fence Dogs In or Out

If you’ve got small dogs, a 16-inch fence border ($29 for 6 feet) will mark the perimeter of your garden and discourage them from trampling your seedlings. For large, spunky dogs, encase your vegetables in a chicken wire cage with a top enclosure, which fence out deer and rabbits, too.

Or, contain your dog in a fenced play area that’s roomy and filled with interesting toys and treats. However, if your dog likes burying things, don’t give him a bone; instead offer chews, such as rawhide or bully sticks, that’ll keep him occupied and his mind off burying.

Erect Prickly Barriers

Place pruned rose or holly branches around your garden or plants. The thorns and prickly leaves will discourage your dog from entering the restricted area.

Provide a Pooch Path

If your dog cruises through your garden but leaves the veggies alone, make him a path of his own. You can lay down mulch, or even place a spare piece of carpet along your pet’s favorite route. You may have to alter your garden design a bit, but that’s better than watching puppy crash through your flowers or zucchini.

By: Lisa Kaplan Gordon:© Copyright 2015 NATIONAL ASSOCIATION OF REALTORS®


How to Divide Plants

How to Divide Plants

Make the most of your perennials by dividing and transplanting favorites that have outgrown their homes.

Follow these dividing and transplanting tips for lush and healthy gardens and landscaping.

Why Divide and Transplant?

Plants need space to thrive. When they become too big for their garden spots, powdery mildew coats leaves, insects chow down on blooms and stems, and centers become brown.

When you divide and transplant, each perennial — the new and old — blooms more. Plus, divided plants are cheap plants — they fill in garden gaps and are a hit at neighborhood plant swaps.

When’s the Best Time to Transplant?

Transplanting rule of thumb: If it flowers in spring, transplant in fall; if it flowers in fall, transplant when the blossoms fade.

But really, anytime is an OK time to move perennials if you can dig the ground and water the transplants. If you transplant in warm weather, avoid hot afternoons.

Early fall is particularly good because rain is more plentiful in most regions, and roots have an entire winter to grow and anchor themselves into the ground. Some happy fall transplants include:

  • Peony
  • Bleeding heart
  • Hosta
  • Spring bulbs such as tulips and iris

Plants that would rather be transplanted in spring are:

  • Coneflowers
  • Black-eyed Susans
  • Mums

Dividing Without Tears

You don’t need a surgeon’s touch to divide perennials, which are hardier than they look.

“Just dig or pull it out; you won’t hurt it,” says Sheri Ann Richerson, author of “The Complete Idiot’s Guide To Year-Round Gardening.”

5 Essential Steps for Dividing Plants

  • Prune the plant by about a third, which reduces its water requirements after transplanting.
  • Place a shovel or spade where you want to divide the plant, push the tool down through the plant and roots, and pull up the divided plant.
  • When dividing bulbs, dig up the mature plants and gently pull bulbs apart with your fingers.
  • To divide hostas, cut roots with a sharp knife or shears.
  • Trim the roots of divided plants, which makes them stronger and healthier (just like trimming split ends makes hair healthier).

6 Essential Steps for Transplanting

  • Give plants a nice long drink before transplanting. Immerse their roots in a bucket of water with a small amount of fertilizer for at least 30 minutes and no longer than overnight. Place the bucket in a shady place. This will decrease plant stress.
  • Amend soil with compost from your pile or a slow-release fertilizer. Bulbs will appreciate a handful of bone meal.
  • Dig a hole about twice the diameter of the plant.
  • If you’ve got clay garden soil, place crushed gravel or terra-cotta pot shards in the bottom of the hole to increase drainage.
  • Place plant in hole and cover with soil.
  • Water thoroughly and check every day or two to make sure the soil is moist, not sopping.

More Tips

  • Divide and transplant perennials every three to five years.
  • Dividing and transplanting temporarily stresses plants, so pick a day that’s not too hot or cold. A mild, overcast day about a month before the first hard frost is best.
  • Let plants rest for a couple of weeks after blooming, which is stressful. Then transplant.
  • If a heat wave suddenly appears, shade transplants with a beach umbrella and water daily.


By: Lisa Kaplan Gordon:© Copyright 2015 NATIONAL ASSOCIATION OF REALTORS®


Season-by-Season Lawn Maintenance Calendar

Season-by-Season Lawn Maintenance Calendar

Follow our season-by-season lawn maintenance calendar to get a barefoot-worthy lawn and ensure great curb appeal.

Early Spring

Like so many maintenance jobs, everything goes smoother — and you’ll get better results — with proper preparation. Early spring is the time to get ready for lawn-growing and mowing season.

Related:
How to Bring Back Your Lawn After Winter Damage

Sharpen mower blades to ensure clean cuts. A dull blade tears the grass, leaving jagged edges that discolor the lawn and invite pathogens.

Sharpen mower blades once each month during grass-cutting season. Have a backup blade (about $20) so that a sharp one is always on hand.

Tune up your mower with a new sparkplug ($3 to $5) and air filter ($5 to $10). Your mower might not need a new sparkplug every season, but changing it is a simple job, and doing it every year ensures you won’t forget the last time you replaced your sparkplug.

Buy fresh gas. Gas that’s been left to sit over the winter can accumulate moisture that harms small engines. This is especially true for fuel containing ethanol, so use regular grades of gasoline.

If you need to dump old gasoline, ask your city or county for local disposal sites that take old fuel.

Clean up your lawn. Time to get out the leaf rakes and remove any twigs and leaves that have accumulated over the winter. A thick layer of wet leaves can smother a lawn if not immediately removed in early spring. Cleaning up old debris clears the way for applying fertilizer and herbicides.

Spring
Early Summer
Summer
Early Fall
Fall

Spring

Depending on your weather, your grass will now start growing in earnest, so be ready for the first cutting. Don’t mow when the grass is wet — you could spread diseases, and wet clippings clog up lawn mowers.

Fertilizing: Both spring and fall are good times to fertilize your lawn. In the northern third of the country, where winters are cold, fertilize in fall — cool weather grasses go dormant over winter and store energy in their roots for use in the spring.

For the rest of the country, apply fertilizer just as your grass begins its most active growth. For best results, closely follow the application directions on the product. You’ll spend about $50 to $75 per application for an average 1/4-acre lot.

Aeration: Aerating punches small holes in your lawn so water, fertilizers, and oxygen reach grass roots. Pick a day when the soil is damp but not soaked so the aeration machine can work efficiently.

Related: More about lawn aeration

Pre-emergent herbicides: Now is the time to apply a pre-emergent herbicide to prevent crabgrass and other weeds from taking root in your lawn. A soil thermometer is a handy helper; you can pick one up for $10 to $20. When you soil temperature reaches 58 degrees — the temperature at which crabgrass begins to germinate — it’s time to apply the herbicide.

Early Spring
Early Summer
Summer
Early Fall
Fall

Early Summer

Watch out for grubs: Warm weather means that grub worms, the larvae stage of June, Japanese, and other beetles, start feeding on the tender root systems of lawns. Affected lawns show browning and wilting patches.

To be certain that the culprits are grubs, pull back the sod and look for white, C-shaped grubs. If you see more than 10 per square foot, your lawn should be treated with a chemical pesticide.

Milky spore is an environmentally friendly way to control some species of grubs. When using insecticides, read and follow all label directions, and water the product into the soil immediately. Cost is around $50 to $75 per application.

Grass-cutting tip: Your grass is starting to grow fast, and you might even be cutting more than once a week to keep up. To keep grass healthy, mow often enough so you’re removing no more than 1/3 of the grass blade.

Pesky weeds: Weeds that have escaped an herbicide application should be removed with a garden fork. Use a post-emergent herbicide only if you think the situation is getting out of hand.

Check out our guide to some common types of weeds and tips on how to get rid of them.

Early Spring
Spring
Summer
Early Fall
Fall

Summer

Here’s a good mantra to guide you through the heart of grass-mowing season: The taller the grass, the deeper the roots, the fewer the weeds, and the more moisture the soil holds between watering.

With that in mind, here’s how to ensure a healthy, green lawn:

  • Set your mower blade height to 3 inches.
  • Deep and infrequent watering is better for lawns than frequent sprinkles, which promote shallow root growth. In general, lawns need about 1 inch of water per week to maintain green color and active growth.

Lawns that receive less than that will likely go dormant. That’s okay, the grass is still alive, but dormant lawns should still receive at least 1 inch of water per month. Your grass will green up again when the weather brings regular rains.

  • To check the output of a sprinkler, scatter some pie tins around the yard to see how much water collects in a specific length of time. Having a rain gauge ($5 to $20) will help you keep track of how much water the lawn receives naturally.
  • At least once each month, clean underneath your mower to prevent spreading lawn diseases.
  • Although it’s OK to leave grass clippings on the lawn where they can decompose and nourish the soil, large clumps of clippings should be removed. Regularly rake up any leaves, twigs, and debris.

If your grass seems to be stressed out, check out our advice on what to do if your lawn is turning brown.

Early Spring
Spring
Early Summer
Early Fall
Fall

Early Fall

The best time to patch bare or thin spots is when the hot, dry days of summer have given way to cooler temps. Follow these simple steps:

1. Remove any dead grass.

2. Break up the soil with a garden trowel.

3. Add an inch of compost and work it into the soil.

4. Add grass seed that’s designed for shade or full sun, depending on the area you’re working on. Spread the seed evenly across the bare patch.

5. Use a hard-tooth rake to work the seed into the soil to a depth of about half an inch.

6. Sprinkle grass clippings over the patch to help prevent the soil from drying out.

7. Water the area; you’ll want to keep the patch moist, so lightly water once a day until the seed germinates and the new grass gets about one inch tall.

Early Spring
Spring
Early Summer
Summer
Fall

Fall

Your main job in fall is to keep your lawn free of leaves and other debris. You can use a mulching mower to break up leaves and add the organic matter to your soil, but be sure to clean up any clumps so they don’t kill the grass.

In the northern one-third of the country, now is the time to fertilize your lawn. Your grass will store the nutrients in its roots as it goes dormant over the winter, and your lawn will be ready for a jump start when spring warms the ground.

This is also the time to clean up your garden.


By: Douglas Trattner:© Copyright 2015 NATIONAL ASSOCIATION OF REALTORS®


Take Back Your Energy Bills — Energy-Efficiency Measures that Work for You

Take Back Your Energy Bills — Energy-Efficiency Measures that Work for You

Published: July 3, 2013

You know that 10 or 20 pounds that you just can’t seem to lose? You do the right thing — eat kale or log time on the StairMaster — but the weight clings. You feel powerless.

It’s like that with our energy bills, too. Eighty-nine percent of us think we’re not using as much energy as we did five years ago, and almost one-half of us think our homes are energy efficient. But 59% also say our energy bills have gone up, according to consumer research by the Shelton Group, a marketing and advertising agency that specializes in energy-efficiency issues.

Call that the Snackwell’s effect, says Shelton Group CEO Suzanne Shelton. Basically, we’re saying, “I bought these CFLs so now I can leave the lights on and not pay more. I bought a high-efficiency washer and dryer because I want to do more laundry without paying more. I ate the salad, so I can have the chocolate cake.”

Unfortunately, that disconnect has led to defeat. We feel victimized by our energy bills and powerless to the point where we’re making fewer energy-efficient improvements. In fact, Shelton’s research shows consumers made only 2.6 improvements in 2012 compared with 4.6 in 2010.

Until the day we all get energy dashboards in our home, we’re here to help you understand why your energy costs are where they are and how you can take back your energy bills.

Hint: You need to do four or five energy-efficient things to see a difference; one or two won’t cut it. But — good news! — they don’t cost much to do.

Energy bills chart

Related: Are Smart Meters Dangerous?

Why Do We Feel Victimized?

We don’t know what we’re buying. Energy is the only product we buy on a daily basis for which we have no idea how much we pay until a month later, says Cliff Majersik, executive director of the Institute for Market Transformation, a research and policy-making nonprofit focused on improving buildings’ energy efficiency.

Energy costs are going up. Inflation is mainly to blame. Your bills are projected to rise on average 2% per year through 2040, according to the U.S. Energy Information Administration (EIA), the research arm of the energy department. Expect about 3.4% per year if the economy gets sluggish.

Other trends pushing up our energy usage:

  • A growing population means more homes.
  • New homes are getting bigger, though our families are getting smaller, according to the Census Bureau.
  • We’re plugging in more devices (computers, smart phones, tablets, X-boxes, plasma TVs) per household — and not unplugging them. (More on behavior later.)

In fact, for the first time, energy use for appliances, electronics, water heating, and lighting accounts for more than heating and cooling, according to EIA.

Still, overall consumption is pretty flat through 2040, thanks in part to:

  • Appliance efficiencies.
  • Population migration to dryer, warmer climates in the South and West.
  • People living in multifamily rather than single-family situations.

We make assumptions.

Assumption #1. Unless a home is old — more than 30 years — we figure it was built to code, which requires a certain amount of energy efficiency. But building codes change pretty regularly, so even newer homes benefit from improvements, says Lee Ann Head, vice president of research and insights with the Shelton Group.

Assumption #2. We think utilities are out to get us: They’ll jack up prices no matter what we do. Shelton’s research shows consumers blame utilities above oil companies and the government. But keep this mind: To get rate changes, utilities must make a formal case to public utility commissions. They’re also on the hook to pay for such things as:

  • Infrastructure upgrades put off for years
  • Efficiencies
  • Equipment repairs after bouts of nutty weather
  • Consumer rebates

Another reason rates seem stuck is because utilities bundle fuel, service, and delivery fees together.

Assumption #3. Our expectations for energy savings are out of whack. When the Shelton Group asked consumers what they would expect to recoup if they invested $4,000 in energy-efficient home improvements, they said about 75% to 80%.

Sorry, unless you invest in some kind of renewable energy source like geothermal and solar, you won’t see that kind of savings. If you do all the right things (we’ll tell you about the best five later), you could expect a 20% to 30% reduction, Head says, particularly if you don’t succumb to the Snackwell’s effect.

What does 30% translate into? $660 in savings per year or $55 per month, based on the average household energy spend of $2,200 per year, according to the U.S. Department of Energy (DOE).

Assumption #4. Many of us don’t know how to make the biggest impact on our homes. That’s why we sometimes replace our windows first, when that should probably be fifth or sixth on the list of energy-efficient improvements, Shelton says.

There’s nothing wrong with investing in new windows. They feel sturdier; look pretty; increase the value of your home; feel safer than old, crooked windows; and, yes, offer energy savings you can feel (no more draft).

But if you spend $9,000 to $12,000 on windows and save 7% to 15% on your energy bill, according to DOE data, when you could have spent around $1,000 for new insulation, caulking, and sealing, and saved 10% to 20% on your energy bill, you made the wrong choice if your only reason for the project was reducing energy costs.

The real reasons for getting new windows are “emotional rather than financial,” Shelton says.

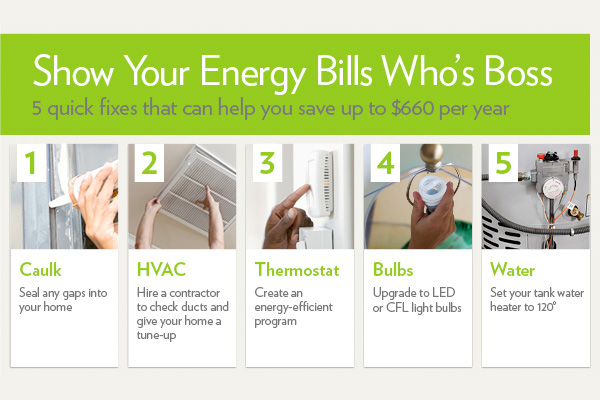
The 5 Things You Should Do to Show Your Bills Who’s Boss

1. Caulk and seal air leaks. Buy a few cans of Great Stuff and knock yourself out over a weekend, sealing penetrations into your home from:

  • Plumbing lines
  • Electricity wires
  • Recessed lighting
  • Windows
  • Crawlspaces
  • Attics

Savings: Up to $220 per year, says EPA

Related: The Biggest Air Leak in Your Home You Don’t Know About

2. Hire an HVAC contractor to take a hard look at all your ductwork — are there any ducts leaking that need to be resealed? — and give you an HVAC tune-up.

Savings: Up to $330 per year, for duct sealing and tune up, says DOE

3. Program your thermostat. Shelton found that 40% of consumers in her survey admit to not programming their thermostat to energy-saving settings. She thinks it’s even higher.

Savings: Up to $180 per year, says EPA

Related: How to Program Your Thermostat to See Real Savings

4. Replace all your light bulbs with LEDs or CFLs. We suggest LEDs, which have fewer issues than CFLs (namely, no mercury), and although expensive are coming down in price. We’ve even seen a $10 model.

Savings: $75 per year by replacing your five most frequently-used bulbs with Energy Star-rated models, says EPA.

Related: Guide to Buying Light Bulbs and Which to Use Where

5. Reduce the temperature on your water heater. Set your tank heater to 120 degrees — not the 140 degrees most are set to out of the box. Dropping 20 degrees could save 6% to 10% on your annual water heating costs, which are 14% to 18% of your utility bills. Also wrap an older water heater and the hot water pipes in insulating material to save on heat loss.

Savings: $18 to $39 per year

Important note: Resist the urge to total these numbers for an annual savings. The estimated savings for each product or activity can’t be summed because of “interactive effects,” says DOE. If you first replace your central AC with a more efficient one, saving, say, 15% on energy consumption, and then seal ducts, you wouldn’t save as much total energy on duct sealing as you would have if you had first sealed them. There’s just less energy to save at that point.

But these practices can help you achieve the goal of shaving 20% to 30% of your annual bill ($440 to $660).

Energy Savings is Addictive. What Else Can We Do?

If you want to go further and spend more, especially if you’re not planning to sell your home soon:

  • Add insulation. Anything you can do to shore up your building envelope is good.
  • If major appliances like your HVAC and water heater are nearing the end of their useful life, research energy-efficient replacements and keep the info where you’ll remember. Otherwise, you’ll make a reactive purchase when the unit finally breaks.
  • Contact your utility about rebates for investing in improvements. Or visit DSIRE, a database of federal, state, local, and utility rebates searchable by state. Energy Star has a discount and rebate finder, too.

A Final Word: Oh, Behave!

Remember the Snackwell’s effect? If your behavior — unplugging chargeable devices from the socket when they’re done charging; putting computers, TVs, and media on smart strips and turning them off at once; reprogramming your thermostat at daylight savings time — doesn’t support your improvements, you’re letting energy, an invisible product, win.

Related:

  • Trying to convince someone you live with to be more energy efficient? Here’s how to win the energy-savings argument.
  • Fun DIY Projects to Cut Energy Use


By: Christina Hoffmann:© Copyright 2015 NATIONAL ASSOCIATION OF REALTORS®

Why Fake Grass is Gaining Popularity

Why Fake Grass is Gaining Popularity

Want a picture-perfect lawn? Maybe fake grass is the answer. It solves watering, weeding, and fertilizing woes. But is it perfect?

If you live in a low-water area, or if you’re just tired of constant lawn maintenance, you’re in good company.

More homeowners are saving time, water — and their backs — by switching from real grass to artificial turf.

Synthetic grass for landscaping and recreation is growing 10% to 15% a year in the U.S.

That means more and more homeowners are using fakes for:

  • Lawns
  • Dog runs
  • Play areas
  • Pool surrounds
  • Rooftops
  • Putting greens
  • Decorative borders between patio pavers

Faking It is Right for You If:

  • You’re tired of watering, weeding, fertilizing, and cutting real grass.
  • Your summer water bills are too high.
  • You don’t want to use chemical fertilizers and herbicides.
  • You believe artificial grass looks as good as real grass — maybe better.

What Exactly is Artificial Grass?

Fake grass consists of filaments threaded into a backing that lets water through. The backing is laid on a drainage layer, usually compacted gravel, and fastened along the perimeter. Then it’s filled with recycled crumb rubber or sand to keep it from blowing away in a stiff breeze.

Today’s synthetic grass is made of nylon, polyethylene, or polypropylene that’s colored to look like various species.

Synlawn, one of the largest manufacturers of synthetic grass, offers: SYNBermuda, SYNFescue, SYNZoysia — you get the idea. Some grasses even have a thatch layer that makes a yard look less Stepford-like and more realistic.

Let’s Talk Money

Artificial grass comes with a big upfront cost — $5 to $20 per square foot, installed. Once it’s down, it’s free for the next 15 to 25 years.

Professionally laid sod, on the other hand, costs only 14 to 60 cents per square foot. But that’s where expenditures (and upkeep) begin. You’ve got to water, mow, fertilize — all of which cost money and take time.

Let’s crunch some numbers on a hypothetical 500-square-foot yard.

First year costs:

Artificial Grass
Installation ($12.50/sq. ft. average) $6,250


Natural Sod
Installation (37 cents/sq. ft. average) $185

Annual costs:

Artificial Grass
Watering n/a
Fertilizing n/a
Gardener/Lawn Man n/a
Annual Total: $0


Natural Sod
Watering ($15/month for 6 months) $90
Fertilizing (20 cents/sq. ft.) $100
Gardener/Lawn Man ($25/week for 26 weeks) $650
Annual Total: $840

So, it would take about seven years for maintenance-free artificial grass to recoup its initial cost. If you’re planning on staying put for longer than that, you’ll begin to save money each year.

What are the Good Points of Artificial Grass?

  • It saves water.
  • It’s easy to maintain.
  • Synthetic grass can be environmentally friendly.

The Southern Nevada Water Authority says a home owner saves 55 gallons of water per year for every square foot of natural grass replaced with synthetic. Plus, some water companies in drought-prone areas will offer a cash rebate for artificial grass, up to $1 per square foot.

You’ve got to blow off leaves and other debris, and hose off pet waste. But there’s no mowing, seeding, edging, and fertilizing — lawn maintenance chores that take the average home owner about 150 hours per year, says Ted Steinberg, author of “American Green: The Obsessive Quest for the Perfect Lawn.”

The Synthetic Turf Council says synthetic lawns’ recycled crumb rubber infill keeps 20 million rubber tires out of landfills every year.

What are the Drawbacks?

  • It’s not completely maintenance-free.
  • It can’t absorb and break down pet urine.
  • It heats up in direct sun.
  • It can’t be recycled.
  • Some HOAs and municipalities ban fake grass.

Weeds can still grow in the dust or rotted leaves that can accumulate; so, you’ll have to spend time blowing or raking.

If you don’t hose off pet runs regularly, they’ll stink.

It radiates heat to surrounding people, pets, trees, and buildings. Shade trees, which prevent real grass from growing, will prevent fake grass from getting too hot.

Although the industry is working on ways to recycle old synthetic grass, currently fakes end up in landfills.

Alternatives to Fake Grass

  • Low-Maintenance Turf Grasses
  • Natural Lawn Replacement Ideas

Or, if you want to green up your lawn in a hurry, try lawn paint.


By: Lisa Kaplan Gordon:© Copyright 2015 NATIONAL ASSOCIATION OF REALTORS®

The owner of this website has made a commitment to accessibility and inclusion, please report any problems that you encounter using the contact form on this website. This site uses the WP ADA Compliance Check plugin to enhance accessibility.