Tips on Pool Fence Safety to Reduce Your Liability

Tips on Pool Fence Safety to Reduce Your Liability

There’s nothing more inviting on a hot summer day than a cool dip in the pool . And that can lead to trouble if your pool lacks a child-proof fence.

Installing a fence around your swimming pool is a smart security measure that prevents kids from having unsupervised access. In many areas, the law and your insurance company may also require it. But how do you know what kind of fence to pick?

Here’s where things get tricky.

There Are No Standard Requirements

The U.S. does not have a federal pool fence law. Instead, pool barriers are regulated at the state and local level.

Wait, it gets more complicated.

There are exemptions built into these laws. For example, families with children over 6 years old don’t have to install a pool fence in Arizona — unless you live in Scottsdale, Glendale, and several other areas.

See what I mean? It’s confusing.

Then you have to consider that although your pool might be exempt from fencing laws, your insurance company might require it.

So, what to choose?

Follow These Recommendations to Be Safe

Here’s a list of features every pool fence should have, based on legal requirements across the states and the U.S. Consumer Product Safety Commission:

  • Height: Some areas require a 4-ft. fence; the CPSC recommendation is 4 ft. or taller.
  • Structure: Must be impossible for children to climb.
  • Type: Permanent fencing is ideal because of durability.
  • Gate: All states require that they open outward away from the pool area, and be self-closing and self-latching.
  • Materials: Structures can be made from a wide range of stuff including wood, vinyl, and aluminum. However, make sure the material you pick is not easily susceptible to damage.

For more on pool safety, visit PoolSafely.gov.

The 3 Most Popular Types of Fences

1. Removable mesh pool fencing: Many consumers like this option because it’s an easy-to-move transparent barrier. But when it comes to safety, don’t skimp. The Association of Pool & Spa Professionals has set a standard for fences like these that is recognized worldwide. Here in the U.S., it has the approval of the American Society for Testing and Materials. So if you go with a mesh barrier, make sure it meets or exceeds the ASTM requirements. In many areas this is also mandatory by law.

2. Vertical bar fencing: Structures can be made from a wide range of stuff including wood, vinyl, aluminum, and wrought iron. However, make sure the material you pick is not easily susceptible to damage. In most states, the space between the vertical bars can’t be more than 4 inches wide.

3. Glass panel fencing: Barriers like these are very popular in California. They are durable and safe because they’re made from tempered glass. Plus, since they’re transparent, they don’t detract from your pool’s beauty.

Add Additional Protection

Keep in mind: Many states, such as New York and California, require layers of protection in addition to fencing.

Examples of additional layers of security include:

  • Automatic rigid pool covers
  • An underwater motion swimming pool alarm
  • Rescue equipment

But who do you contact in your area to get the skinny on swimming pool safety? Since every state and county sets up their agencies differently, try contacting the following departments in your area:

  • Building Code Department
  • Department of Health
  • Licensing and Regulatory Affairs


By: Deirdre Sullivan:© Copyright 2015 NATIONAL ASSOCIATION OF REALTORS®

Does a Pool Add Value to a Home?

Does a Pool Add Value to a Home?

Published: July 10, 2013

Learn how a pool affects the value of your home, and get advice on construction and maintenance costs.

Does a pool add value to a home? No. And yes.

In general, building a pool is not the best way to add value to your home. You’re better off making physical improvements to your actual house instead of adding a pool to your yard.

Related: What Home Projects Give the Most Value?

However, a pool can add value to your home in some cases:

  • If you live in a higher-end neighborhood and most of your neighbors have pools. In fact, not having a pool might make your home harder to sell.
  • If you live in a warm climate, such as Florida or Hawaii.
  • Your lot is big enough to accommodate a pool and still have some yard left over for play or gardening.

Still, that’s no guarantee you’ll get a return on your investment. At most, your home’s value might increase 7% if all circumstances are right when it comes time to sell. Those circumstances include the points made above, plus:

  • The style of the pool. Does it fit the neighborhood?
  • The condition of the pool. Is it well-maintained?
  • Age of the pool. If you put a pool in today and sell in 20 years, you probably won’t recoup your costs, especially if the pool needs updating.
  • You can attract the right buyer. Couples with very young children may shy away from pools because of safety issues, but an older childless couple may fall in love with it.

But only you, the homeowner, can determine the true return on investment. A pool can add value to your quality of life and enhance the enjoyment of your home. You can’t put a price tag on that.

But we can put a price tag on how much a pool costs to build and maintain.

The Cost to Build a Pool

The average cost in the U.S. to install, equip, and fill a 600-sq.-ft. concrete pool starts at $30,000.

Add in details like safety fences (most states require them), waterfalls, lighting, landscaping, and perhaps a spa, and you’re easily looking at totals approaching $100,000.

Costs also depend on the type of pool you choose.

Gunite is the most popular in-ground pool. Gunite is a mixture of cement and sand, which can be poured into almost any shape. It has replaced concrete pools as the sought-after standard.

Fiberglass shells and those with vinyl liners fall on the lower end of the budget scale, but the liners typically need replacing every 10 or so years. Changing the liner requires draining the pool and replacing the edging (called coping), so over time, costs add up. Most homebuyers will insist that you replace a vinyl liner, even if it’s only a few years old.

Related: Fences for Pool Safety

Filtration and Heating

The filtration pump is the biggest energy hog in a pool system, so you want to get the most efficient pump possible. The good news here is that new, variable-speed pumps use up to 80% less energy than old single-speed pumps, cutting operating expenses dramatically.

At about $500, these cost more up front, but some local utilities offer rebates through participating pool dealers. You can further cut energy costs by setting the pump to run at non-peak times, when rates for electricity are lower.

If you’re planning to heat your pool, gas heaters are the least expensive to purchase and install, but they typically have the highest operation and maintenance costs. Many pool owners opt instead for electric heat pumps, which extract heat from the surrounding air and transfer it to the water. Heat pumps take longer than gas to warm the pool, but they’re more energy-efficient, costing $200 to $400 less to operate per swimming season.

Regardless of heating system, covering the pool with a solar blanket to trap heat and reduce evaporation will further lower operating costs.

Related: Solar Pool Heater Costs and Facts

Maintenance Expenses

All pools require that the water be balanced for proper pH, alkalinity, and calcium levels. They also need sanitizing to control bacteria and germs, which is where chlorine has traditionally entered the picture.

These days you have a variety of options, including systems that use bromine, salt, ozone, ionizers, or other chemical compounds that can be less irritating to skin. Chlorine remains the most popular because the upfront costs are reasonable, and you don’t have to be as rigid about checking the levels on a set schedule. But as far as your wallet is concerned, they all even out in the end.

In a seasonal swimming climate, budget about $600 annually for maintenance if you shoulder the chemical balancing and cleaning yourself; in a year-round climate, it’s more like $15 to $25 per week.

To save yourself the task of once-a-week vacuuming, you can buy a robotic cleaning system for between $500 and $800 that will do the job for you. In locations where the pool must be opened and closed for the season, add another $500 each time for a pro to handle this task.

Related: Natural Swimming Pools

Insurance and Taxes

A basic homeowners insurance policy typically covers a pool structure without requiring a separate rider, but you should increase your liability from the standard amount.

It costs about $30 a year to bump coverage from $100,000 to $500,000. Many underwriters require you to fence in the pool so children can’t wander in unsupervised.

In some areas, adding a pool may increase your annual property taxes, but it won’t necessarily add to your home’s selling price. For that reason, try to keep your total building cost between 10% and 15% of what you paid for your house, lest you invest too much in an amenity that won’t pay you back.


By: Julie Sturgeon:© Copyright 2015 NATIONAL ASSOCIATION OF REALTORS®


How to Properly Care for Trees

How to Properly Care for Trees

When trees fail to thrive, they (and you) have a problem. Here are tips on how to care for your trees to prevent troubles.

Unless our trees have problems, we don’t fuss about them. So long as they’re green, leafy, flowery, and fruity, we let them be.

But when trees fail to leaf out in spring or drop the leaves they have; when foliage turns brown before autumn; when trees lean precariously or branches die; then suddenly our trees become the center of attention.

What’s wrong? The likely culprit is human error. Trees often get sick because they haven’t been planted and cared for properly.

The good news: It’s pretty easy to give your trees the care they need to stay healthy and fight off diseases. Here are the most common errors and how to avoid them:

Improper Pruning

Improper pruning can destabilize a tree, encourage the spread of disease, and even make it fall over.

Signs of bad pruning include:

  • Tree is leaning more than usual.
  • Tree looks top- or bottom-heavy.
  • One tree is blocking the sun from another.
  • Tree is too big for its space.
  • Pruning cuts are jagged.

Do it right:

  • Pruning is as much art as science. A properly pruned tree looks balanced and beautiful; it feels comfortable — not squished into — its space; it lacks dead branches or ones that crisscross.
  • Pruning techniques — where and how — are specific to each species of tree. So before you make your first cut, consult a pruning manual.
  • Make sure your saws, loppers, and shears are clean and sharp to prevent disease.

Mulching Mayhem

Mulch helps protect trees (especially young ones) from stress and gives your yard great curb appeal. But more mulch is not necessarily better, and too little mulch does little to protect trees.

Signs of mulching mistakes:

  • Mulch piled up against the tree trunk, volcano style, which can cause trunk rot and encourage infestation and disease.
  • Mulch covering the tree’s root collar, where the trunk flares into the root system.
  • Exposed roots.

Do it right:

Begin mulching about 6 in. from the tree base, and extend the mulch to the end of the tree’s drip line just beneath the end of the tree canopy. Start with 1 in. of mulch toward the base, building up to no more than 4 inches at the end of the mulch circle.

Use mulch only from reputable sources, not strange mulch piles that may contain material from diseased trees. To save money, make your own mulch from healthy lawn clippings, shredded leaves, branches, and bark.

Fertilizer Frenzy

A tree planted in a sunny location with good soil and covered with organic matter doesn’t need extra fertilizer: it makes its own food through photosynthesis.

Still, many homeowners mistakenly think their trees need an annual dose of fertilizer that adds minerals and nutrients to the soil. In fact, the opposite is true. Over-fertilizing can poison a tree’s root system, cause excessive and weak growth, and pollute watersheds.

Signs of over-fertilizing:

  • Small or yellow foliage.
  • Dead branches.
  • Reduced growth.
  • Salts on soil surface.

Do it right:

Many ailments — infestation, compacted soil, trauma, and nutrient deficiency — can cause a tree to show the same symptoms of over-fertilizing. So before you add fertilizer, test your soil to determine which, if any, nutrients your tree lacks. A good time to test soil is either before you plant, or every 3 years or so after planting.

If fertilize you must, add only the nutrients your tree needs, usually nitrogen, phosphorous, and potassium. Fertilize in early spring and fall; never fertilize during drought.

Planting Mistakes

Your new tree has so much potential. But if you plant a tree that doesn’t fit your hardiness zone; if you manhandle the little one and squeeze it into a hole that’s too narrow and too shallow; you may limit your tree’s future.

Signs of improper planting:

  • Trees grow into utility lines or foundations.
  • Scant or dry foliage.
  • Stunted growth from inappropriate sun conditions.
  • Dieback due to trauma at planting time.

Do it right:

You and your trees will be together for a long time. So when you select a species and location, consider the eventual size of the mature tree — the spread of its canopy and roots — not just the dimensions of the sapling. Plant trees away from overhead power lines and underground gas lines, and at least 15 feet away from the house (up to 35 feet for big trees).

When planting, dig a hole 3 to 5 times the diameter of the tree’s root ball and about 1 ft. deep. Make sure the root collar (flare) rests just above the soil surface. Don’t forget to water slowly and deeply until the root system is established.

If you want to be warned away from troublesome trees, check out these stories:

  • 11 Trees You Should Never Plant In Your Yard
  • More Trees You Should Never Plant in Your Yard


By: Lisa Kaplan Gordon:© Copyright 2015 NATIONAL ASSOCIATION OF REALTORS®


How to Prevent Wood Rot

How to Prevent Wood Rot

If water gets into cracks and under painted surfaces and doesn’t dry out, it can cause wood rot. Once wood rot takes hold, your only options are big-buck repairs and replacement of the rotted parts.

Left untreated, wood rot may spread, infecting other wood parts and possibly leading to structural damage.

That’s not all: The dampness that causes wood rot invites voracious termites. Bottom line: Because your house is made with a lot of wood — framing members, plywood sheathing, trim — there’s a lot to protect.

Look for Trouble Spots

The best defense against rot? Your eyes — once each year, make a tour of your house to inspect for:

  • Cracks and holes in the caulking around windows, doors, dryer vents, etc.

Remedy: Re-caulk any openings using a high-quality acrylic latex exterior caulk.

  • Stains under eaves, around fireplaces, and on interior ceilings. 

Remedy: You may have a roof leak. Inspect for damage yourself or hire a specialized roofing inspector ($175) through the National Roof Certification and Inspection Association. Roof repairs may cost as little as $10 to patch a minor leak, or $1,000 to fix a leaky roof valley.

  • Sagging and leaking gutters and downspouts.

Remedy: Most gutter repairs and replacements are easy DIY jobs. That said, you’ll want to be cautious about working near the top of a multi-story house. Pro gutter repairs are $100 to $900, depending on the extent of the damage.

  • Shrubbery and tree branches closer than 2 feet from siding and roofing.

Remedy: Trim back shrubbery; it should be 3 feet away from siding. Tree branches can rub against roofs during windy days, damaging the roofing. Trim tree branches at least 3 feet away from roofing.

  • Peeling and cracked painted surfaces.

Remedy: Scrape and sand peeling paint. Apply primer to ensure good adhesion. Paint the damaged area with color-matched exterior paint.

  • Crawl space vents blocked with leaves and other debris.

Remedy: Remove blockage; use a shop vac to thoroughly clean vent screens.

  • Dirt, leaves, and twigs between decking boards.

Remedy: Use a screwdriver or awl to pry out gunk that may trap moisture and lead to rot. Flush out any remaining debris using a garden hose.

Probe for Rot

As you inspect your house, you should actively look for wood rot. It’s not always obvious; wood rot may occur below the outer surface of wood and underneath intact layers of paint.

If you suspect rot, use your fingers to press on wood surfaces and see if they feel soft or crumble easily. Use an awl to probe wood framing members. Typical trouble spots include:

  • Where two pieces of trim meet.
  • Siding butt joints, and where siding meets trim.
  • Horizontal surfaces, such as window sills, door thresholds, and railings.
  • Deck support posts.
  • Exterior stair stringers that support steps.
  • Fascia behind leaking gutters.

Tips for Preventing Wood Rot

  • Always use decay-resistant or pressure-treated lumber for decks. Wood that touches the ground should be pressure-treated lumber that’s rated for ground contact.
  • When building an exterior project with wood, stain or paint all sides of each lumber piece before assembly.
  • Don’t lean anything against your siding, such as old plywood, tools, and ladders.
  • Clean your gutters regularly to prevent clogs that could cause water to back up and spill onto fascia and siding.

Other Ways to Protect Your House

Home inspections are a good defense against a multitude of problems. Here are other essential inspections you can easily do yourself:

  • Checking Your Plumbing Pipes
  • How to Inspect Your HVAC
  • How to Make Sure Your Fireplace is Safe

By: John Riha:© Copyright 2015 NATIONAL ASSOCIATION OF REALTORS®

Are You Prepared to Evacuate in an Emergency?

Are You Prepared to Evacuate in an Emergency?

When stuff hits the fan and you need to flee your home, being organized is the best way to protect your home and family.

If there comes a time when you have to abandon your house, an emergency probably won’t give you enough time to gather essentials and take steps to limit property damage. Getting all of your ducks in a row before disaster strikes is the best course of action.

How to Get Ready Now

Evacuations in the U.S. are more common than most people realize, according to FEMA. Natural disasters aside, people are forced to leave their homes hundreds of time a year because of transportation and industrial accidents.

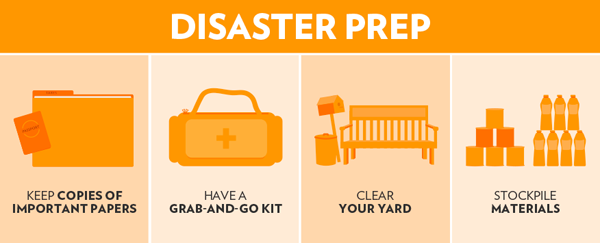
Home evacuation checklist infographic

Here’s a list of things you can prepare now in case your home is ever in harm’s way:

  • Have a grab-and-go kit. Include essential supplies, such as water, food, and first-aid supplies.

    Related: What to Put In Your Emergency Preparedness Kit

  • Have copies of important papers. Keep these in a plastic, waterproof case. FYI, this stuff is priceless, because you may need to prove who you are and that you own your house. Include:
    • Your driver’s license.
    • The deed to your house.
    • Proof of insurance.
    • Medical records.
    • Passports.
    • Social security cards.
    • A list of personal contacts.
  • Safeguard pets. Make sure they’re micro-chipped and have I.D. collars. Create pet grab-and-go kits that include leashes, medications, meal bowls, and three days worth of food and water.
  • Prep your yard. Maintain your trees and shrubs so diseased or weakened branches won’t fall down and damage your property.
  • Know your utility shutoffs. Learn now how to safely shut off all utility services in your home. FEMA has tips for shutting off electricity, water, and gas. Note: To turn off gas you may need a special wrench.
  • Stockpile sandbag materials. If you live in a flood prone area, keep sandbags on hand or the materials to make them. It takes 100 sandbags to create a 1-foot-tall wall that’s 20 feet long. If you’re filling bags on the fly, two adults can create the wall in about an hour.
  • Protect windows. If you live in an area susceptible to hurricanes, install shutters that are rated to provide protection from windblown debris.

When It’s Time to Evacuate

Before you pick up and go (and if you have enough time) follow these steps — they’re designed to protect your pets and help prevent property damage:

  • Clear your yard. Remove any objects hanging on trees or your home’s exterior, such as birdhouses and wind chimes — they can break off in high winds and cause serious damage. Bring inside anything that’s not nailed down including lawn furniture, trashcans, toys, and garden equipment.
  • Shut off utilities. Turn off electricity, water, and gas. Doing so will help prevent additional dangers including flooding, fire, and explosions. Keep in mind, you’re going to need the utility company to turn your gas back on when you return home.
  • Windproof windows and doors. If you don’t have storm-proof shutters, fit plywood coverings over all windows. (FYI, using just tape on windows is not recommended because it will not stop windows from breaking, just shattering.)
  • Protect indoor stuff. Move valuables to higher levels in your home to prevent water damage. As an extra measure, wrap electronics and furniture in sheets, blankets, or plastic drop cloths.
  • Gather up pets. If it’s not safe for you to stay, it’s not safe for Fido. Make plans to stay with friends or at a pet-friendly hotel — most emergency shelters will only accept service animals that assist people with disabilities.
  • Lock your house. Because crooks and looters take advantage of evacuations, lock all doors and windows and don’t leave house keys in an obvious place, such as a mailbox.

Important Stuff to Remember

Whether the order is voluntary or mandatory, if officials in your area tell you to evacuate, you should do so before things get worse. Although laws vary from area to area, you may receive a hefty fine or face a jail sentence if you don’t follow a mandatory evacuation order.

Failure to follow an evacuation order can place your life in danger by leaving you stranded in an area with no basic services or food and water.

When you return home after an emergency, don’t use matches, lighters, or any sources of flame or spark until you’re 100% certain that you don’t have a natural gas leak inside your home — you’ll need a gas company service technician to confirm that it’s safe.

Stay Informed with Emergency Alerts

Smartphone technology has made it easier to receive disaster alerts free of charge. You’ll automatically receive alerts if you have a phone capable of receiving Wireless Emergency Alerts (WEA) and your wireless carrier participates in the program. To find out if your mobile device is capable of receiving WEA alerts, contact your mobile device carrier or visit CTIA – The Wireless Association.

Related: Preparing Your Home for a Natural Disaster


By: Deirdre Sullivan:© Copyright 2015 NATIONAL ASSOCIATION OF REALTORS®

How to Clean and Care for Your Home’s Siding

How to Clean and Care for Your Home’s Siding

Cleaning your home’s siding every year and keeping it in good repair extends the life of any siding and heads off replacement costs.

With a bit of preventative maintenance, your home’s siding could be trouble-free for 50 years or more. And that means you won’t have to replace siding as often.

Cleaning siding removes the dirt and mildew that shortens the life of siding. A clean house protects your investment, too. Some real estate appraisers say good curb appeal can add 5%-10% to the value of your house.

Related: How Maintenance Also Adds to Your Home’s Value

Cleaning All Types of Siding

All types of siding benefit from an annual cleaning to remove grit, grime, and mildew. Cleaning an average-sized house may take you and a friend every bit of a weekend. Here’s how to do it:

1.  Start with a bucket of warm, soapy water. Mix 1/2 cup trisodium phosphate (TSP, available at grocery stores, hardware stores, and home improvement centers) with 1 gallon of water.

2.  Divide your siding into 10-foot sections. Scrub each section using a soft-bristled brush attached to a long handle. Work from bottom to top to avoid streaking, and rinse often. (For two-story homes, you’ll be using a ladder, so keep safety foremost.)

Related: Care and Maintenance of Your Deck

What’s a Professional Cleaning Cost?

If you don’t have the time — or the inclination — you can have your house professionally cleaned for $300-$500. A professional team will use a power washer and take less than a day.

You can rent a power washer to do the job yourself for about $75/day, but beware if you don’t have experience with the tool. Power washers can strip paint, gouge softwoods, loosen caulk, and eat through mortar. Also, the tool can force water under horizontal lap joints, resulting in moisture accumulating behind the siding.

A siding professional has the expertise to prevent water penetration at joints, seams around windows and doors, and electrical fixtures.

Inspecting Siding for Damage

All siding: Siding is vulnerable to water infiltration where it butts against windows, doors, and corner moldings. Look for caulk that has cracked due to age or has pulled away from adjacent surfaces, leaving gaps. Reapply a color-matched exterior caulk during dry days with temperatures in excess of 65 degrees for maximum adhesion.

Wood siding:
Check for chipped or peeling paint, and cracked boards and trim.

Stucco: Be on the lookout for cracks and chips.

Brick: Look for crumbling mortar joints.

You’ll want to repair any defects before cleaning. The sooner you make repairs, the better you protect your house from moisture infiltration that can lead to dry rot and mold forming inside your walls.

Related: 10 Steps to the Perfect Exterior Paint Job

Repairing Wood, Vinyl, and Fiber-Cement Siding

Repairs to wood, vinyl, and fiber-cement siding require the expertise to remove the damaged siding while leaving surrounding siding intact. Unless you have the skills, hire a professional carpenter or siding contractor. Expect to pay $200-$300 to replace one or two damaged siding panels or pieces of wood clapboard.

Repairing Brick and Mortar

Crumbling and loose mortar should be removed with a cold chisel and repaired with fresh mortar — a process called repointing. An experienced do-it-yourselfer can repoint mortar joints between bricks, but the process is time-consuming. Depending on the size of the mortar joints (thinner joints are more difficult), a masonry professional will repoint brick siding for $5-$20/sq. ft.

Efflorescence — the powdery white residue that sometimes appears on brick and stone surfaces — is the result of soluble salts in the masonry or grout being leached out by moisture, probably indicating the masonry and grout was never sealed correctly.

Remove efflorescence by scrubbing it with water and white vinegar mixed in a 50/50 solution and a stiff bristle brush. As soon as the surface is clear and dry, seal it with a quality masonry sealer to prevent further leaching.

Persistent efflorescence may indicate a moisture problem behind the masonry. Consult a professional building or masonry contractor.

Repairing Stucco

Seal cracks and small holes with color-matched exterior acrylic caulk. Try pressing sand into the surface of wet caulk to match the texture of the surrounding stucco. Paint the repair to match.

To repair larger holes and cracks, you may want to call in a pro who’s familiar with stucco work. A professional charges $200-$1,000 for a repair job, depending on the size of the damage. Repainting the patch to match your siding will be up to you.

Removing Mildew

Stubborn, black spotty stains are probably mildew. Dab the area with a little diluted bleach — if the black disappears, it’s mildew. Clean the area with a solution of one part bleach to four parts water. Wear eye protection and protect plants from splashes. Rinse thoroughly with clean water.


By: John Riha:© Copyright 2015 NATIONAL ASSOCIATION OF REALTORS®


The owner of this website has made a commitment to accessibility and inclusion, please report any problems that you encounter using the contact form on this website. This site uses the WP ADA Compliance Check plugin to enhance accessibility.