Garden Watering Systems You Can Make Yourself

Garden Watering Systems You Can Make Yourself

Easy DIY watering systems for gardens are lifesavers when hot weather moves in and thirsty plants moan, “Feed me!” once or twice a day.

Save money when you make these nifty DIY watering systems from materials you probably already have.

  • Drip hoses that save water by delivering moisture directly to roots.
  • Self-watering planter that hydrates plants by wicking moisture from a water well.
  • Ollas, buried clay pots that deliver water to roots on demand.

DIY Drip Hose

A drip hose soaks soil — drop by drop — without wasting water to evaporation or promoting disease by soaking foliate. A 50-ft. drip hose costs $14 at big box stores. Or you can make one yourself from any old hose you might otherwise toss into the trash. Here’s how.

  • Rescue an old hose. Clean it and lay it on a flat surface, such as a wood plank.
  • On one side of the hose, punch tiny holes 1 to 2 inches apart, leaving 6 inches with no holes on both ends of the hose. To make holes, use an upholstery needle or a tiny, 1/64-inch drill bit.
  • Attach a hose cap ($1.80 for ¾-in. brass) to one end of the hose. Attach the other end to another hose that’s long enough to reach from a spigot to your garden.
  • Turn on water so that drops fall from each hole along the hose. You want a drip — not a spray — so lower the pressure if too much water comes out.
  • Wind the hose along the base of plants, then cover with 2 inches of mulch.

Self-Watering Earth Box Planter

An earth box is a self-watering planter that relies on the wicking ability of soil to continuously draw water from a built-in well. You fill the well through a tube — far less often than if you watered by hand.

An earth box can be any size or material, so long as it has a water reservoir and soil. Here’s a good one:

1. Select a Rubbermaid Roughneck Tote (24-by-16-by-12 inches; $6). Using a super-sharp knife, cut out the flat part of the lid, separating it from the lip.

2. Make “weeping cups” by punching 1/2-in. holes in two 16 oz. plastic cups until they look like Swiss cheese.

3. Take a 5-ft. long piece of ½-inch-diameter ABS pipe ($6), mark it off every 2.5 inches, and cut into 16 pieces. Use the remainder (about 20 inches) for your watering tube.

4. In the lid corners, cut out holes to fit two weeping cups and the watering tube.

5. Using a ½-in. drill bit, punch holes in the lid spaced about 1 inch apart (that’s lots of holes!)

6. Arrange the small PVC pieces in the bottom of the bin — they should be on-end and evenly spaced. Place the lid on top of the pieces. Place weeping cups and watering tube into their holes.

7. Pack the weeping cups snugly with potting soil, then fill the box with soil.

8. Drill a ½-in. drainage hole in the side of the box 2 ½ in. from the bottom.

9. Fill the bin with water through the watering tube. When it’s full, water will come out the drainage hole.

10. Plant.

Check out this video, which shows you how to make an earth box from two Rubbermaid tubs.

Make Your Own Ollas

Ollas (OY-yas) are earthen jars with thin necks and wide bellies that you fill with water and bury in your garden. Water seeps through the ollas’ unglazed walls to feed plant roots without wasting any water to evaporation or runoff. Eventually, plant roots grow around the ollas, drawing water when needed, creating a super-efficient self-watering system.

Make yours from extra clay garden pots and silicone caulk.

  • Select two 8- or 10-in. clay pots with smooth rims that closely match each other.
  • Caulk a bottle cap or piece of tile over the bottom hole of one pot to prevent water from pouring out.
  • Cover the rim of one pot with a thick ribbon of silicone caulk. Place the other pot over the caulk and press lightly.
  • Let caulk dry for 24 hours, then fill the pot with water to check for leaks.
  • When you’re satisfied that your olla is leak-proof, bury it in your garden next to plants. Water in an 8-in. diameter; olla spreads 18 inches.
  • Fill olla with water, and cover the hole with a rock or glazed saucer. Check water levels with a stick and refill as necessary.




By: Lisa Kaplan Gordon © Copyright 2015 NATIONAL ASSOCIATION OF REALTORS®


5 Fragrant Plants for Your Home

5 Fragrant Plants for Your Home

Published: January 9, 2013

Here are 5 green and fragrant houseplants that can chase the winter blues away.

If you’re starting to feel stifled by the dark days of winter, snap out of it with a fresh whiff of spring.

January 10th is National Houseplant Day, so we rubbed our green thumbs together and came up with a list of 5 potted beauties that will brighten your mood and freshen your home with pleasing fragrances.

But that’s not all; each species we picked is also visually stunning — from eye-catching leaf textures to beautiful blossoms. All you have to do is choose the nose-pleaser that’s perfect for you.

1. Scented Geraniums — Nose Candy

There are over 200 varieties of this plant, and some have striking leaf shapes and textures that are ruffled and fuzzy, or smooth and lacey.

Nevertheless, what makes scented geraniums really stand out is the range of fragrances different varieties offer. Types include: Peppermint Lace, Chocolate Mint, Lemon Fancy, Prince of Orange, and the intriguing Pink Champagne.

I recently learned that the leaves of this plant are considered an herb. But here’s a twist: They don’t add flavor when used, just an aroma. Check out this video to learn how you can use your sugar dish to add a dash of fragrance to a room when the bowl is opened.

FYI: Most types of geraniums are pretty hardy and do well indoors, but they do need lots of sunlight. During the short days of winter you can give them a few extra hours of light using fluorescents.

2. Jasmine — Great for Chilly Rooms

If you’re not the type who cranks up the heat during the cold winter months, the Jasminum polyanthum is a houseplant that prefers cool indoor temperatures.

Also known as winter jasmine, this easy-to-grow plant is an evergreen vine. It features pink buds that blossom into fragrant white flowers from January to February. Its sweet, perfume-y scent might remind you of a spring floral garden.

In order for this beauty to thrive, it needs 4-6 hours of indirect sunlight a day in a cool place in your home. If a room is too warm, the flowers won’t open — so don’t place next to a heating source.

For additional tips, check out this video that details how to take care of a winter jasmine houseplant.

FYI: We’ve heard winter jasmine can handle temperatures as low as 20 degrees, so this is a plant that can thrive outdoors in most climates. Just make sure you have a healthy plant before transplanting, and don’t make the transition during cold weather.

3. Orchids — Here’s One that Smells Sweet

There’re oodles of beautiful orchids, but Oncidium are among the easiest to grow indoors.

Orchids can flower up to twice a year and they’re available in a wide range of colors and sizes. A favorite during winter is the fragrant Sharry Baby. It features long stems covered in tiny reddish-brown and cream blossoms.

When it comes to Sharry Baby’s fragrance, there are two camps: Some fans believe it smells like vanilla while others detect a chocolate-like fragrance.

As with all orchids, the Sharry Baby won’t bloom without plenty of light, but direct sunlight will cause the flowers to spot. So make sure you keep your plant in a warm part of your home with lots of filtered light. The amount of water this plant needs varies based on its growth; refer to your local nursery for details.

FYI: When your orchid stops flowering, don’t chuck it out — replant it. That way it will have room to grow and can bloom again. For repotting tips, check out this video.

4. Paperwhites — Just Add Water

These tall, white plants can be forced to bloom indoors any time of the year, and are popular holiday gifts.

Paperwhites are a member of the daffodil family. The bulbs can be easily planted in water and in about a month, flowers will begin to appear.

To get started, all you need is a shallow pot and some pebbles. Just make sure you cover the lower half of the bulbs in water; don’t submerge them. If you do, they won’t sprout.

Check out this video by Lowe’s that shows how quick and easy it is to grow these flowers from bulbs.

FYI: Paperwhites have a sweet, musky smell that some people love and others strongly dislike. We suggest catching a whiff first at a local garden center before growing these flowers at home.

5. Gardenia — High-Maintenance Nose-Pleaser

Gardenias are at the top of most fragrant-houseplant lists. Although they do grow beautiful flowers, it’s actually the leaves that are responsible for its pleasant scent.

Gardenias require a lot of pampering in order to thrive. Most gardenias need daytime temperatures that are between 68 and 74 degrees, with a steady 60 degrees at nighttime.

They also require frequent fertilizing, daily misting, and lots of bright sunlight.

For expert tips, refer to your local nursery about specific types of gardenias. Also, check out this video.
Care Tips for Indoor Gardenia Plants — powered by ehow

FYI: While gardenias need lots of misting, they’re very sensitive to overwatering and can develop root rot and other related conditions very quickly.


By: Deirdre Sullivan © Copyright 2015 NATIONAL ASSOCIATION OF REALTORS®


HVAC Maintenance Checklist

HVAC Maintenance Checklist

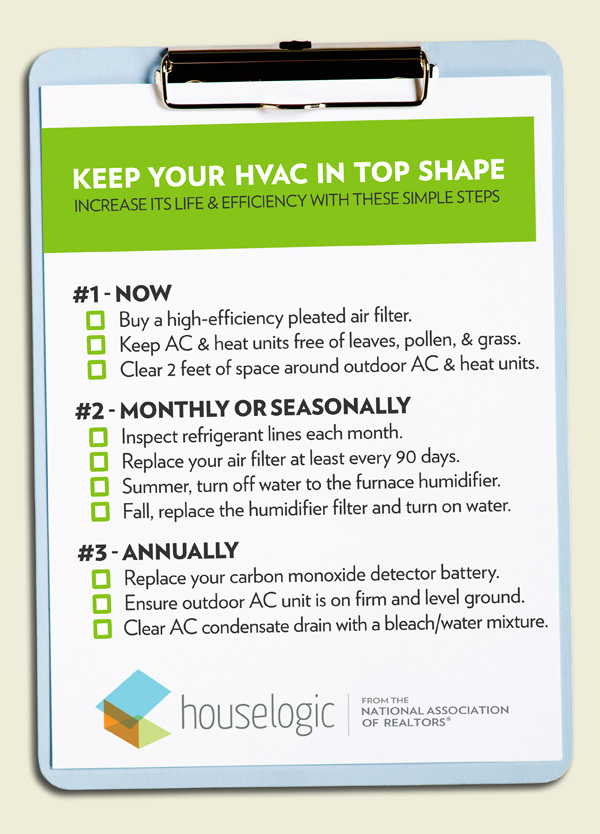
Here’s an easy, doable preventative maintenance checklist to keep your HVAC in top shape.

It’s a good idea to hire a HVAC company to inspect and do maintenance on your system every fall and spring. They’ll do things like inspect and clean the wiring and mechanisms of the unit, which is bit more challenging for the average homeowner.

But you can prolong the life and increase the efficiency of your system if you follow this simple maintenance plan:

HVAC checklist for homeowners

Some things you should do immediately; other tasks only need to be done seasonally or once a year. Here are the steps to a healthy HVAC system:

  • Buy a better filter if you haven’t already. The new high-efficiency pleated filters have an electrostatic charge that works like a magnet to grab the tiniest particles — even those that carry bacteria.
  • Replace the filter at least every 90 days. But check it monthly. If it looks dark and clogged, go ahead and change it. If you have pets, you’ll probably need to change every month.
  • Check to make sure there’s at least two feet of clearance around outdoor air conditioning units and heat pumps.
  • Weekly during spring, summer, and fall remove debris such as leaves, pollen, and twigs from top and sides of outdoor air-conditioning units and heat pumps. Don’t allow the lawn mower to discharge grass clippings onto the unit.
  • Monthly, inspect insulation on refrigerant lines leading into house. Replace if missing or damaged.
  • Annually, ensure that outdoor air-conditioning units and heat pumps are on firm and level ground or pads.
  • Annually, pour a cup of bleach mixed with water down the air-conditioner condensate drain to prevent buildup of mold and algae, which can cause a clog.
  • In summer, shut off the water supply to the furnace humidifier. In fall (or when you anticipate turning on the heat), replace the humidifier wick filter, set the humidistat to between 35% and 40% relative humidity, and turn on the water supply.
  • Never close more than 20% of a home’s registers to avoid placing unnecessary strain on the HVAC system.
  • Annually, replace the battery in your home’s carbon monoxide detector.

Related:

  • How to Inspect Your HVAC
  • How to Use a Programmable Thermostat for Real Savings
  • The 5 Most Effective Ways to Take Back Your Energy Bills


By: Douglas Trattner © Copyright 2015 NATIONAL ASSOCIATION OF REALTORS®


The Right Disaster Insurance for Your Region

The Right Disaster Insurance for Your Region

Published: June 20, 2013

The region in which you live dictates what kind of disaster insurance you might need to protect your home from Mother Nature’s wrath.

Real estate comes down to location, location, location. Same goes for disasters. Where you live offers clues to how susceptible your home is to damage by floods, tornadoes, hurricanes, earthquakes, wildfires, and other calamities.

These regional risks also indicate whether you need to consider purchasing supplemental disaster insurance to cover claims that wouldn’t be included under a typical homeowners policy. Determining if you live in a disaster-prone region and reviewing your existing coverage are good first steps.

The next step is to create a home inventory, ideally with a digital camera or camcorder. Store copies of those files far away from your house or online at a backup storage site. That way, even if your home and computer are damaged, you’ll have proof of what was lost. Remember, too, to devise a family evacuation plan and assemble an emergency kit with food, water, and supplies.

Floods

Homes in low-lying areas, near bodies of water, or downstream from dams are particularly vulnerable. Saturated carpet, insulation, and drywall can promote mold growth. Since flood damage is often excluded from homeowners policies, it’s important to weigh the risk to your property.

At-risk regions: All

Coverage: Find out if your homeowners policy differentiates between “falling water” flooding — heavy rain, which may be covered — and “ground water” flooding, which usually isn’t. Most insurers sell flood insurance, but it may be more difficult to get in high-risk regions. The National Flood Insurance Program is open to anyone. Most experts recommend insuring your home and its contents at the replacement value.

Cost: The average flood insurance policy costs $600 per year, while the average flood claim is $30,000, according to the NFIP.

Hurricanes

Damage from hurricanes can result from heavy winds, rain, hail, and tidal or groundwater surge. Insurers in areas that have been battered by storms — especially coastal regions in the Southeast — are more skittish than those in other areas.

At-risk regions: Primarily East Coast and Gulf Coast

Coverage: In low-risk areas, your homeowners policy may cover any damage not done by rising water or groundwater surge. In high-risk areas, you may need to purchase additional coverage or participate in a state-run pool for hurricane and windstorm coverage. Your state’s insurance commissioner can provide details. Be sure to check whether additional hurricane coverage includes flooding from tidal or groundwater surge, or if you need a separate flood policy.

Cost: David Miller, CEO of Brightway Insurance in Jacksonville, Fla., says he has seen comprehensive windstorm and flood policies range from $300 for low-risk areas to up to $20,000 for high-end homes in the riskiest communities.

Earthquakes

Although earthquakes are associated with California, fault lines run through virtually every region. The U.S. Geological Survey tracks the latest quakes and keeps maps that show existing fault lines. Even minor earthquakes can damage belongings and leave houses structurally unsound.

At-risk regions: West Coast, especially California, and parts of Midwest

Coverage: Homeowners policies typically exclude earthquake damage. In California, supplemental coverage is available through the California Earthquake Authority. In other states, it’s usually available from private carriers. Your state’s insurance commissioner will have information on options.

Cost: A typical earthquake policy runs between $1.50 and $3 per $1,000 of coverage per year, with a deductible of 5% to 15% of the home’s value. If a home is insured for $200,000, the deductible would be $10,000 to $30,000, possibly with separate deductibles for the structure and the contents.

Tornadoes

Winds can reach up to 300 miles per hour and spiral into violent funnels. Although there’s not much that can be done to guard against tornadoes, keeping a home’s exterior in good repair can help mitigate damage from high winds.

At-risk regions: Eastern U.S, especially Central Plains

Coverage: Tornadoes are typically covered under your homeowners insurance. However, it’s a good idea to read over your policy or call your agent for confirmation.

Cost: Homeowners insurance premiums in recent years have averaged about $800 annually.

Wildfires

Approximately 68,000 wildfires burned more than 9.3 million acres in 2012. Every state but Hawaii was hit. Areas that are experiencing drought are most at risk. Damage to homes can result from flames themselves, but also from smoke, soot, and even the water used to fight the fires.

At-risk regions: All

Coverage: Fire is typically covered by a standard homeowners policy. Be sure to verify exactly what your coverage entails. Is cleanup included? How about full replacement value?

Cost: In recent years homeowners policies have averaged as low as $477 (Idaho) to as high as $1,409 (Texas).

Mine subsidence

Homes built over or near abandoned mines are at risk of structural damage if the ground shifts or sinkholes develop. Mine subsidence can also affect the water supply and utilities in the area.

At-risk regions: Primarily Eastern U.S.

Coverage: Mine subsidence isn’t typically covered by homeowners insurance. Coverage is usually available through state-sponsored pools, so check with your state’s insurance commissioner.

Cost: Premiums vary. In Pennsylvania, $130,000 in residential coverage is about $7 per month. In Illinois, it costs less than $95 per year to insure a house worth up to $250,000.


By: Gwen Moran © Copyright 2015 NATIONAL ASSOCIATION OF REALTORS®


Screen in Your Deck for a Bug-Free Summer

Screen in Your Deck for a Bug-Free Summer

You can make the most of your backyard by converting your deck to a screened-in porch, which turns mosquitoes, heat waves, and downpours into non-events. Plus, the thwack of a screen door is still the soundtrack for summer.

Converting won’t be easy — unless you’ve got top-notch handyman skills, you’ll have to hire a pro. And it won’t be cheap — converting a 14-foot-by-14-foot deck into a porch will cost $10,000-$12,000.

But it’s worth the time and money. Screened-in porches add value to your home. Reginald Carter, a Jacksonville, Fla., appraiser, says the return on investment is about 70% if you stay in your home for at least five years after installing the porch.

Screened-in porches also can help you sell your home faster. In Virginia, for instance, about 70% of buyers can’t live without screened-in porches, says Elaine VonCannon, a REALTOR® from Williamsburg, Va.

“It works for everybody who likes to sit outside,” says VonCannon.

Related: Pictures of Screened-In Porches
Can Your Deck Become a Screened-In Porch?

Maybe.

The biggest structural difference between a deck and porch is the weight of the load that rests on its foundation, joists, and beams, says David Berryhill, owner of Archadeck of Chicagoland.

Most decks are relatively lightweight: A 14-foot-by-14-foot deck can rest safely if it’s attached to the house and supported by three concrete piers. A porch, however, is much heavier because it has a roof.

To prepare your current deck for the additional load, you’ll have to:

  • Possibly add more posts and foundation piers ($500-$5,000). Check with your local building code authority. In some municipalities, building codes require a solid concrete foundation, which could cost up to $10,000 (and would eliminate most decks from consideration as porches).
  • Beef up joists and beams to support the additional roof load.
  • Remove railings if you want a floor-to-ceiling screened porch, which gives you an unobstructed view.
  • Bug-proof deck floors. To keep tiny critters from climbing into your new porch from below, attach a fine mesh screen or landscape paper to the underside of the floor. Or, replace the current floor with tongue-and-groove boards that fit so tightly bugs can’t climb through.

Pick the Right Roof

The right roof makes the difference between a porch that looks like it was always part of your house, and one that looks like an afterthought with no architectural rhyme or reason. Some tips:

  • Select a roof shape that’s compatible with your house’s roofline. A hip roof is strongest, a shed roof the most economical, and a gable roof lets in the most light.
  • In some cases, the new roof can be built over the existing one, but you’ll still have to flash the valley and rearrange the gutters and downspouts.
  • Use the same roofing material as your main roof.

The Skinny on Screens

Know thyself before you select screening for your porch. Do you have rambunctious pets that make strength a top priority? Is there a beautiful view you don’t want blocked by an obtrusive screen?

Here are some options:

Fiberglass (17 cent/sq. ft.): An inexpensive, lightweight screening in black or charcoal. It’s easy to install but tears easily, too, and has a tendency to stretch and look floppy.

Aluminum (26 cents/sq. ft.): Stronger and more durable than fiberglass, and the least visible. On the downside, aluminum dents easily and can oxidize.

Vinyl-Coated Polyester (60 cents-$1.53 /sq. ft.): Used to make pet screens that are super strong — down, Rex, down — and ones that dissipate heat in hot climates.

Bronze ($1.10/sq. ft.): Strong, doesn’t easily oxidize in salt air along coasts, and develops a patina with age.

Monel (alloy of copper and nickel) and stainless steel ($2.25-$5/sq. ft.): Strong, and tear-, rust-, and corrosion-resistant.

Related: Repair a Torn Screen

Screened-In Porch Tips

  • Pre-made screen panels are easier to install and repair than rolls of screening, but you pay the price of $50-$75/running ft.
  • When planning your porch project, check local building codes for setback regulations and building specifications.
  • Don’t forget to add electrical outlets to your porch for lamps, ceiling fans, and phone chargers.
  • Porches block light and can make the inside of your house seem dark. You can cure that by installing a skylight in the room adjacent to the porch.
  • Building codes may require that you have a 3-foot-by-3-foot concrete landing outside the egress door to your porch.


By: Lisa Kaplan Gordon © Copyright 2015 NATIONAL ASSOCIATION OF REALTORS®


Ikea Studied Americans at Home. Here’s What It Found.

Ikea Studied Americans at Home. Here’s What It Found.

Published: April 15, 2014

Ikea was curious about what Americans want from their homes. Surprisingly, it has nothing to do with expensive upgrades.

The Swedish retailer’s first annual “US Life at Home Report” uncovered that, above all else, 95% of Americans consider comfort a top home feature. We’re not talking about cushy furniture or other features that makes life at home physically more comfortable. It’s an emotional thing. Ikea found that American consumers want their homes to have a feel-good environment so they can let their hair down and connect with loved ones.

Here are more nuggets from the report:

We aren’t show-offs. In fact, we’re modest (!). Ikea says, “… home in the U.S. is not so much about status or wealth. Or keeping up with the Joneses.” Only a mere 1% wants their abodes to reflect their success.

We love living rooms. Maybe that’s why open kitchens are hot. Homeowners don’t want to be separated from their favorite room. Of those polled, 65% agree it’s the most popular spot in the house.

We feel cramped in the kitchen. We’re starved for kitchen storage. We also want more elbow room and counter space.

We use technology in the kitchen. But this has nothing to do with futuristic home gadgets. A total of 27% listen to music, use the computer, or watch TV while cooking or hanging out.

We stash stuff under our beds. The bedroom is another room that leaves us feeling squeezed for space. Fifty-four percent of Americans use the space under their beds for storage.

We want to save energy. If the opportunity popped up, 98% of us would buy an Energy Star-rated appliance. We’re also starting to shift away from inefficient incandescent light bulbs.  Forty-three percent of us have transitioned to LED bulbs and have at least one in the house.

We’re getting greener. A whopping 71% of Americans recycle at home. Twenty-eight percent want to generate their own solar power.

The panel for this study consisted of 4,000 U.S. consumers:

  • A combination of male and female heads of household between the ages of 25-54
  • Household income of at least $35,000


By: Deirdre Sullivan © Copyright 2015 NATIONAL ASSOCIATION OF REALTORS®


The owner of this website has made a commitment to accessibility and inclusion, please report any problems that you encounter using the contact form on this website. This site uses the WP ADA Compliance Check plugin to enhance accessibility.